DDR DIMM SPD Adapter for Raspberry Pi
All computer DDR memory today have little I2C EEPROMs to store vendor, configuration and module spec information.
This is done to allow computer to detect memory type, and configure memory interface to correct speeds and voltages according to module spec. This mechanism is based on JEDEC Serial presence detection specification (SPD) which is available for download.
Sometimes it’s needed to modify SPD and there are rarely available software tools to do so in-system.
To overcome this issue design can be done stand-alone, with independent hardware to read/write EEPROM on memory module.
Raspberry Pi is one from hundreds of possible ways to do such, and it’s easy and widely popular linux platform, which enables lot of engineers to customize and discover new uses of ARM embedded platform.
And since we don’t want to modify anything on DIMM modules directly, there is requirement to have standard DIMM sockets, so user can easily interchange modules to perform SPD operations, without any damage risk or soldering.
Basic spec for this little project
- Open-source project, managed via dev.xdevs.com and mercurial DVCS
- Full-size DDR3/DDR4 UDIMM/RDIMM slots to support most of standard memory modules
- Standard header for direct connection to Raspberry Pi host
- I2C EEPROM interface connection for Raspberry Pi port
- Fixed +3.3V voltage level for SPD power
- Power switch to allow swapping modules without RPI power down.
- I2C address switch to enable multiple adapters to be used with single RPI.
- Onboard MCU (LPC11U37FBD64) for future development/standalone operation without RPI (e.g. automation usage)
Project file tree
All project files and documentation tracked by Mercurial DVCS.
It’s free and well maintained version control engine, with syntax similar to git and SVN.
So if you want to play with project or repeat by yourself, you can get tree by running
hg clone https://dev.xdevs.com/hg/ddr4s
Or to view just some files you can browse project tree here
Login and password are guest.
Hardware design
After few hours here is adapter board schematics (PDF format on click).
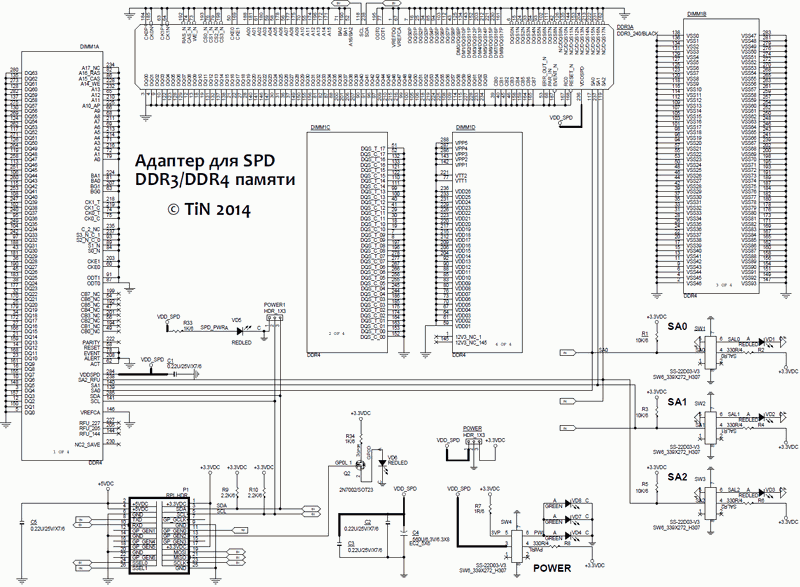
Pretty simple design with low amount of parts. MCU section is optional and not required for operation with RPI.
PCB Layout is done for 4-layer FR4, with silkscreen on both sides for assembly aid. All parts except connectors, switches and solid capacitor are SMD. Gerber files available for download as well
For DIY assembly or custom applications this can be simplified even more

This is as simple as it goes, two pull-up resistors for I2C bus, +3.3V power taken from RPI and power switch with LED.
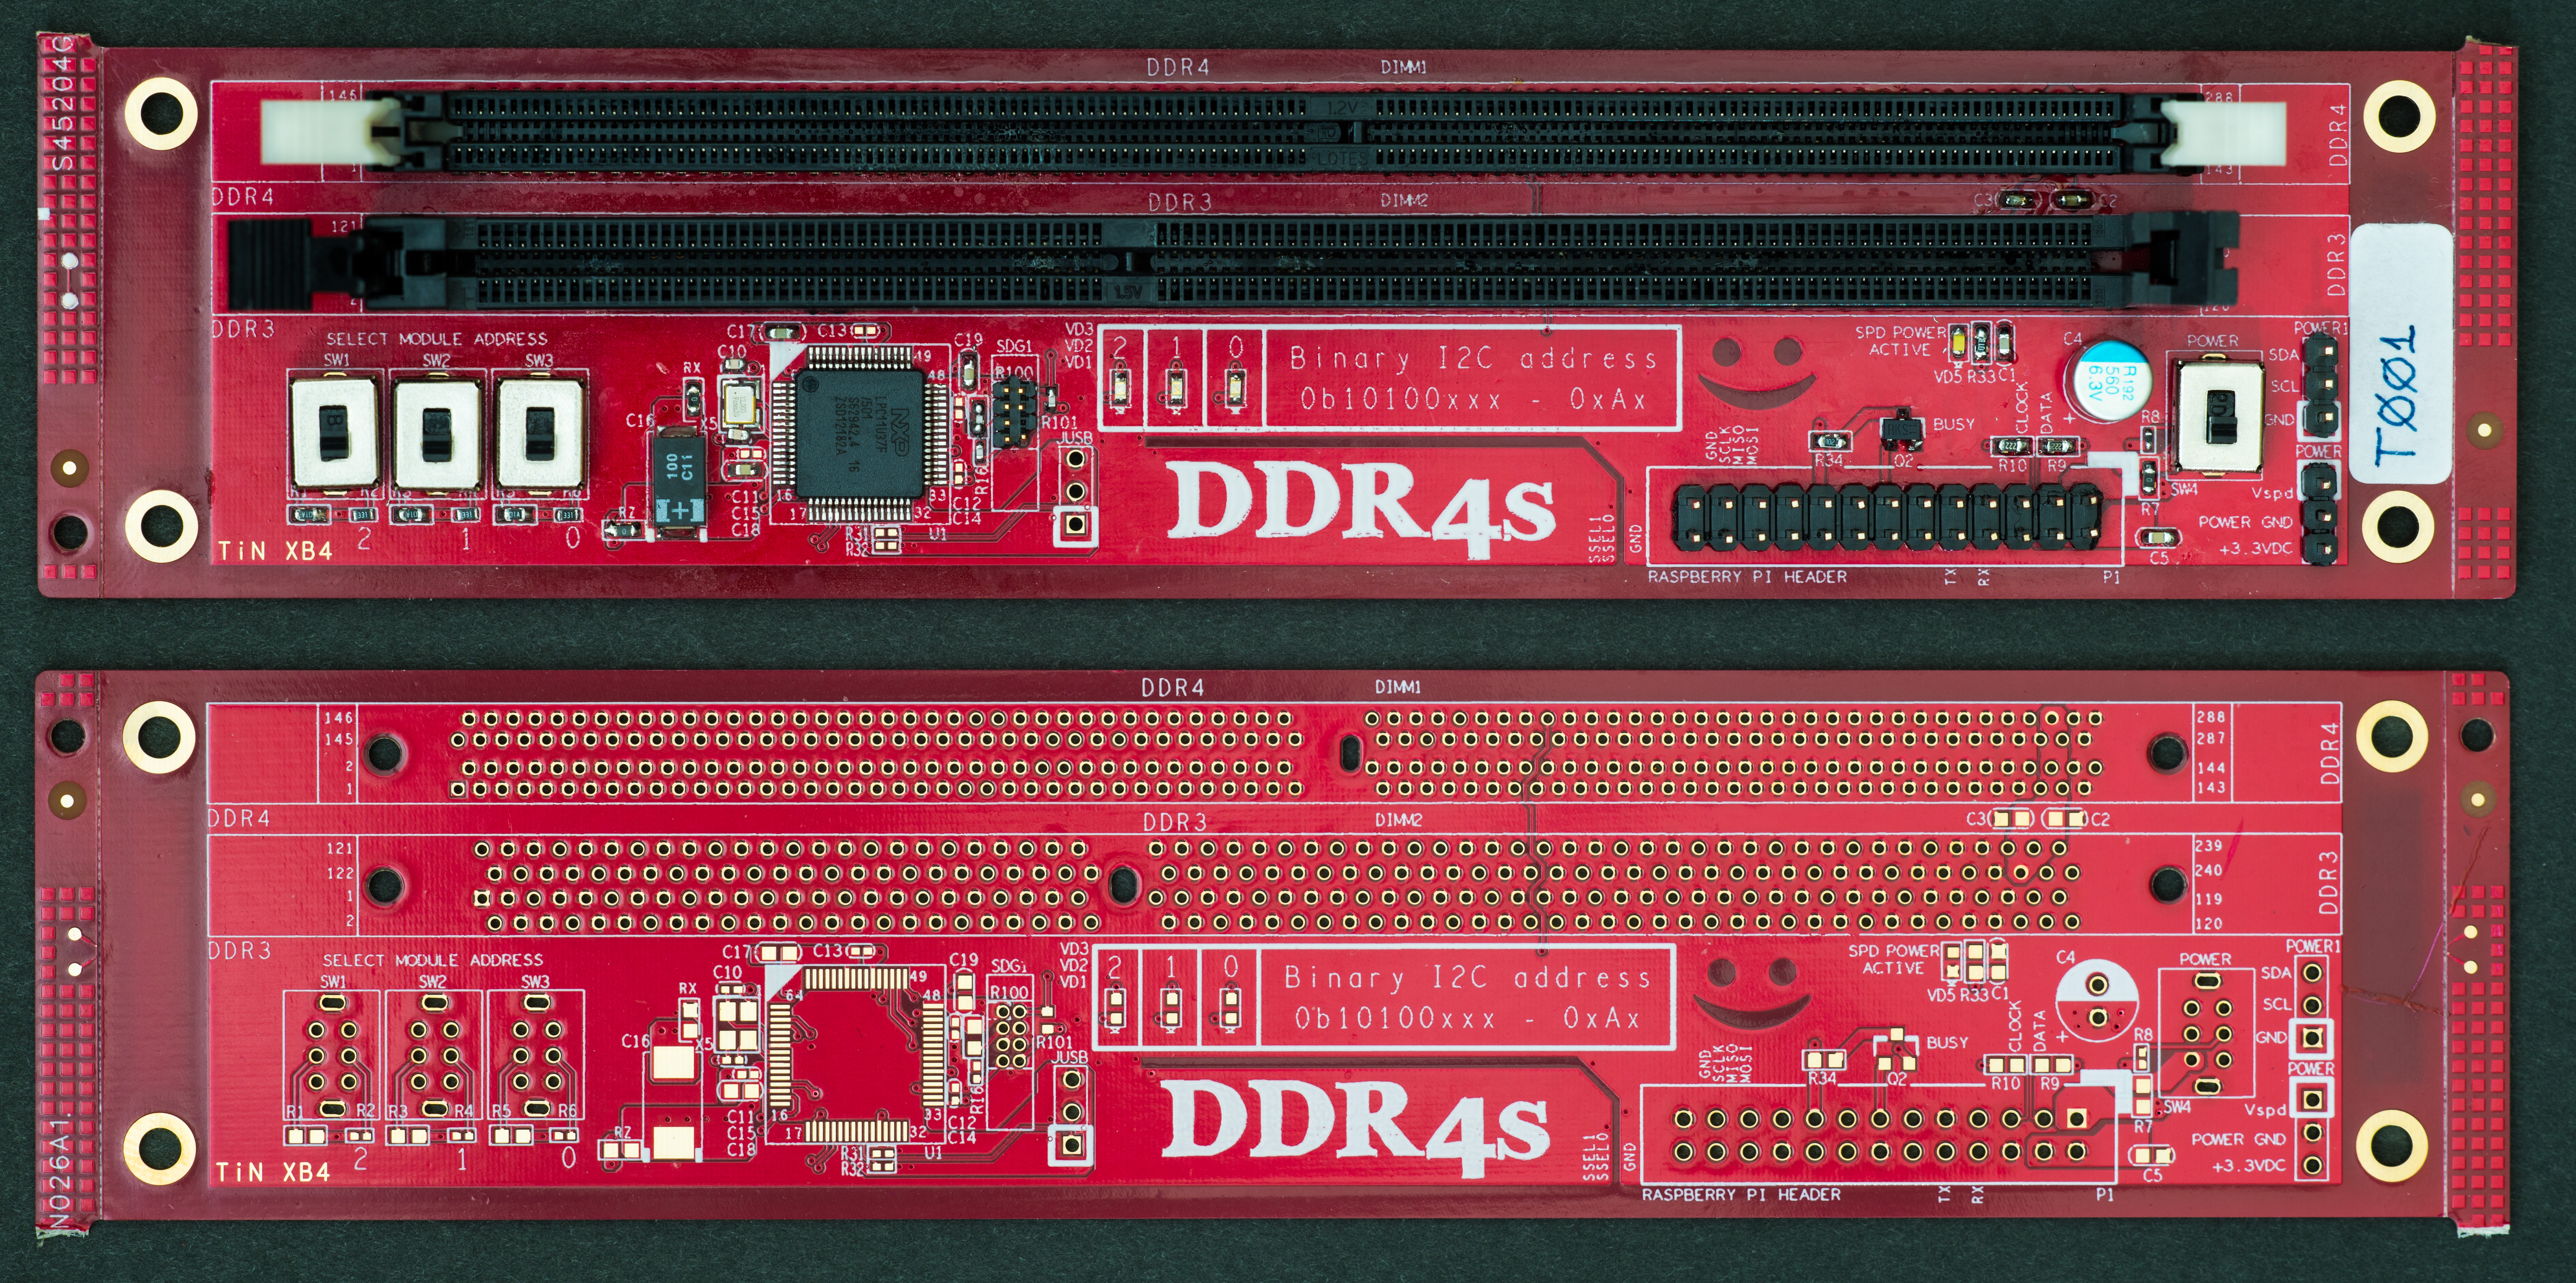
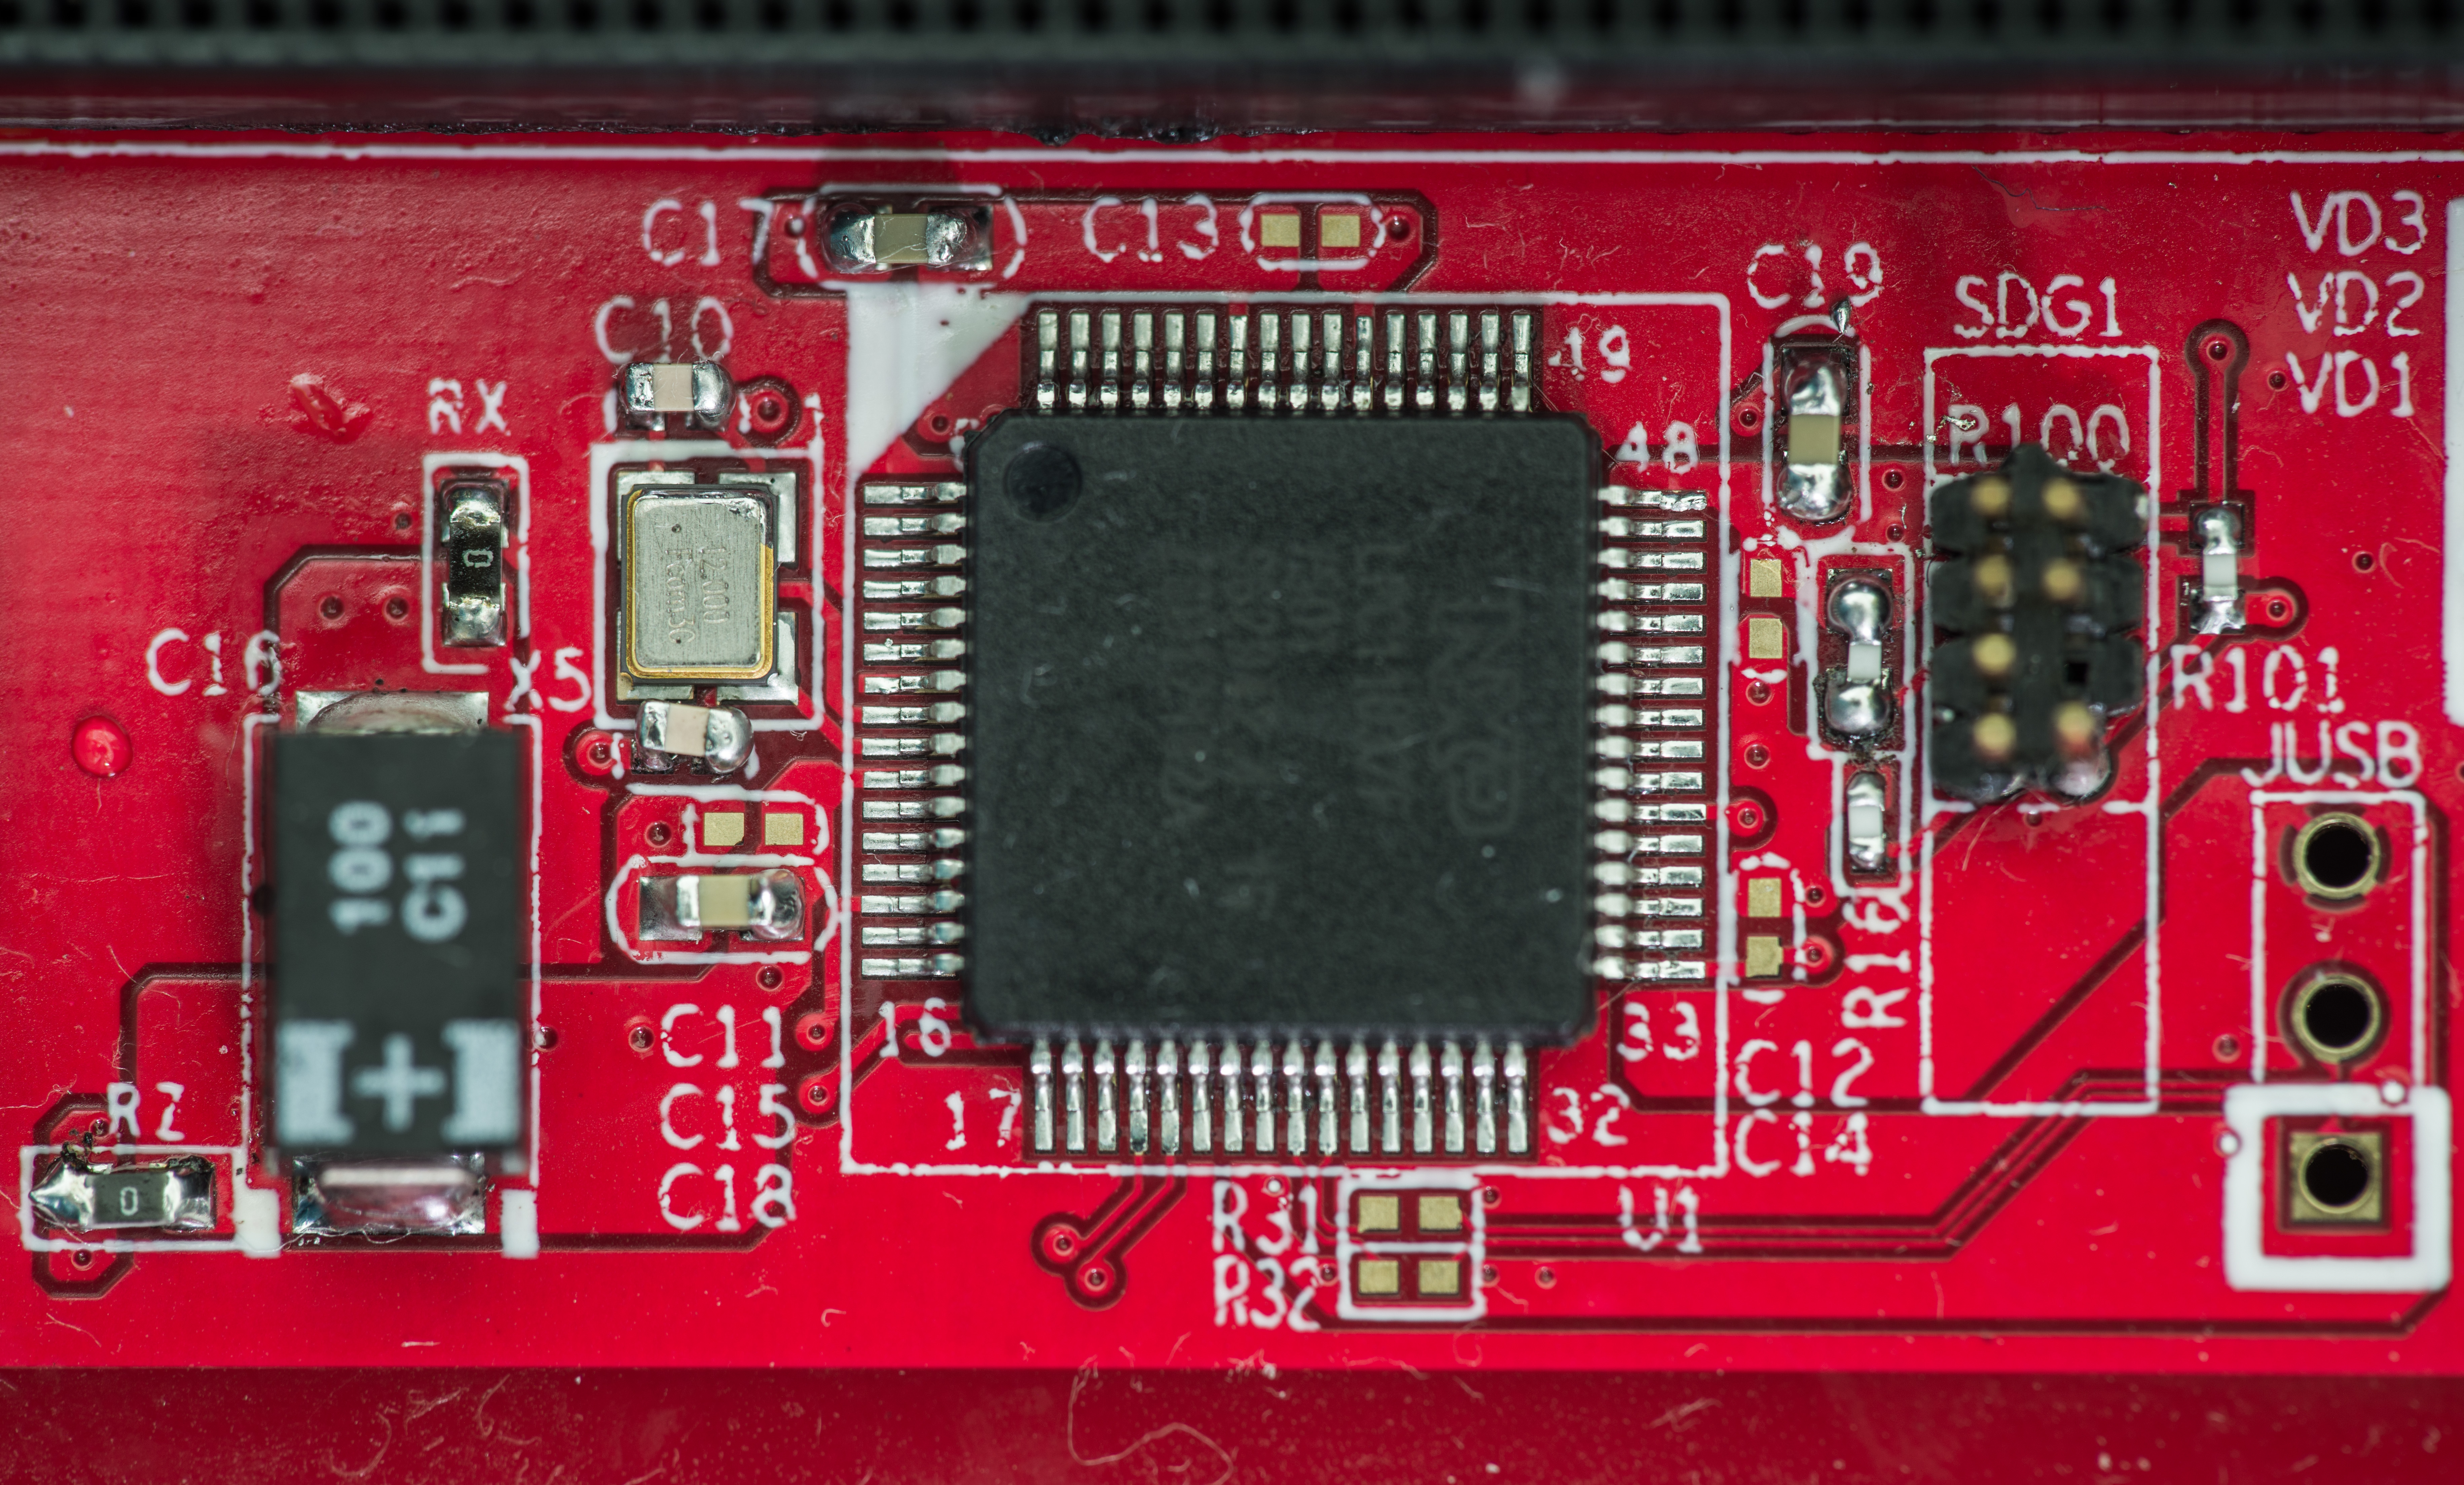
Manufactured adapter (hand assembled board and bare PCB)
Required parts for Raspberry Pi only operation:
- Power switch SW4 (2-position)
- I2C pullup resistors R10,R9 (2.2kOhm, 0603 5%)
- Bypass resistor R7 (0-10 ohm, 0603 5%)
- Decoupling capacitors C3,C2 (0.1uF 0603 ×7R)
- Bulk capacitor C4 (100-560uF 6.3-16V 7mm diameter, pin pitch 4mm)
- 2.54mm 26-pin header for RPI extension port P1.
- DDR3 240-pin DIMM slot
- DDR4 288-pin DIMM slot (if required)
All these components located in bottom right area.
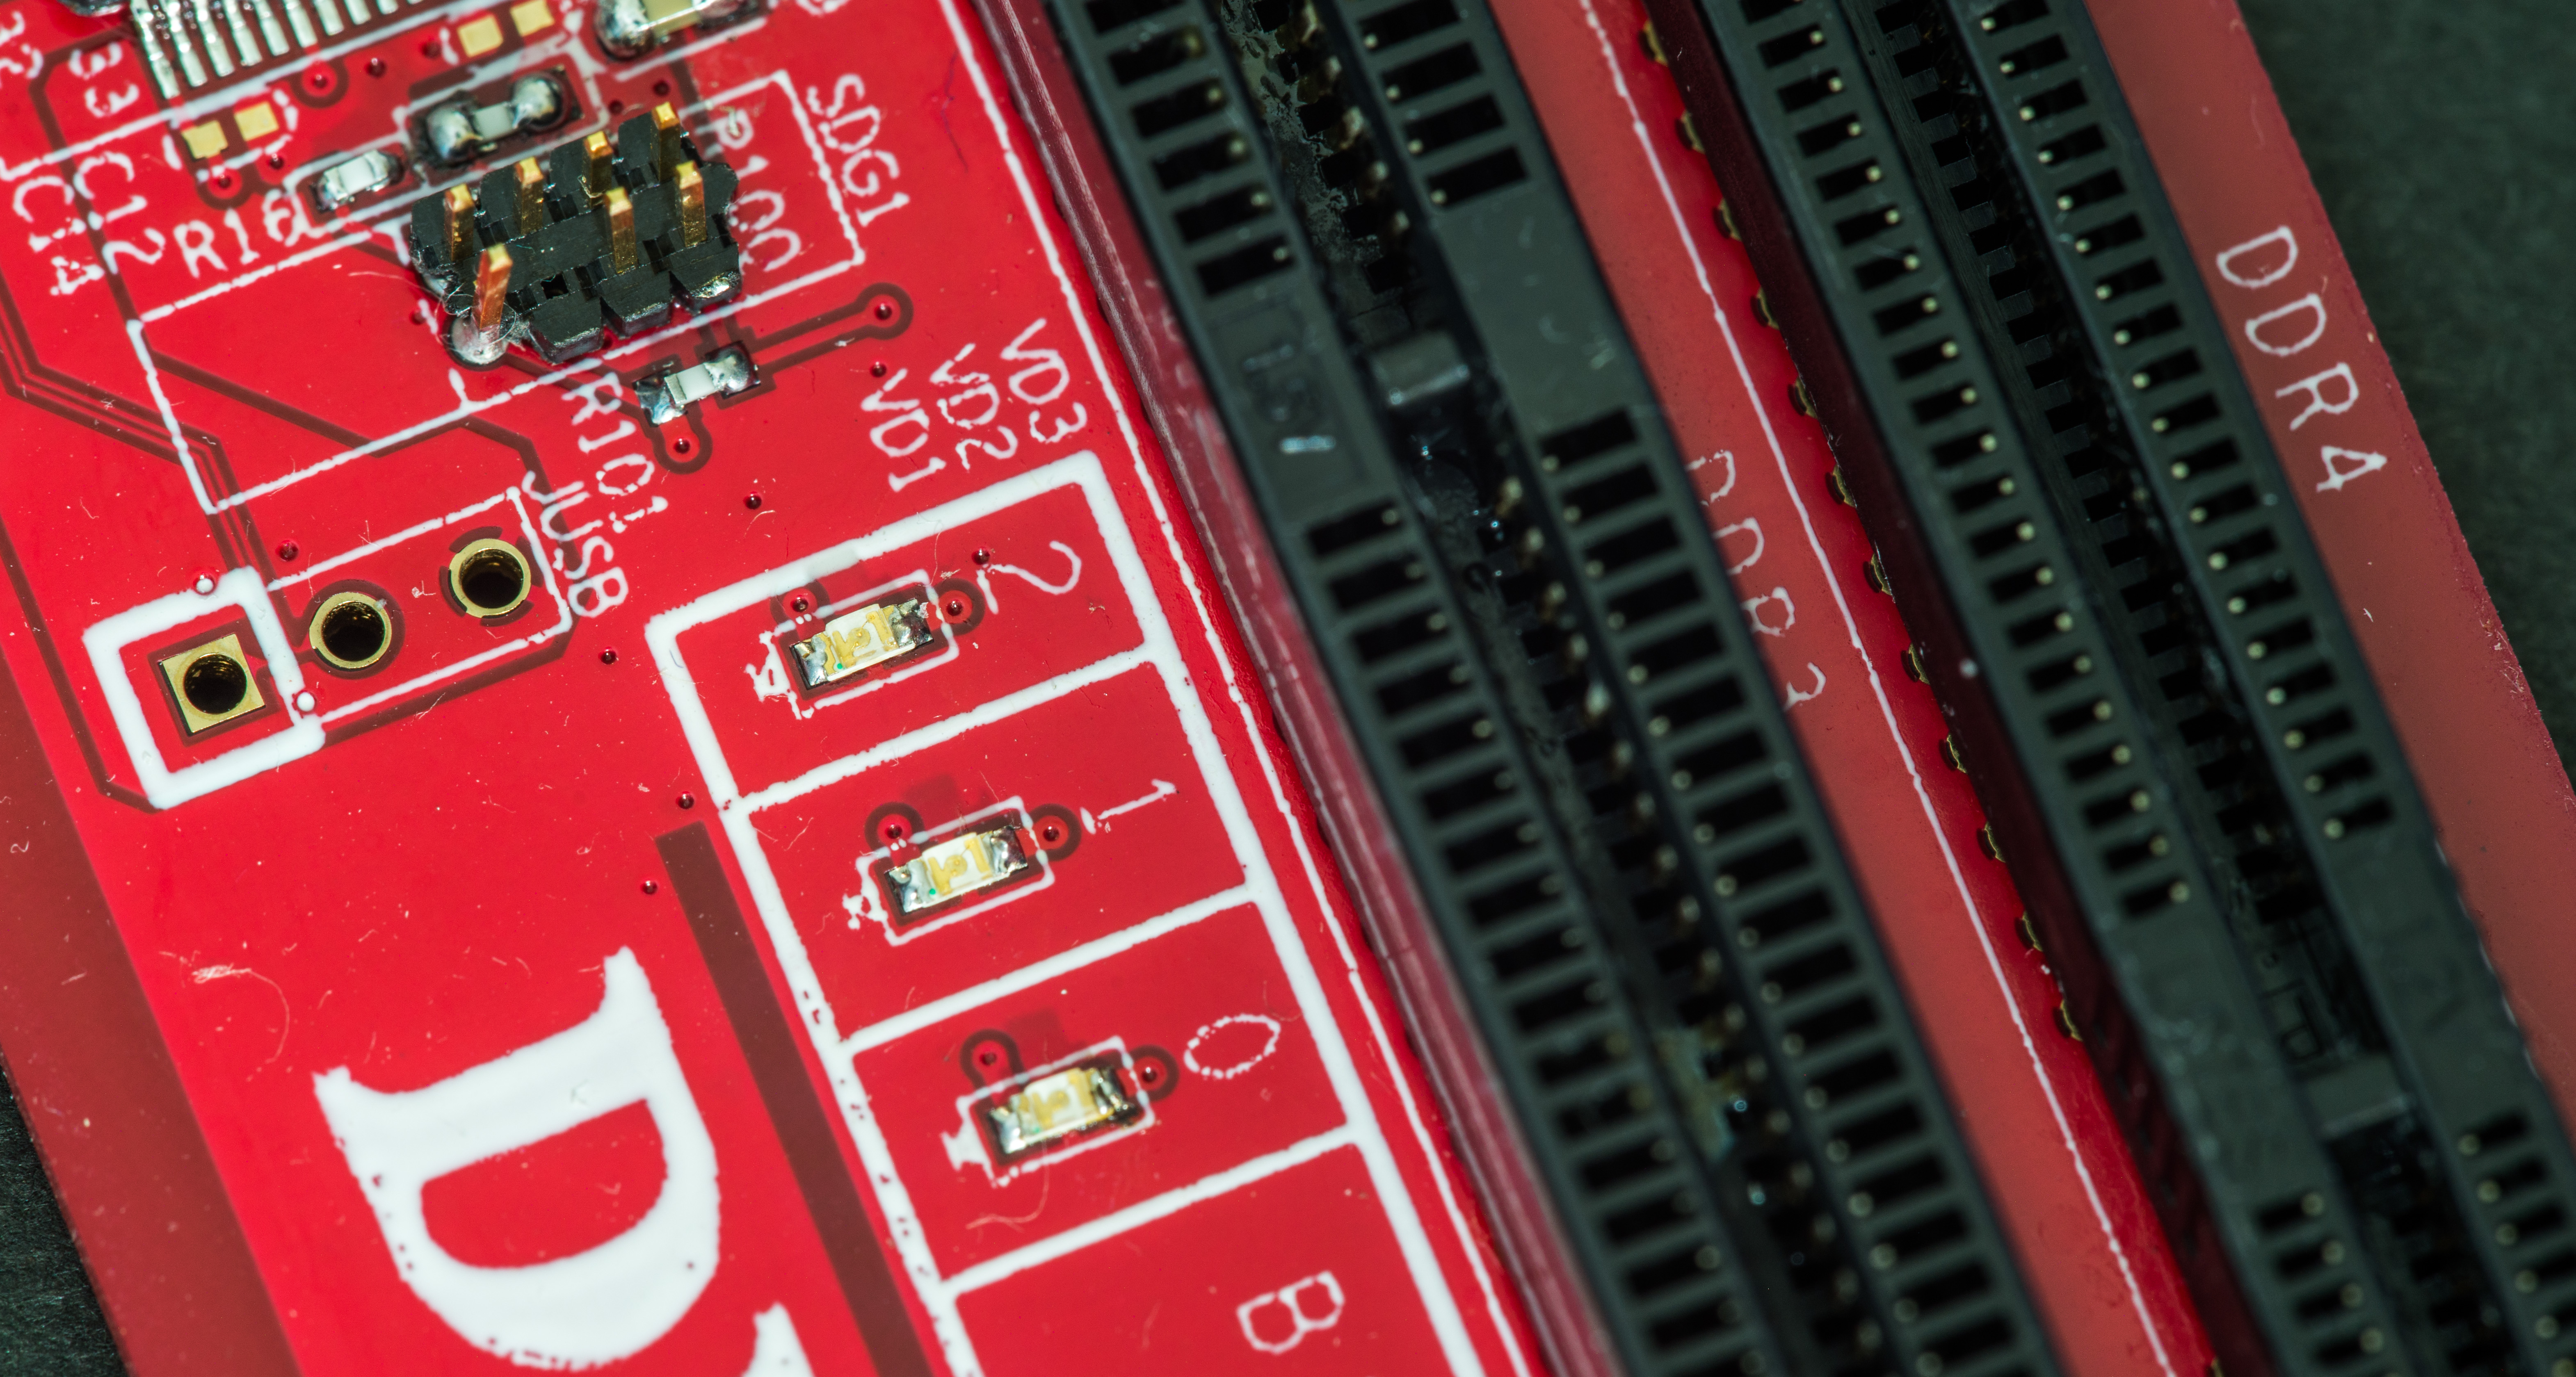
Bottom side have only optional decorative 0603 LEDs.

Power, I2C, SPI and UART are routed from 26-pin header, which mates with Raspberry Pi expansion port just with straight ribbon cable.
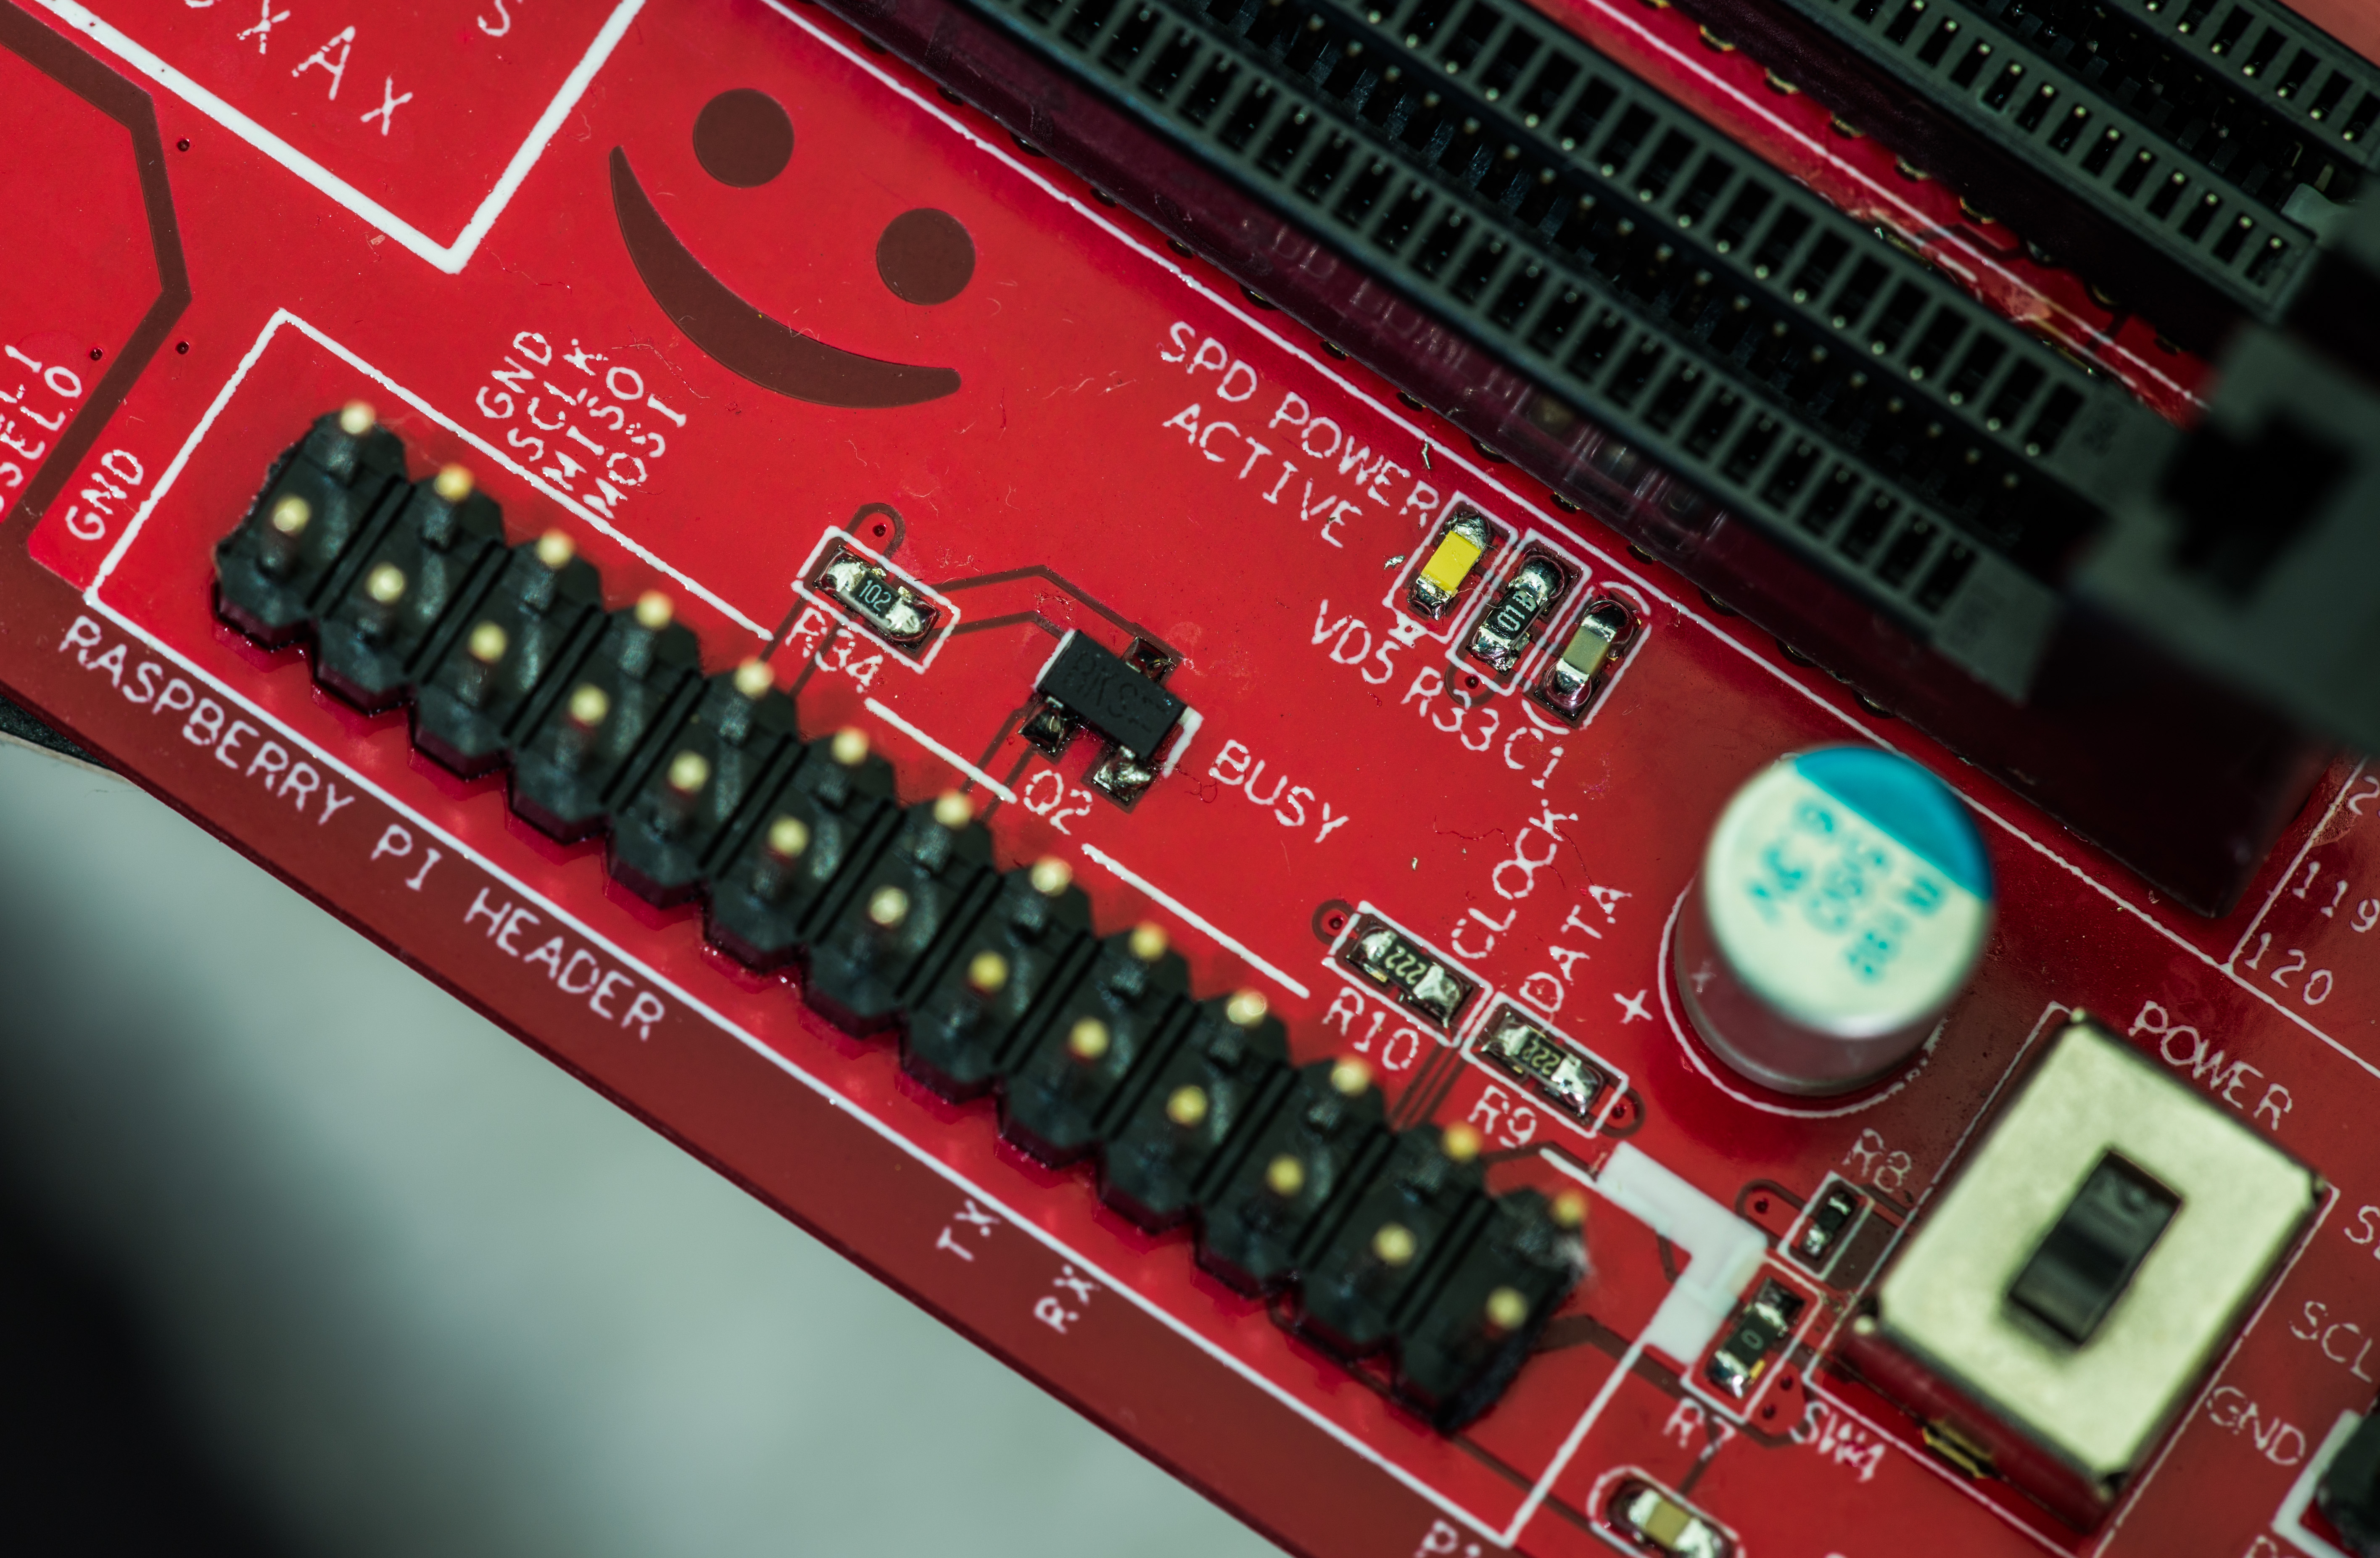
Adressing for multiple adapters is set via 2-position switches and indicated by LEDs. It’s just usual A0,A1,A2 pin signaling for I2C EEPROMs.
Onboard MCU is NXP LPC11U37FBD64 with SWD header for debug/firmware development. SMD crystal is 12.000 MHz, to support UART and USB.
Overall kit looks like this:
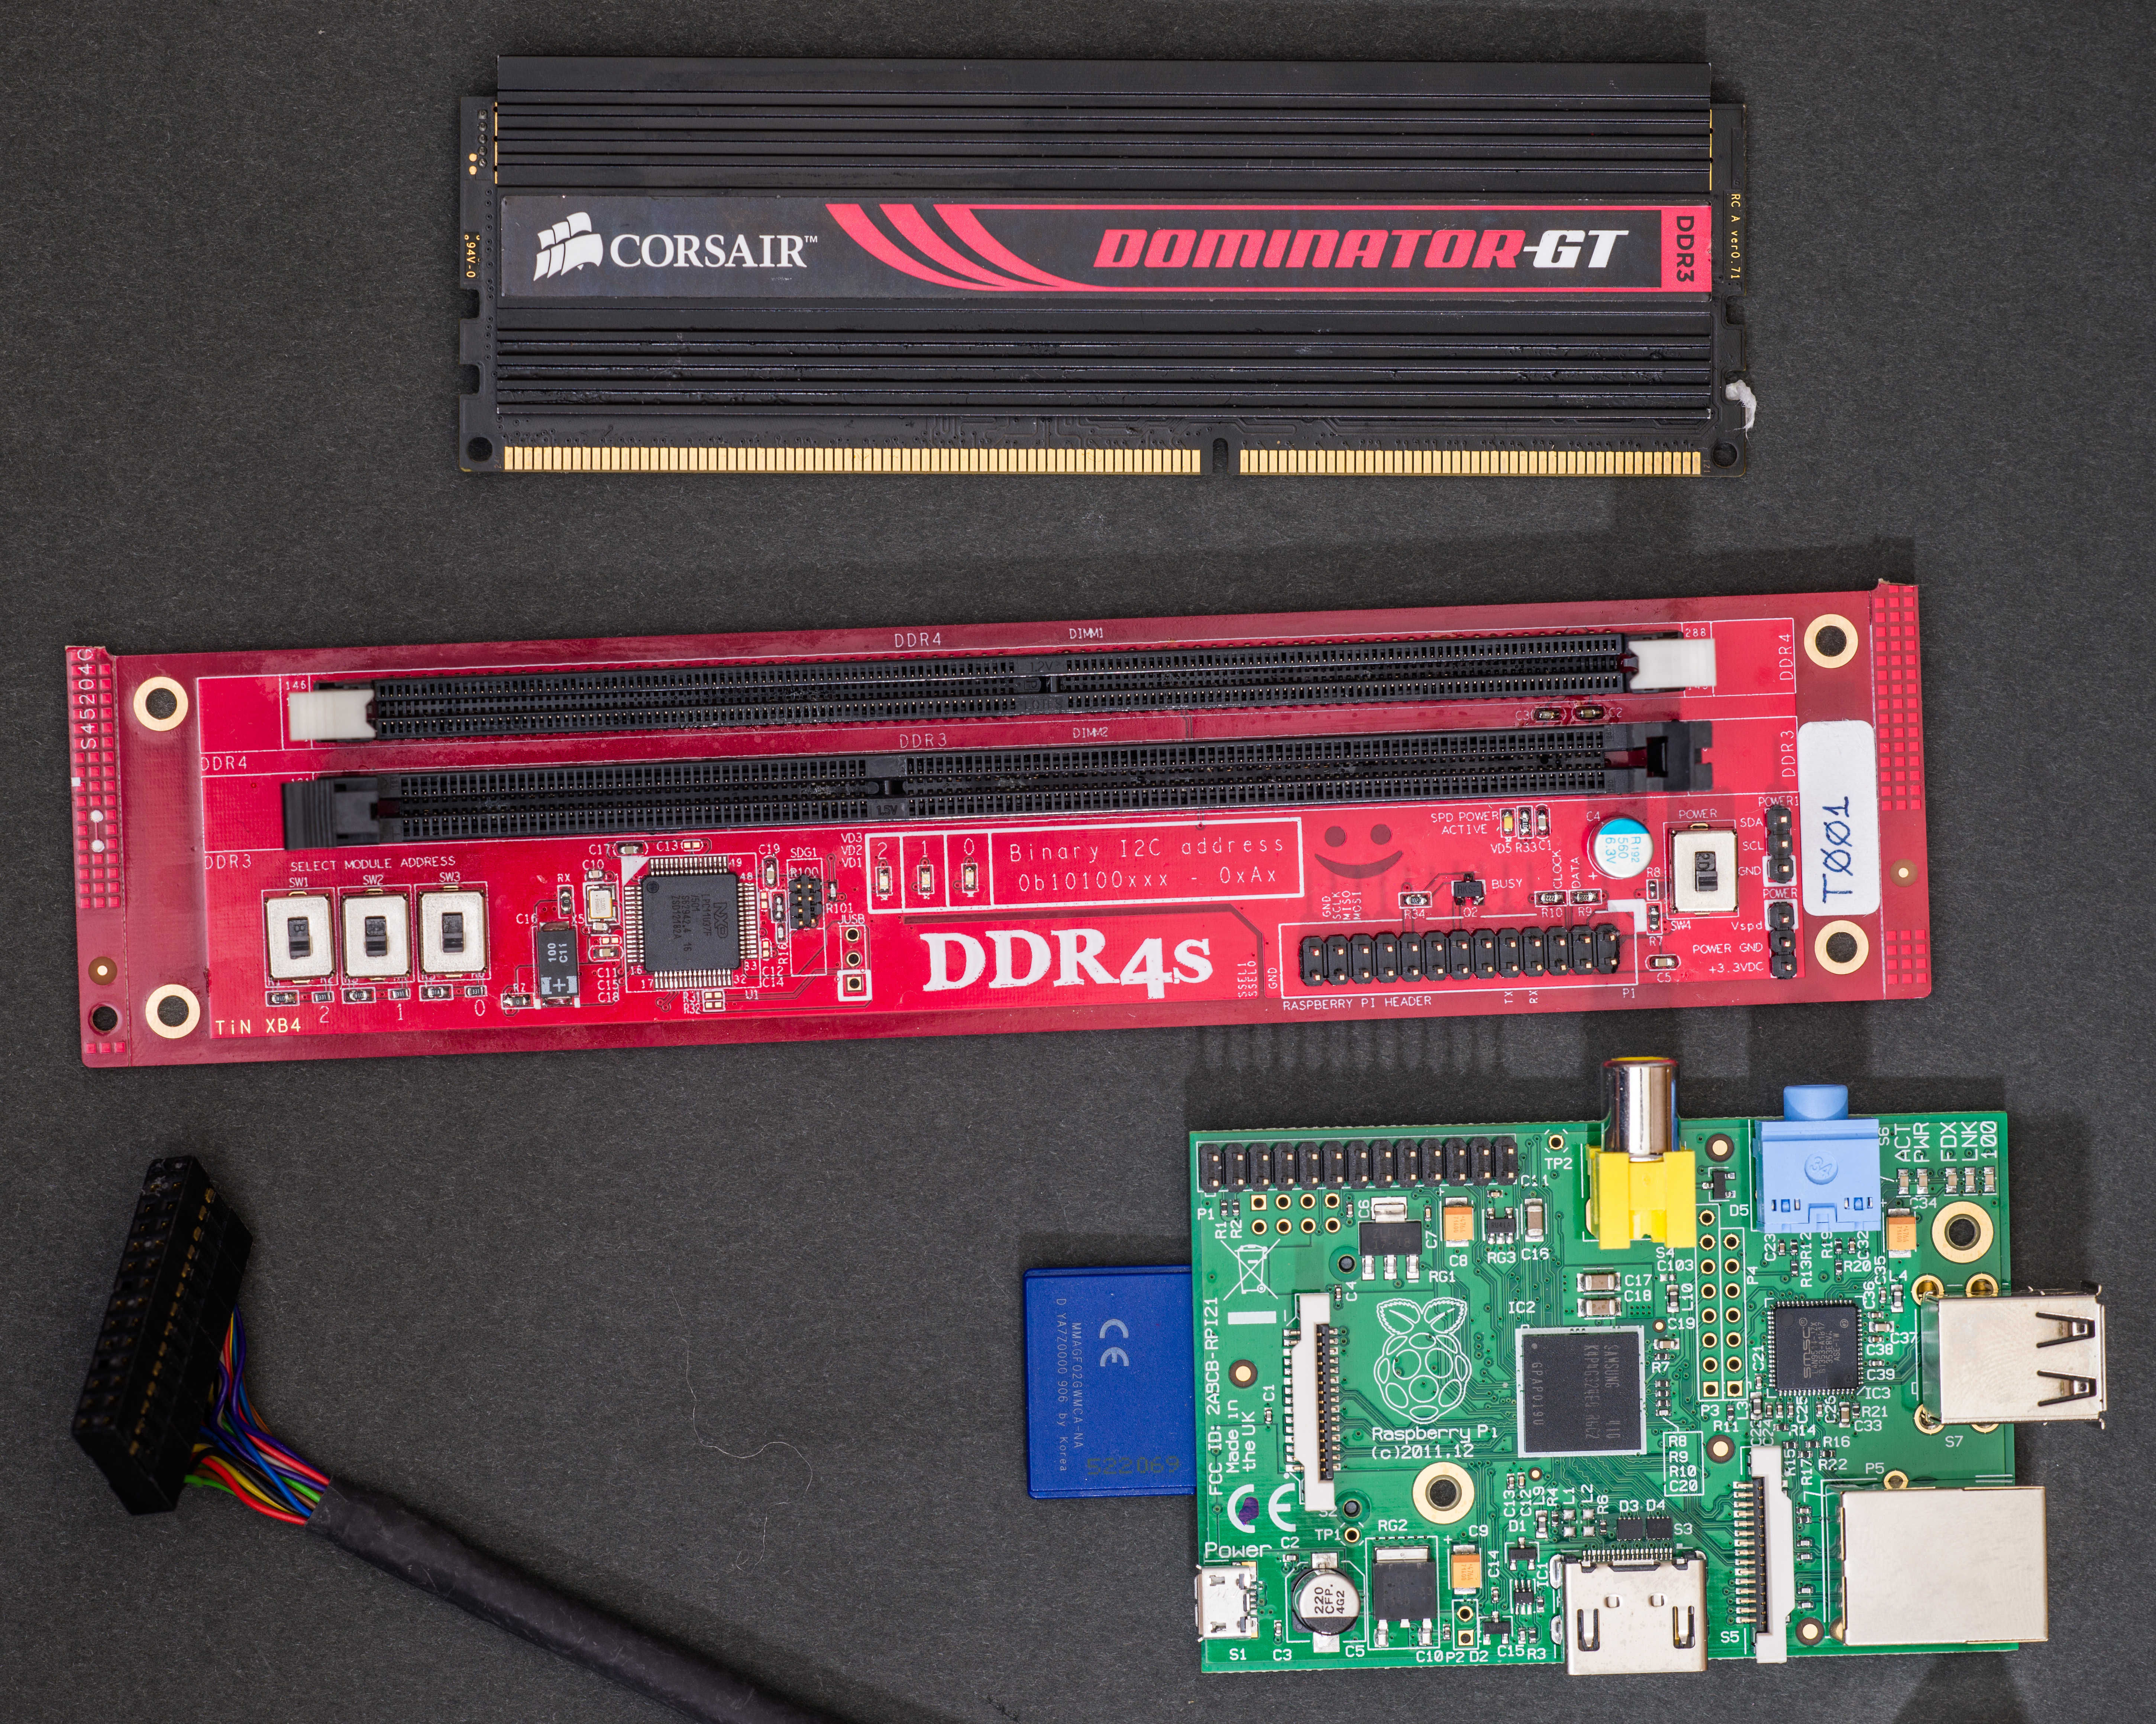
From top to bottom – DDR3 Corsair UDIMM, DDR adapter board, Raspberry Pi Model B with 2GB SD card and 26-pin 2.54mm cable.
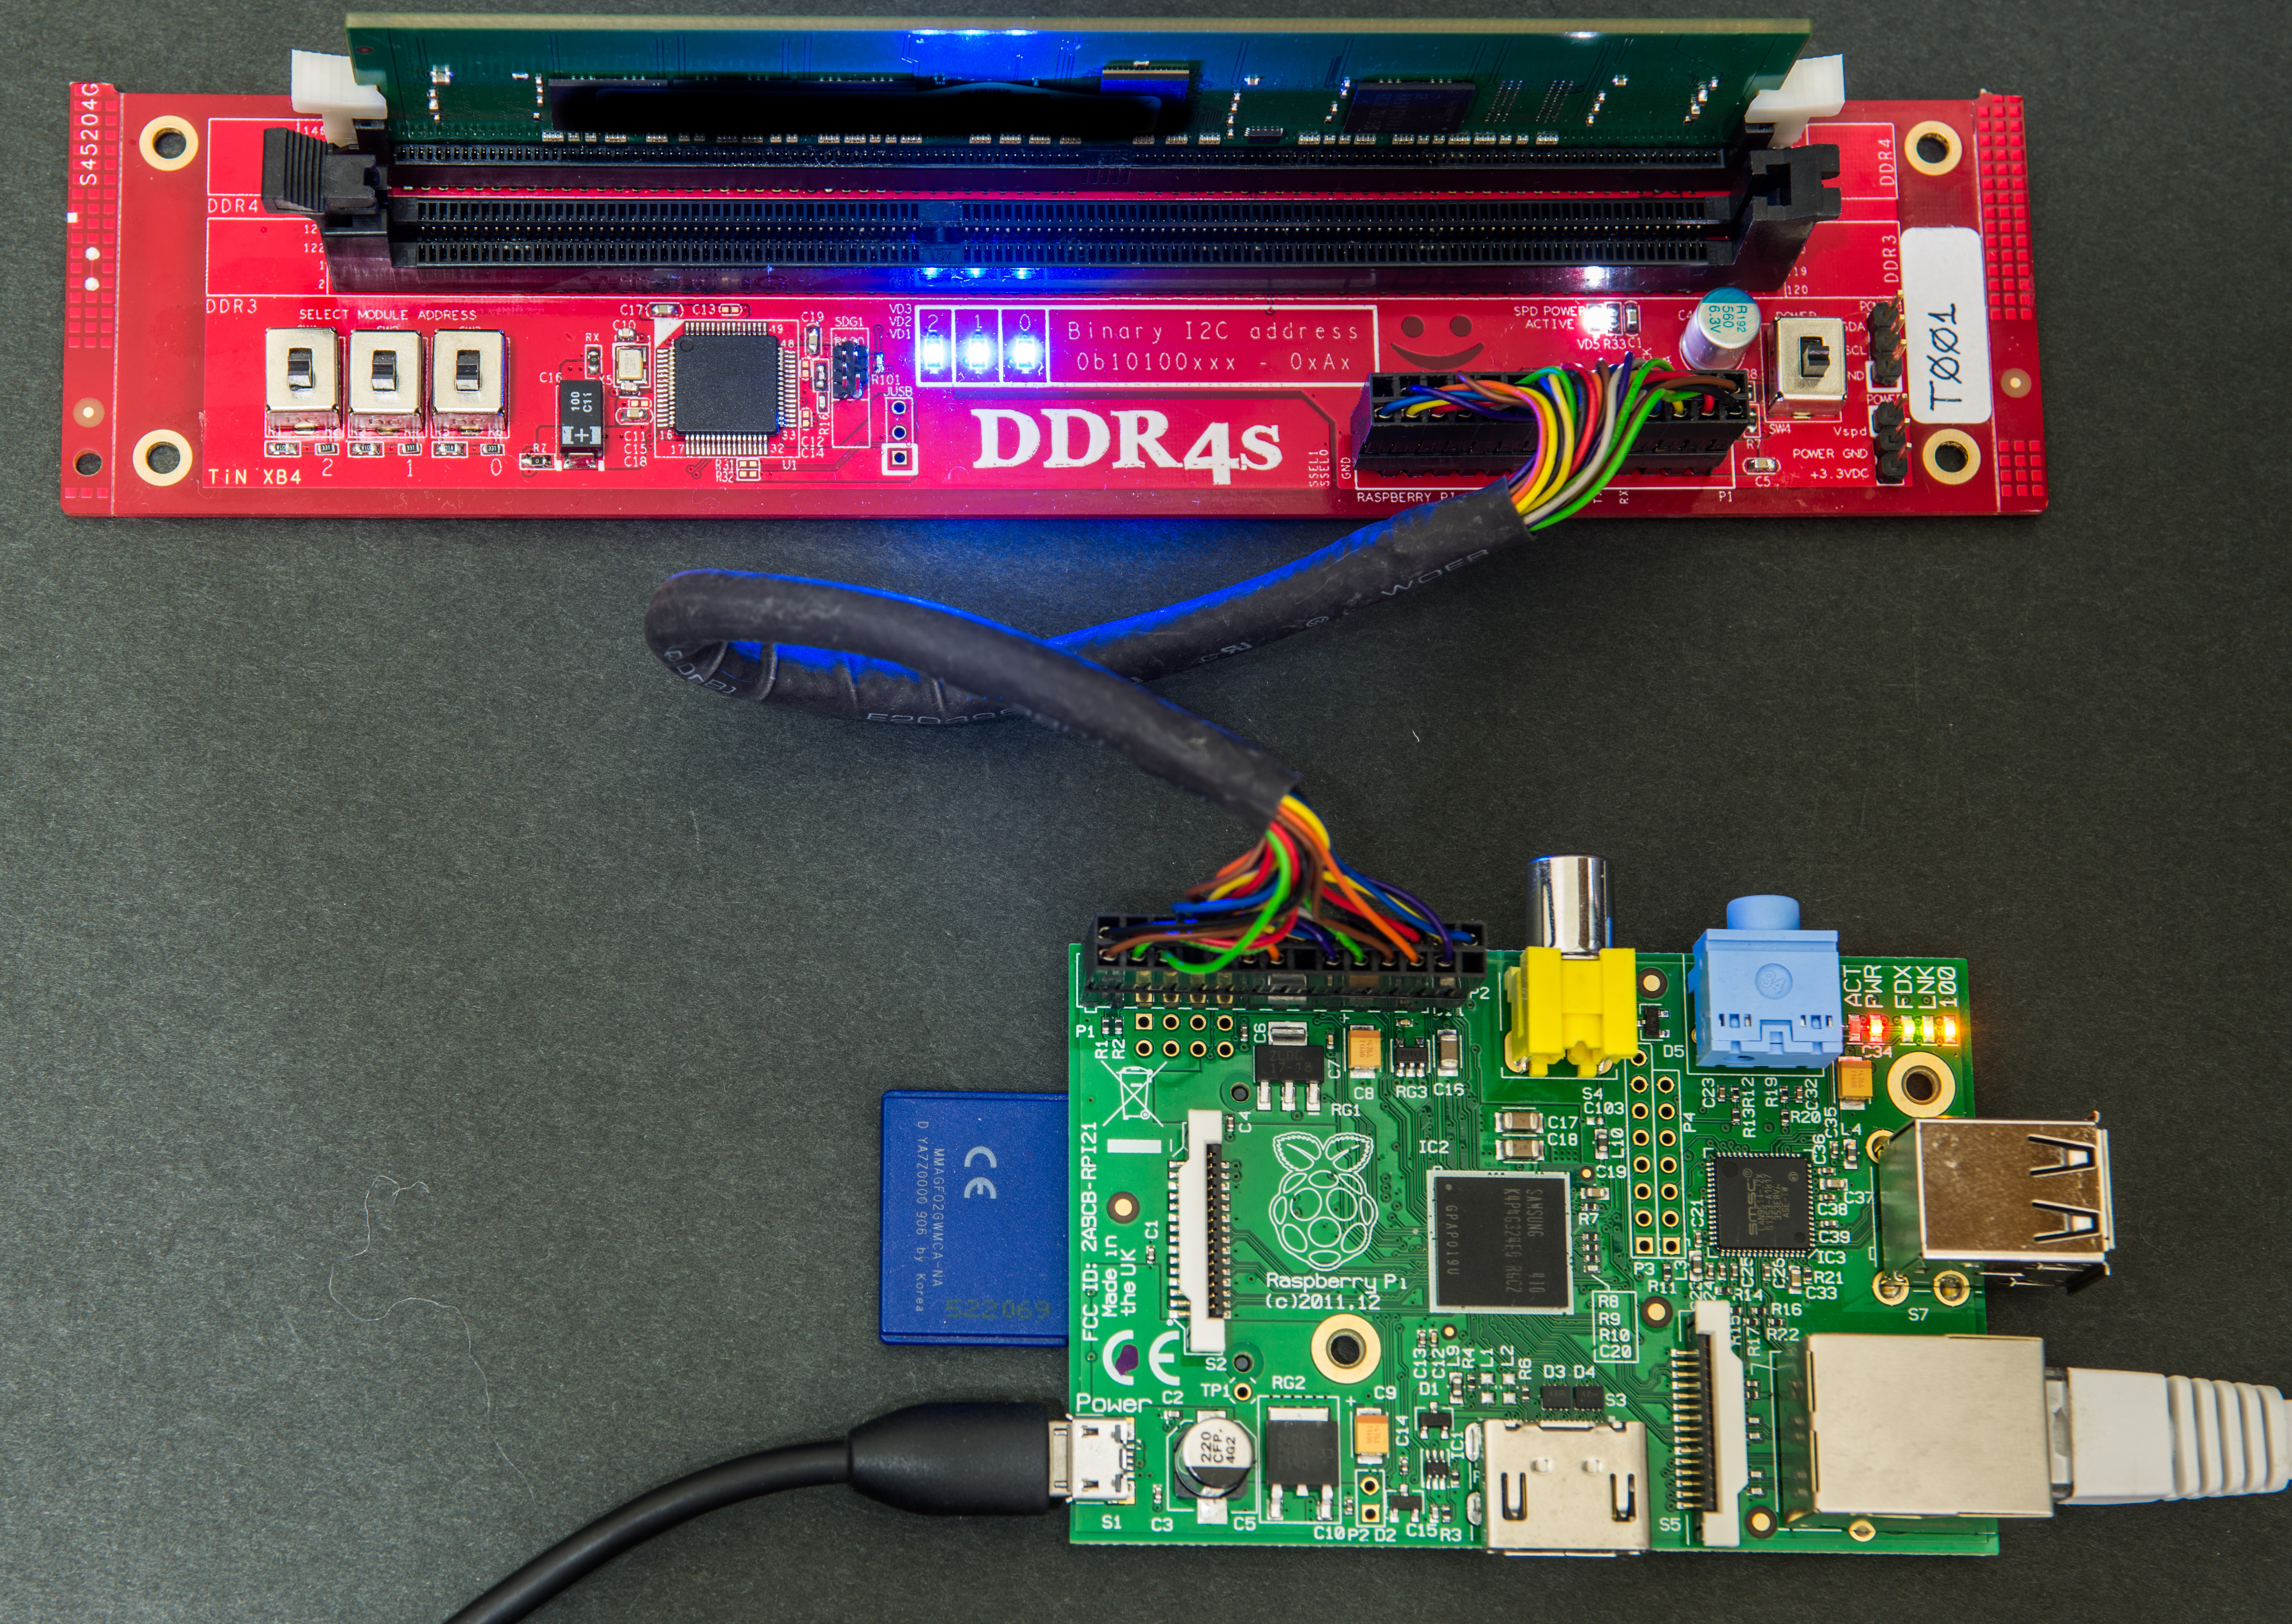
Using DDR3 module and connections:
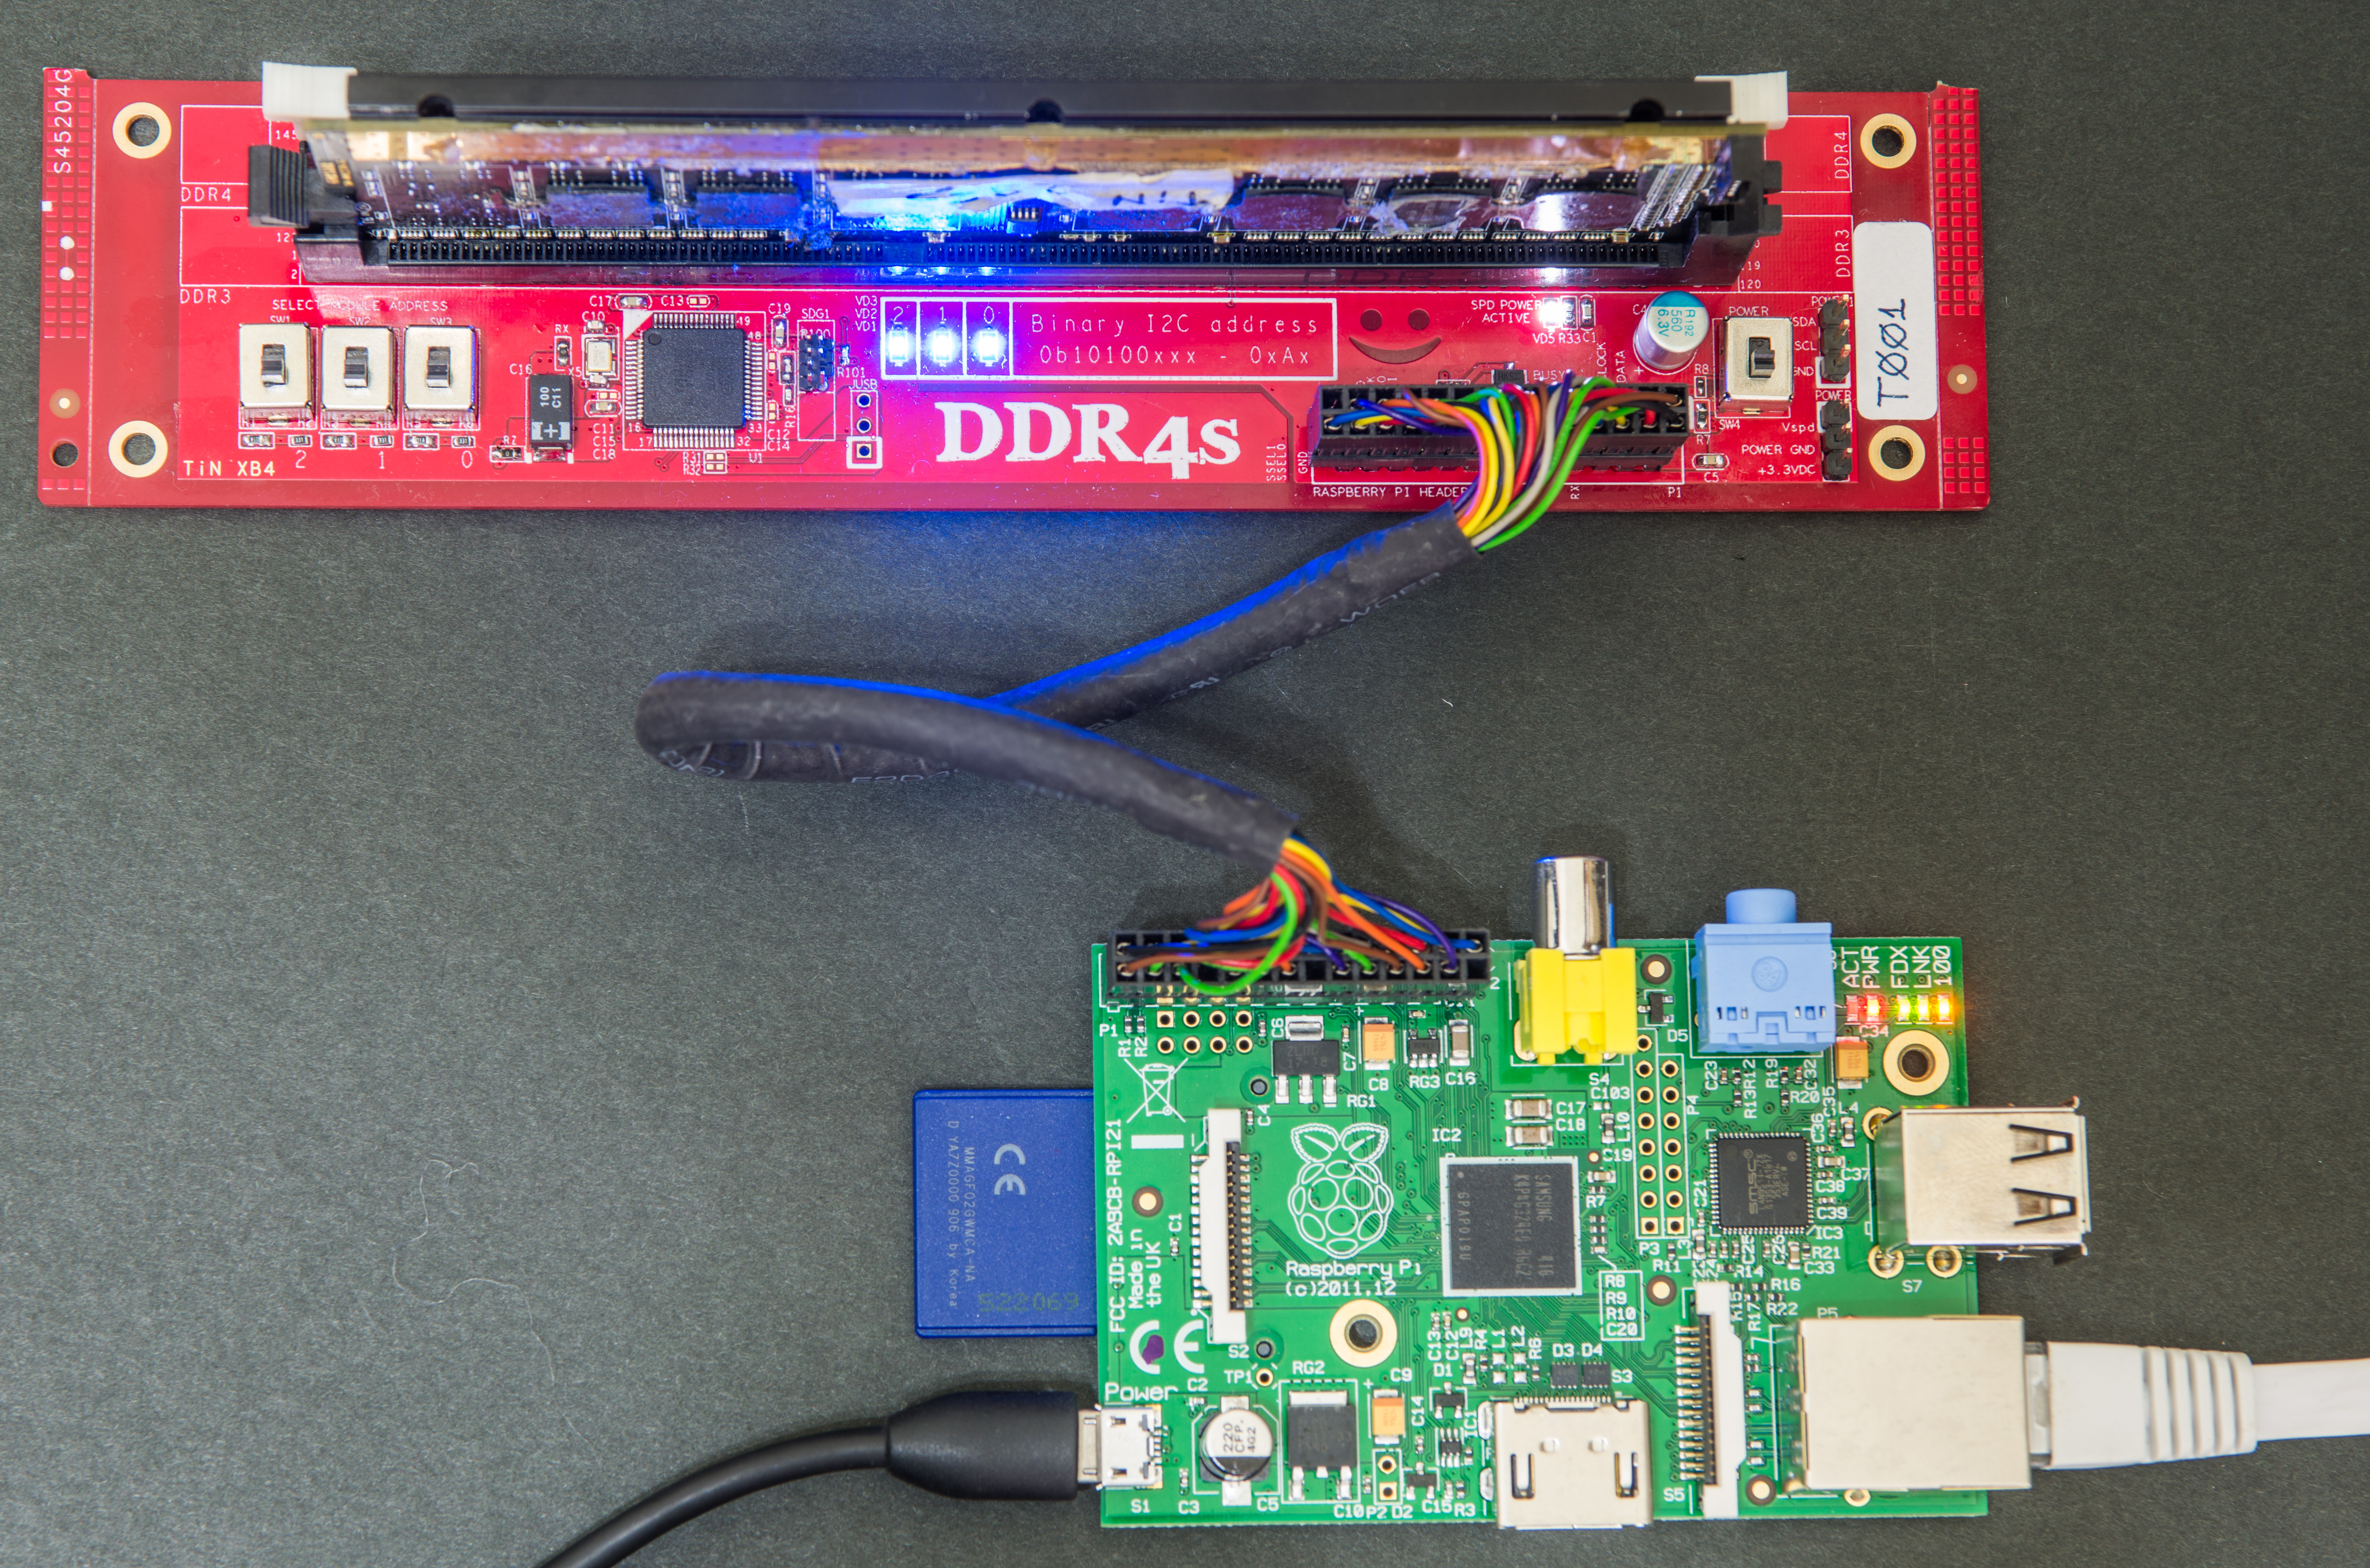
Using DDR4 RDIMM module and connections:
Cannot use both DIMM types at same time, as there will be address conflict on I2C bus.
Inner layers just carry ground and power. PCB stackup photo:

Software design
This is step-by-step tutorial how to get fresh Raspberry Pi up and running for this project:
I used minimal OS, as intention was only to use network-based connection to RPI via ssh.
OS Image can be downloaded from origin here: http://www.linuxsystems.it/raspbian-wheezy-armhf-raspberry-pi-minimal-image/
or from local mirror
It’s 120MB, so can take a little time to download.
To write image onto SD card you can use any imager tool.
For Win32 there is free Win32 Disk imager from gruemaster, tuxinator2009
The root password is raspberry.
Software setup
For accessing Raspberry Pi via network you will need to have network (eth0) configured properly.
If your network have DHCP service, usually enough just to add next line to /etc/network/interfaces
iface eth0 inet dhcp
If SD card is bigger than 1GB (which follows filesystem in linux image mentioned above), you may want to add extra partition to use extra space.
Create new partition using fdisk, so final table can look like this:
root@raspberry-pi:/# fdisk /dev/mmcblk0
Command (m for help): p
Disk /dev/mmcblk0: 32.1 GB, 32127320064 bytes
...
        Device Boot      Start         End      Blocks   Id  System
/dev/mmcblk0p1            2048      104447       51200    b  W95 FAT32
/dev/mmcblk0p2          104448     1742847      819200   83  Linux
/dev/mmcblk0p3         1742848     1945599      101376   82  Linux swap / Solaris
/dev/mmcblk0p4         1945600    62748671    30401536   83  Linux
Then make ext4 filesystem in new partition.
root@raspberry-pi:/# mkfs.ext4 /dev/mmcblk0p4 -L ummspi2
mke2fs 1.42.5 (29-Jul-2012)
Filesystem label=ummspi2
OS type: Linux
Block size=4096 (log=2)
Fragment size=4096 (log=2)
....
....
Creating journal (32768 blocks): done
Writing superblocks and filesystem accounting information: done
Now make sure your /etc/fstab is updated:
root@raspberry-pi:/# cat /etc/fstab
# <file system> <mount point>   <type>          <options>               <dump>  <pass>
proc            /proc           proc            defaults                0       0
/dev/mmcblk0p1  /boot           vfat            defaults                0       0
/dev/mmcblk0p3  none            swap            sw                      0       0
*/dev/mmcblk0p4  /repo           ext4            defaults                0       0*
root@raspberry-pi:/#
Here I have /repo filesystem partition with ext4 Linux type.
Now we can mount it.
root@raspberry-pi:/# mount -a
And it’s ready to use:
root@raspberry-pi:/# df -h
Filesystem      Size  Used Avail Use% Mounted on
rootfs          788M  566M  222M  72% /
/dev/root       788M  566M  222M  72% /
devtmpfs        212M     0  212M   0% /dev
tmpfs            44M  180K   44M   1% /run
tmpfs           5.0M     0  5.0M   0% /run/lock
tmpfs           108M     0  108M   0% /run/shm
/dev/mmcblk0p1   50M   19M   32M  37% /boot
*/dev/mmcblk0p4   29G  172M   27G   1% /repo*
It’s usually good idea to update your OS packages prior to installation of new software.
Be aware, than if your memory storage is limited, then you may run out of space if new packages occupy too much size.
Aptitude is common way for updating:
root@raspberry-pi:~# aptitude update
Get: 1 http://archive.raspbian.org wheezy Release.gpg [490 B]
Get: 2 http://archive.raspbian.org wheezy Release [14.4 kB]
Get: 3 http://archive.raspbian.org wheezy/main Sources [6262 kB]
70% [3 Sources 4375 kB/6262 kB 70%].....79.8 kB/s 23s
...
Current status: 33 updates [+33], 77 new [+77].
And then run actual update.
Example output can be like below:
root@raspberry-pi:~# aptitude dist-upgrade
The following packages will be upgraded:
  apt apt-utils base-files dmsetup dpkg gnupg gpgv initscripts libapt-inst1.5 libapt-pkg-dev libapt-pkg4.12 libc-bin libc-dev-bin libc6 libc6-dev libdevmapper1.02.1 libgnutls26
  libssl1.0.0 linux-libc-dev locales lsb-base multiarch-support openssh-client openssh-server perl perl-base perl-modules ssh sysv-rc sysvinit sysvinit-utils tzdata wget
The following packages are RECOMMENDED but will NOT be installed:
  bcc gcc gcc-4.4 gcc-4.5 gcc-4.6 gcc-4.7 gnupg-curl libldap-2.4-2 manpages-dev psmisc
33 packages upgraded, 0 newly installed, 0 to remove and 0 not upgraded.
Need to get 35.5 MB of archives. After unpacking 234 kB will be freed.
Do you want to continue? [Y/n/?] Y
...
...
Setting up ssh (1:6.0p1-4+deb7u1) ...
Setting up perl (5.14.2-21+rpi2+deb7u1) ...
Current status: 0 updates [-33].
Also since i’m DOS-grown, prefer to use mcedit as default system editor. To change default nano to mcedit you can run
root@raspberry-pi:/etc/mercurial# update-alternatives —config editor
There are 3 choices for the alternative editor (providing /usr/bin/editor). Selection Path Priority Status 0 /bin/nano 40 auto mode 1 /bin/nano 40 manual mode 2 /usr/bin/mcedit 25 manual mode 3 /usr/bin/vim.tiny 10 manual modePress enter to keep the current choice[*], or type selection number: 2
update-alternatives: using /usr/bin/mcedit to provide /usr/bin/editor (editor) in manual mode
I usually prefer to keep all develpoment and project files in local repository, install mercurial so we can develop our software and commit changes right away from Raspberry Pi system.
apt-get install mercurial
root@raspberry-pi:~# apt-get install mercurial
Reading package lists... Done
Building dependency tree
Reading state information... Done
The following extra packages will be installed:
  ca-certificates mercurial-common openssl python python-minimal
Suggested packages:
  qct wish vim emacs kdiff3 kdiff3-qt kompare meld xxdiff tkcvs mgdiff python-mysqldb python-pygments python-openssl python-doc python-tk
The following NEW packages will be installed:
  ca-certificates mercurial mercurial-common openssl python python-minimal
0 upgraded, 6 newly installed, 0 to remove and 0 not upgraded.
Need to get 3514 kB of archives.
After this operation, 10.3 MB of additional disk space will be used.
Do you want to continue [Y/n]? Y
Get:1 http://archive.raspbian.org/raspbian/ wheezy/main python-minimal all 2.7.3-4+deb7u1 [42.8 kB]
...
...
Creating config file /etc/mercurial/hgrc.d/hgext.rc with new version
Processing triggers for ca-certificates ...
Updating certificates in /etc/ssl/certs... 158 added, 0 removed; done.
Running hooks in /etc/ca-certificates/update.d....done.
For mercurial repostory system how-to you can reference official documentation or short article here.
Now it’s time to do actual software setup for accessing our I2C hardware.
1. Add to /etc/modules
i2c-bcm2708
i2c-dev
1b. If your Linux kernel is 3.18 or newer, add next lines to */boot/config.txt. This is due to migration for new Device Tree method.
dtparam=i2c_arm=on
dtparam=i2c1=on
dtparam=i2c0=on
dtparam=spi=on
2. sudo apt-get install python-smbus
root@raspberry-pi:~# apt-get install python-smbus
Reading package lists... Done
Building dependency tree
Reading state information... Done
The following extra packages will be installed:
  i2c-tools
Suggested packages:
  libi2c-dev
The following NEW packages will be installed:
  i2c-tools python-smbus
0 upgraded, 2 newly installed, 0 to remove and 32 not upgraded.
Need to get 71.0 kB of archives.
After this operation, 317 kB of additional disk space will be used.
Do you want to continue [Y/n]? Y
Get:1 http://archive.raspbian.org/raspbian/ wheezy/main i2c-tools armhf 3.1.0-2 [59.5 kB]
Get:2 http://archive.raspbian.org/raspbian/ wheezy/main python-smbus armhf 3.1.0-2 [11.5 kB]
Fetched 71.0 kB in 1s (36.0 kB/s)
Selecting previously unselected package i2c-tools.
(Reading database ... 22286 files and directories currently installed.)
Unpacking i2c-tools (from .../i2c-tools_3.1.0-2_armhf.deb) ...
Selecting previously unselected package python-smbus.
Unpacking python-smbus (from .../python-smbus_3.1.0-2_armhf.deb) ...
Processing triggers for man-db ...
Setting up i2c-tools (3.1.0-2) ...
Setting up python-smbus (3.1.0-2) ...
3. sudo apt-get install i2c-tools
root@raspberry-pi:~# apt-get install i2c-tools
Reading package lists... Done
Building dependency tree
Reading state information... Done
i2c-tools is already the newest version.
i2c-tools set to manually installed.
0 upgraded, 0 newly installed, 0 to remove and 32 not upgraded.
4. Now we can connect adapter board and try i2c detect tool to see if I2C interface working.
i2cdetect -y 1
When no devices / memory modules installed there should be no devices present on any address.
Just like this:
root@raspberry-pi:~# i2cdetect -y 1
     0  1  2  3  4  5  6  7  8  9  a  b  c  d  e  f
00:          -- -- -- -- -- -- -- -- -- -- -- -- --
10: -- -- -- -- -- -- -- -- -- -- -- -- -- -- -- --
20: -- -- -- -- -- -- -- -- -- -- -- -- -- -- -- --
30: -- -- -- -- -- -- -- -- -- -- -- -- -- -- -- --
40: -- -- -- -- -- -- -- -- -- -- -- -- -- -- -- --
50: -- -- -- -- -- -- -- -- -- -- -- -- -- -- -- --
60: -- -- -- -- -- -- -- -- -- -- -- -- -- -- -- --
70: -- -- -- -- -- -- -- --
5. Minimalist linux builds may not have gcc compiler as well, so install it before you can compile/test own code.
apt-get install gcc
apt-get install make
If you get errors like:
sudo: unable to resolve host raspberry-pi
Then add line to /etc/hosts
127.0.0.1 raspberry-pi
6. If you have wiringPi library not installed, need to install it.
If you used OS image attached in this code repository, then you will need to install wiringPi library.
root@raspberry-pi:/rpdb/ddr4s/fw/wiringPi# ./build
wiringPi Build script
=================
WiringPi Library
[UnInstall]
[Compile] wiringPi.c
[Compile] wiringSerial.c
[Compile] wiringShift.c
...
[Compile] wiringPiSPI.c
[Compile] wiringPiI2C.c
...
[Compile] drcSerial.c
[Link (Dynamic)]
[Install Headers]
[Install Dynamic Lib]
WiringPi Devices Library
[UnInstall]
[Compile] ds1302.c
[Compile] maxdetect.c
[Compile] piNes.c
[Compile] gertboard.c
[Compile] piFace.c
[Compile] lcd128x64.c
[Compile] lcd.c
[Compile] piGlow.c
[Link (Dynamic)]
[Install Headers]
[Install Dynamic Lib]
GPIO Utility
[Compile] gpio.c
gpio.c:85:12: warning: 'decodePin' defined but not used [-Wunused-function]
[Compile] extensions.c
[Compile] readall.c
[Link]
[Install]
All Done.
NOTE: This is wiringPi v2, and if you need to use the lcd, Piface,
  Gertboard, MaxDetext, etc. routines then you must change your
  compile scripts to add -lwiringPiDev
7. Running test GCC-compiled software in putty terminal connection to Raspberry Pi’s Debian Linux.
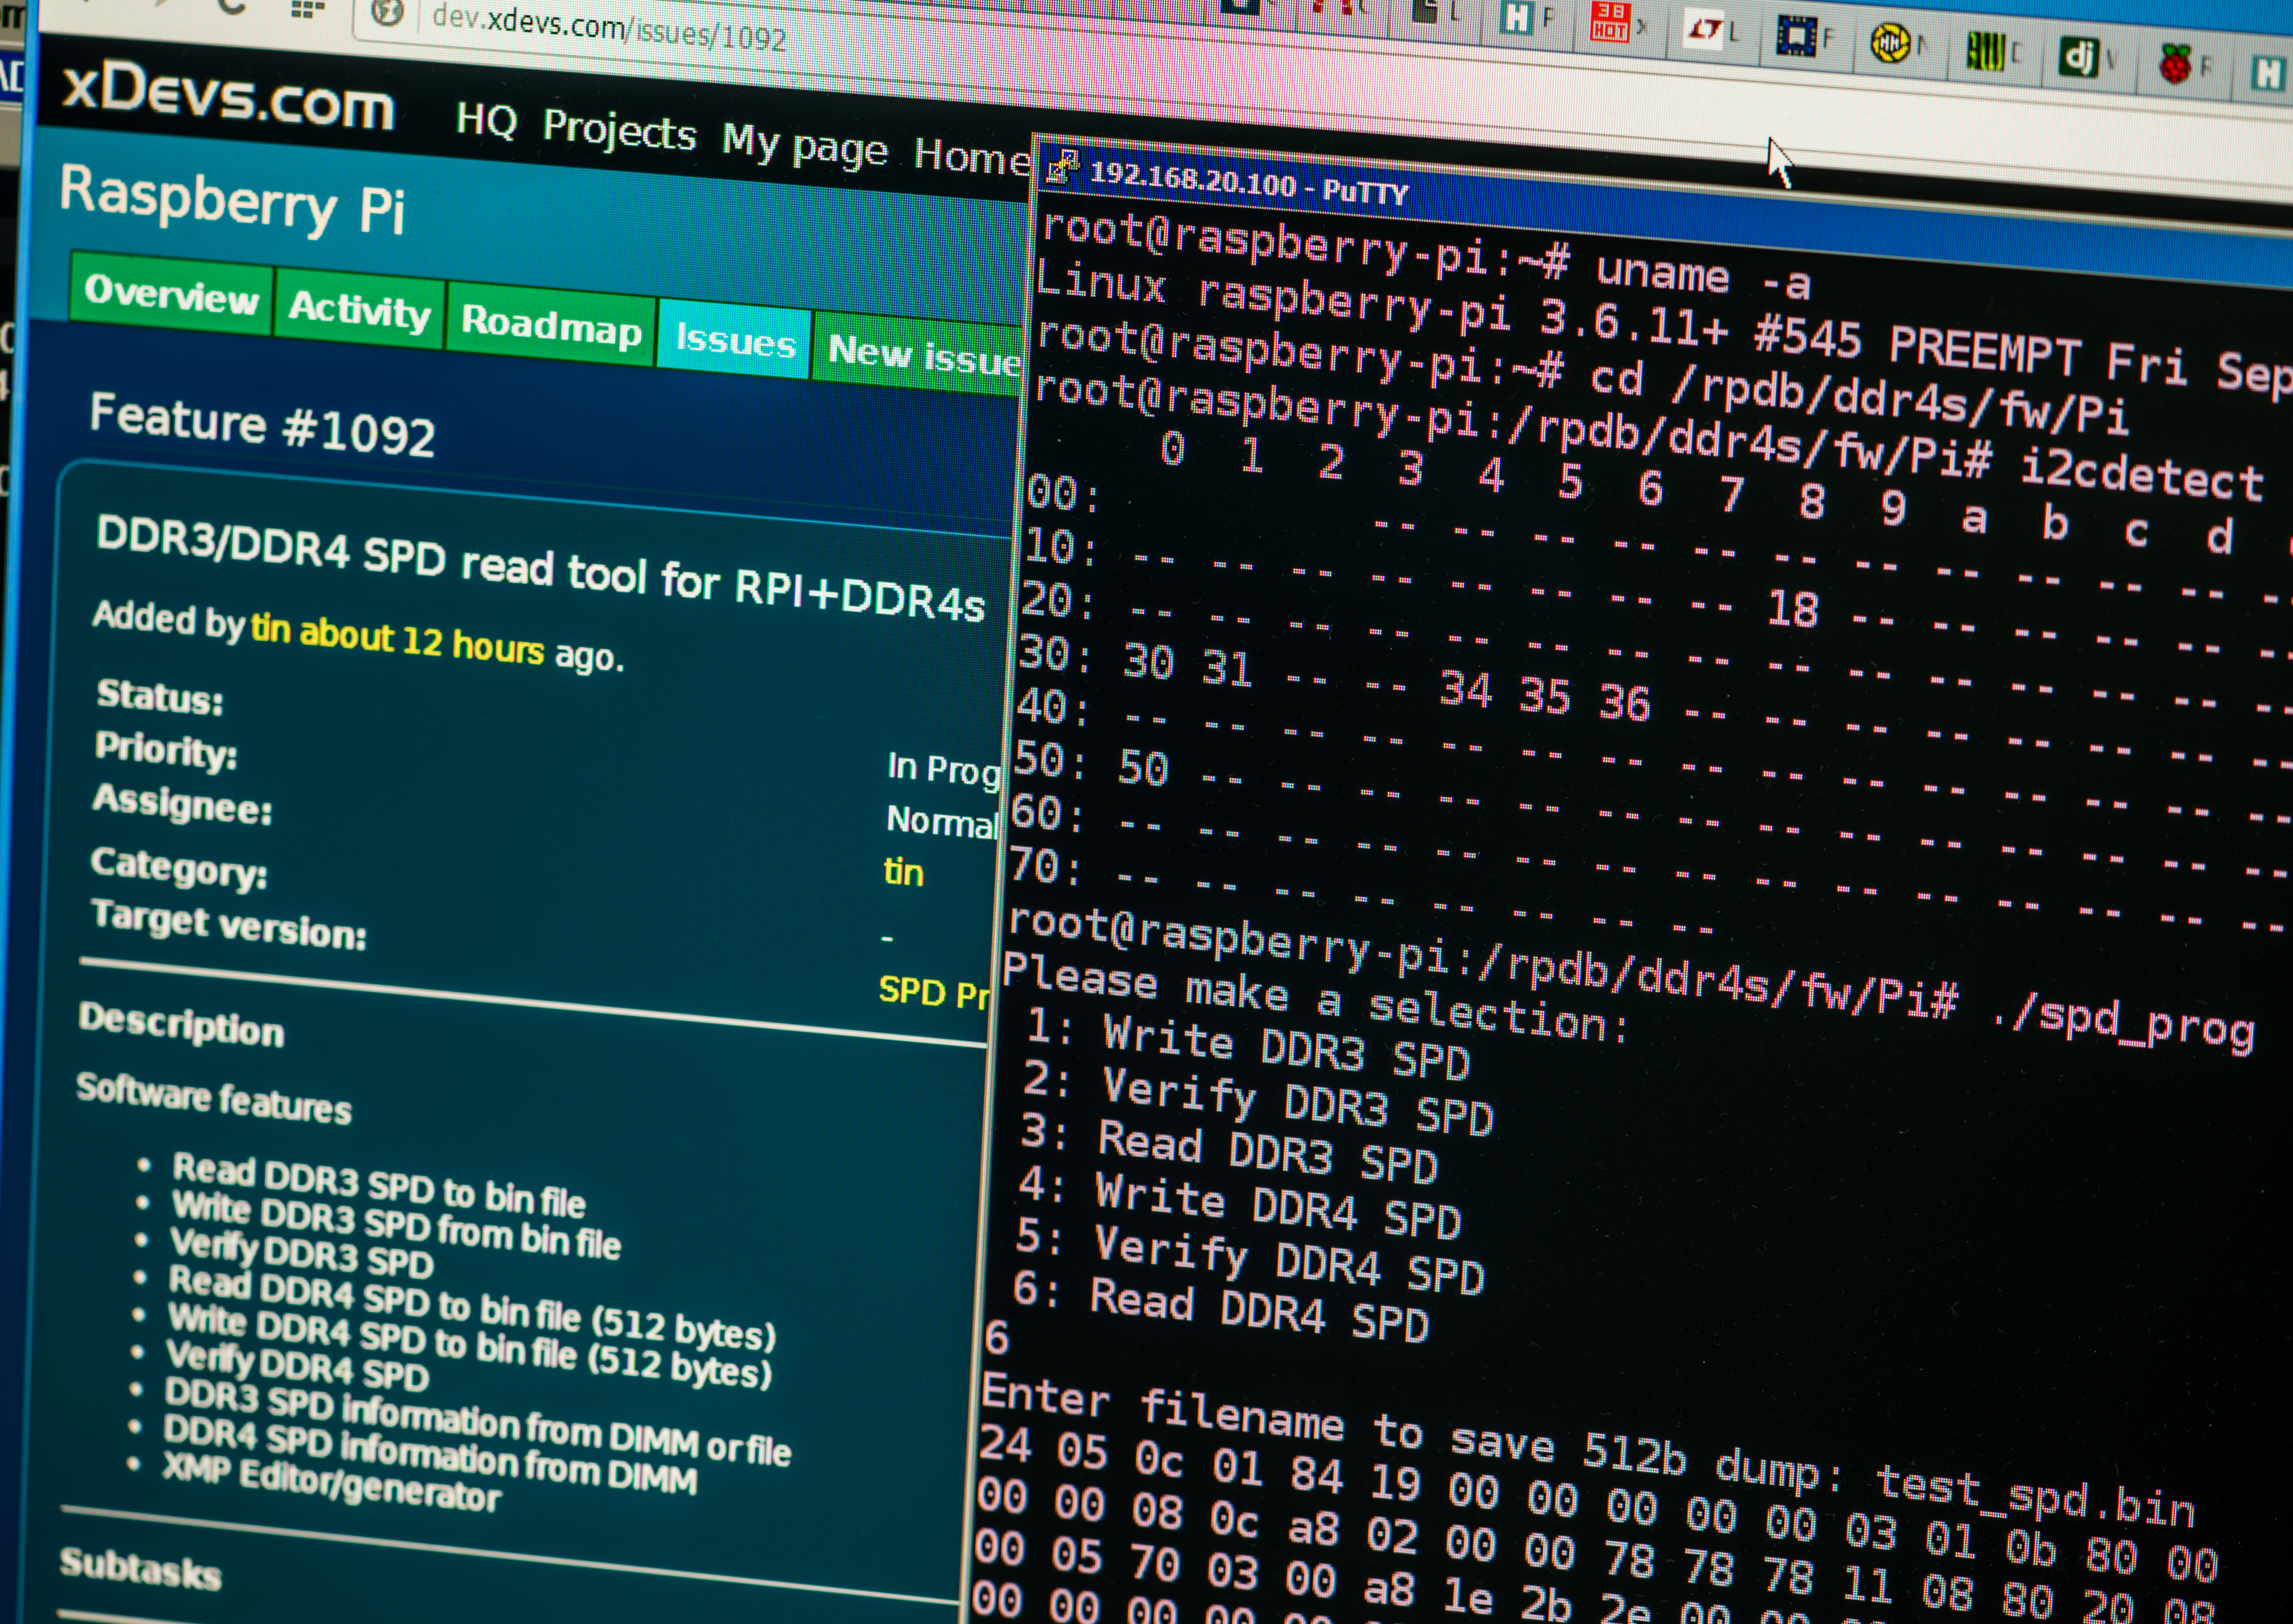
8. Usage:
- /comp.sh* – compiler script to run gcc compiler with spd_prog_both.c to generate spd_prog main app executable (*nix)
- /check.sh* – compiler script to run gcc compiler with checksum.c to generate checksum tool executable (*nix)
- /spd_prog* – runs application to read/write DDR3/DDR4 SPD. It operates with plain binary files only.
- /checksum* – runs tool to calculate and check CRC16 fields in DDR3/DDR4 plain binary file. It accepts filename with parameter -f [filename]
9. Check sum tool example:
DDR3 dump example:
$:/repo/ddr4s/fw/Pi$ ./checksum -f ddr3.bin
/********************** xDevs.com DDR4s Project ************************/
 DDR3/DDR4 dump checksum check tool | calculates CRC16 for input binary
 Usage: checksum -f [dump_filename]
/***********************************************************************/
File DDR3 CRC16 = 600E | byte 126 = E | byte 127 = 60
Calculated DDR3 CRC16 = 600E | byte 126 = E | byte 127 = 60
CRC in dump is correct
DDR4 Dump example
$:/repo/ddr4s/fw/Pi$ ./checksum -f ddr4.bin
/********************** xDevs.com DDR4s Project ************************/
 DDR3/DDR4 dump checksum check tool | calculates CRC16 for input binary
 Usage: checksum -f [dump_filename]
/***********************************************************************/
-i- DDR4 mode enabled, 512 bytes parsed
File DDR4 CRC16 = E752 | byte 126 = 52 | byte 127 = E7
File vendor section DDR4 CRC16 = 0 | byte 382 = 0 | byte 383 = 0
Calculated DDR4 CRC16 = E752 | byte 126 = 52 | byte 127 = E7
CRC in dump is correct
tin@tin-lap:/repo/ddr4s/fw/Pi$
——
References:
JEDEC Standard No. 21C : Serial Presence Detect (SPD), General Standard
JEDEC Registration – DDR4 DIMM PTH 288 Pin Socket Outline, 0.85 mm Pitch. SKT
JEDEC 288 PIN DDR4 DIMM, 0.85 mm PITCH
JEDEC Definitions of the EE1004-v 4 Kbit Serial Presence Detect (SPD) EEPROM and TSE2004av 4 Kbit SPD EEPROM with Temperature Sensor (TS) for Memory Module Applications
JEDEC DDR4 UDIMM Design Specification Annex D
JEDEC Proposed Annex for DDR4 UDIMM, R/C B
JEDEC Standard No. 21C : Annex L: Serial Presence Detect (SPD) for DDR4 SDRAM Modules
JEDEC Standard No. 21C : Serial Presence Detect (SPD) for DDR3 SDRAM Modules DDR3 SPD Document Release 6
JEDEC Standard No. 21C : Memory Module Nomenclature
JEDEC Standard No. 21C : Definition of the TSE2002av Serial Presence Detect (SPD) EEPROM with Temperature Sensor (TS) for Memory Module Applications
Guide revision:
Rev 10, Initial release to public, added low-cost option schematics
Rev 11, Added extra settings for Kernel 3.18+ to enable I2C operation
Modified: Jan. 11, 2018, 3:12 p.m.