- Intro
- Art of electronics photography, common mistakes and solutions for them
- Photo examples and setups used to make them
- Editing software
- xDevs.com photo setup
- Conclusion
Intro
It’s a good day get this article published, as Nikon just released new fancy flagship D5 and D500 cameras at CES 2016. These will get lot of people excited. But there is far more important thing, such as knowledge how to use gear you already have to produce great electronics-related photographs? This is often needed today to show things on forums, blogs and articles.
I had idea to cover some aspects of hardware photography a while, but just recently got into finishing it up, with few requests of such guide from our readers. Engineers by nature, are often willing to share their experience and designs, looking for criticism or for recognition. Design something and build designed device is not even half of job overall, unlike many beginners think. Proper documentation and ability to explain what that blinky thing actually does is a key for success of many projects, from many different application areas.
Writing good quality documentation and manuals is whole another level of difficulties and experiences, compared to only making schematics, making board layout and soldering everything together. While documenting is rather common in software development, there are still many “black scary box” hardware projects online. Any successful market players know this and spend tremendous man-hours on projects documentation, either its internal eyes only service information, or public datasheets and manuals. Even lab notes are often have big value, considering cases when not every idea get it’s way in final product. Prominent examples of these valueble notes are recognized work of engineers like Jim Williams and Bob Pease.
And today, in 21st century one may think, what would be easier job to do, with wide availability of great instruments and tools to make a document? Well, drawback is usually not absence of tool, but rather lack of experience or knowledge about what is available to use. While we can talk about documenting till the cows come home, this article is for only one aspect of documentation/support area to cover – photography. Like a well-known common phrase – one picture can say more than thousand words.
All examples and photos below are courtesy of xDevs.com, and available to download in original size by click. All metadata information, such as EXIF settings with exposure, focal settings and camera presets are kept, so you can get some references and actual settings.
We will not talk about very basics of camera and lens controls, nor any specific special settings, so if you holding camera first time, it’s better to read thru user’s manual and get yourself familiar with controls, camera interface and overall concepts, such as focusing, exposure, lighting, focal distances, ISO sensitivity. There are plenty of guides, articles and videos online covering all these subjects for very beginners. We will focus on specific area of camera use as a hardware electronics project documentation tool, and talk few things about doing it with decent quality.
Art of electronics gear photography, common mistakes and solutions for them
First, let’s get understanding of common mistakes hardware guru’s do trying to take a photo of their fresh hardware project.
On-camera flash
This is literally a photography killer, right there. No matter what camera is that, compact or high-end DSLR, on-camera flash will always produce bad result due to straight angle with flat and usually shiny boards and surfaces in front of camera. Also flash washes out any light from LEDs, display image or controls indicators on working equipment as well. Harsh sharp shadows finishing last nail in flash usage for documenting photo.
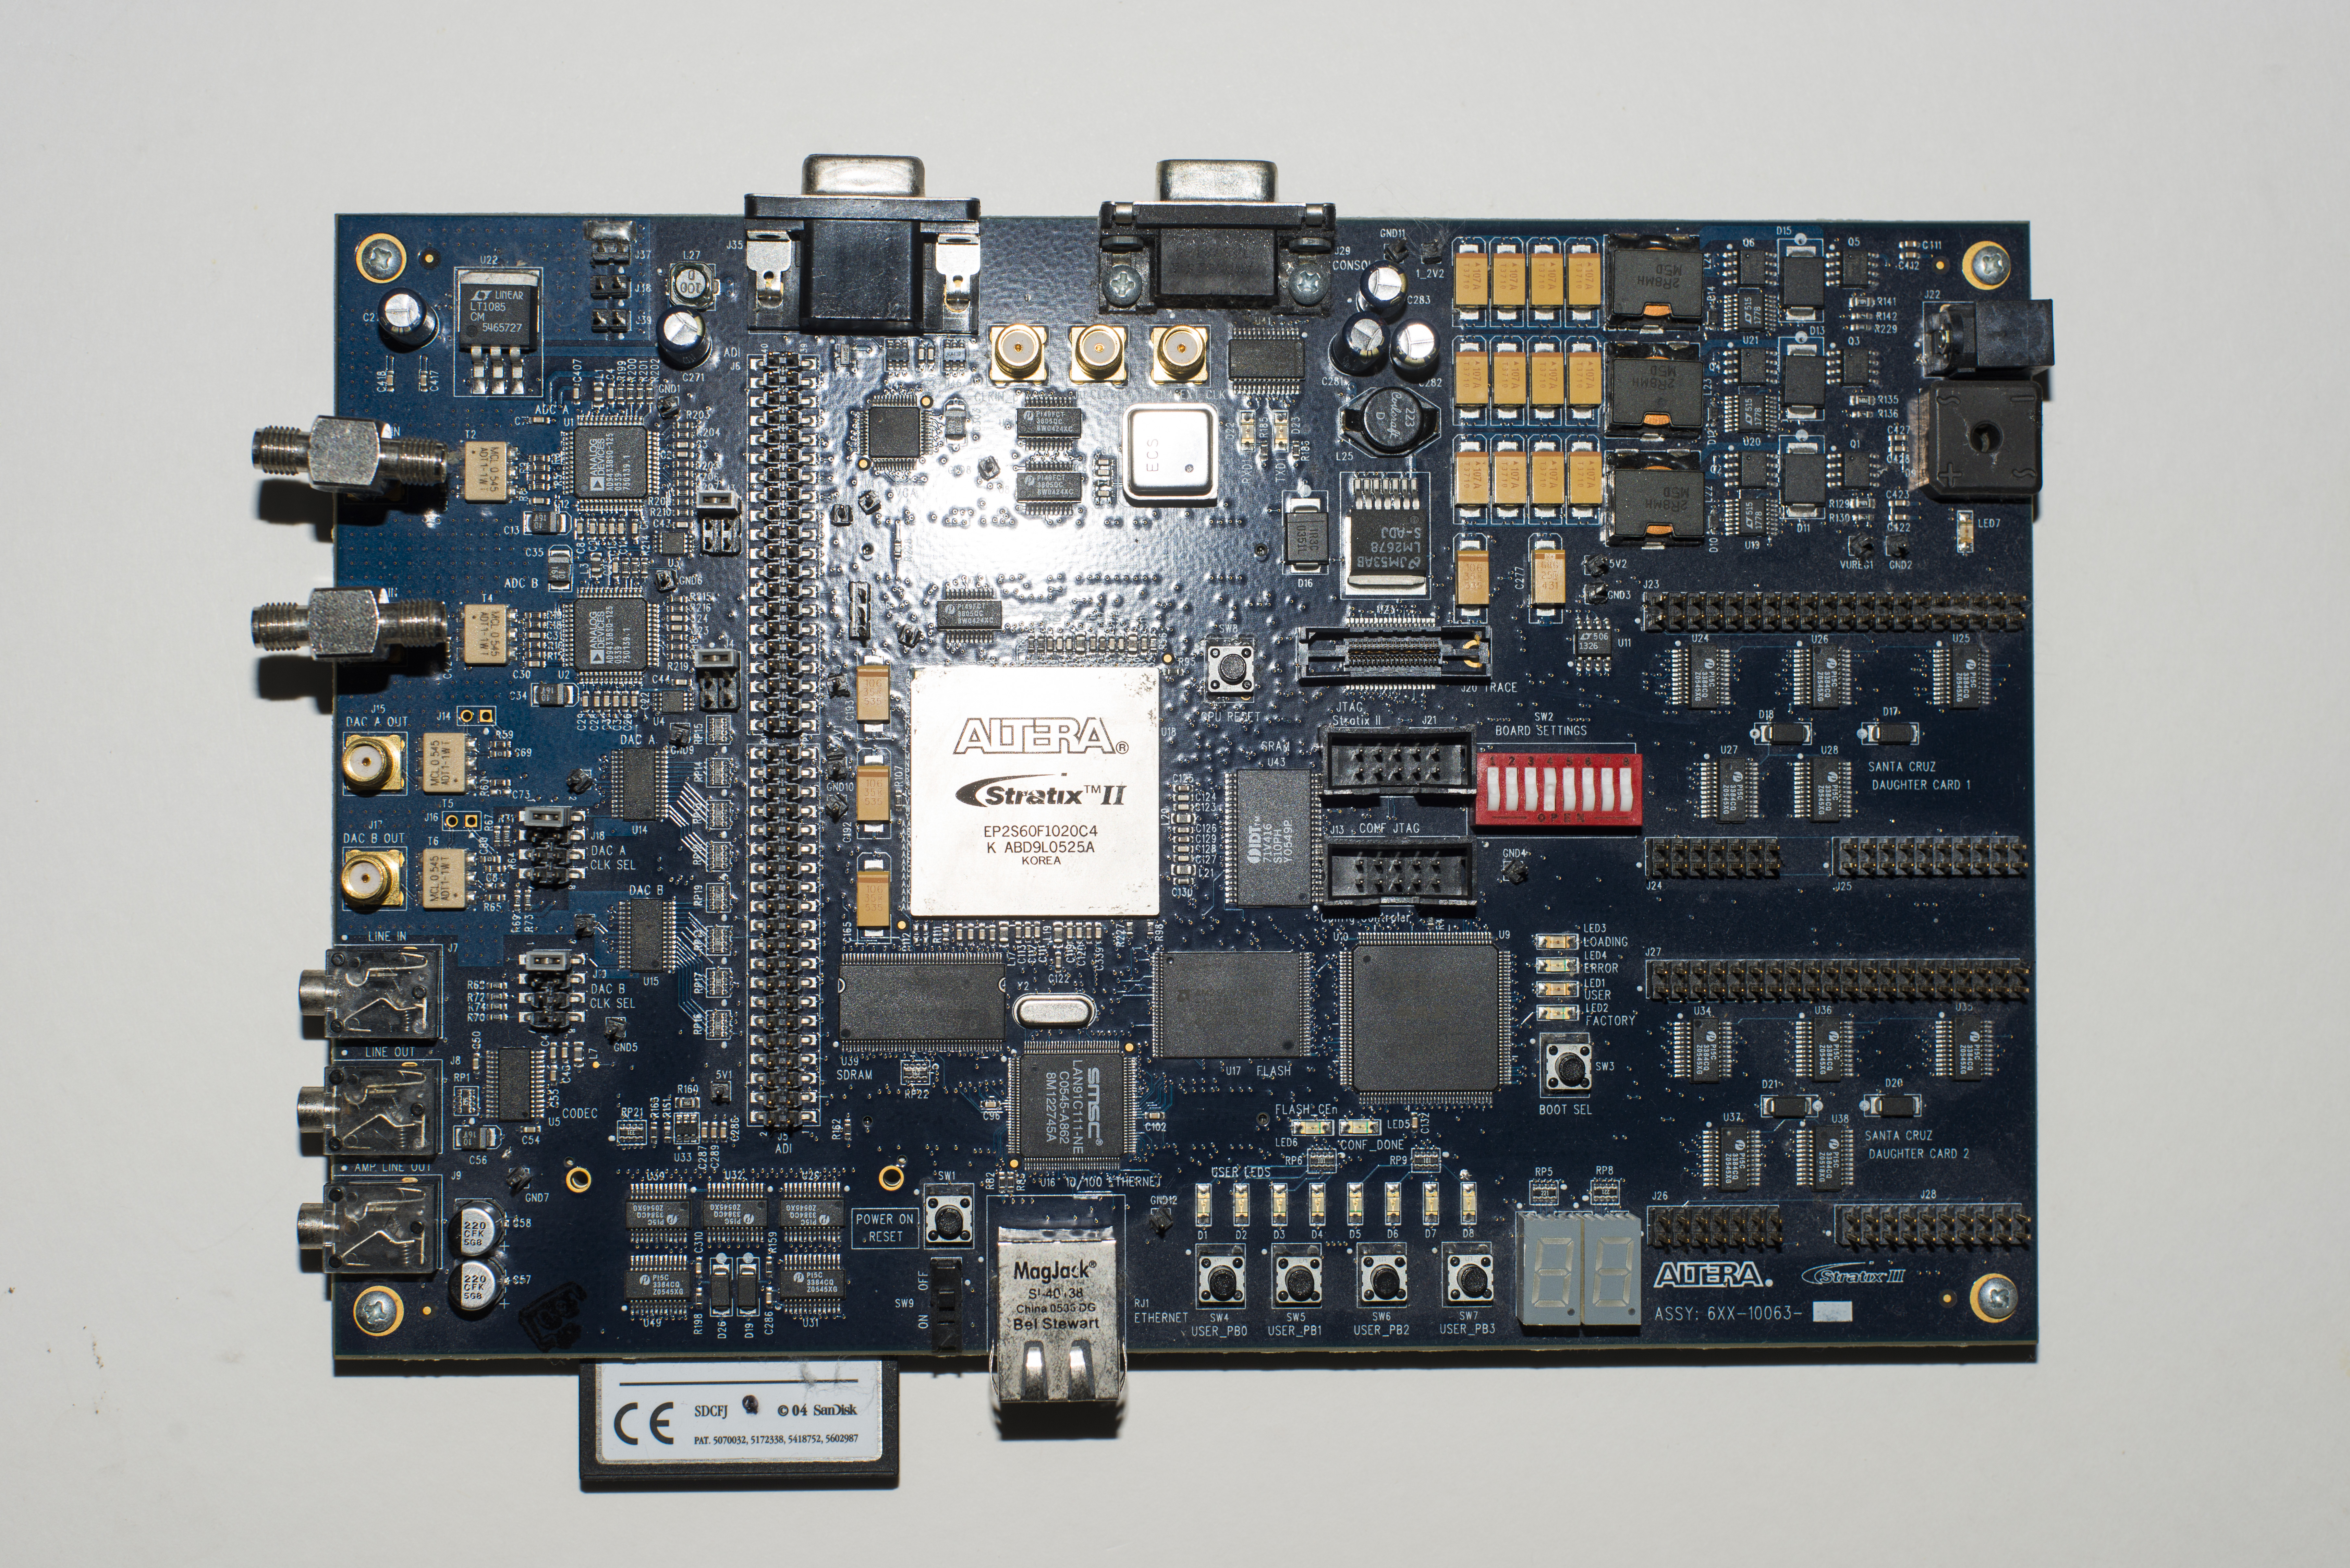
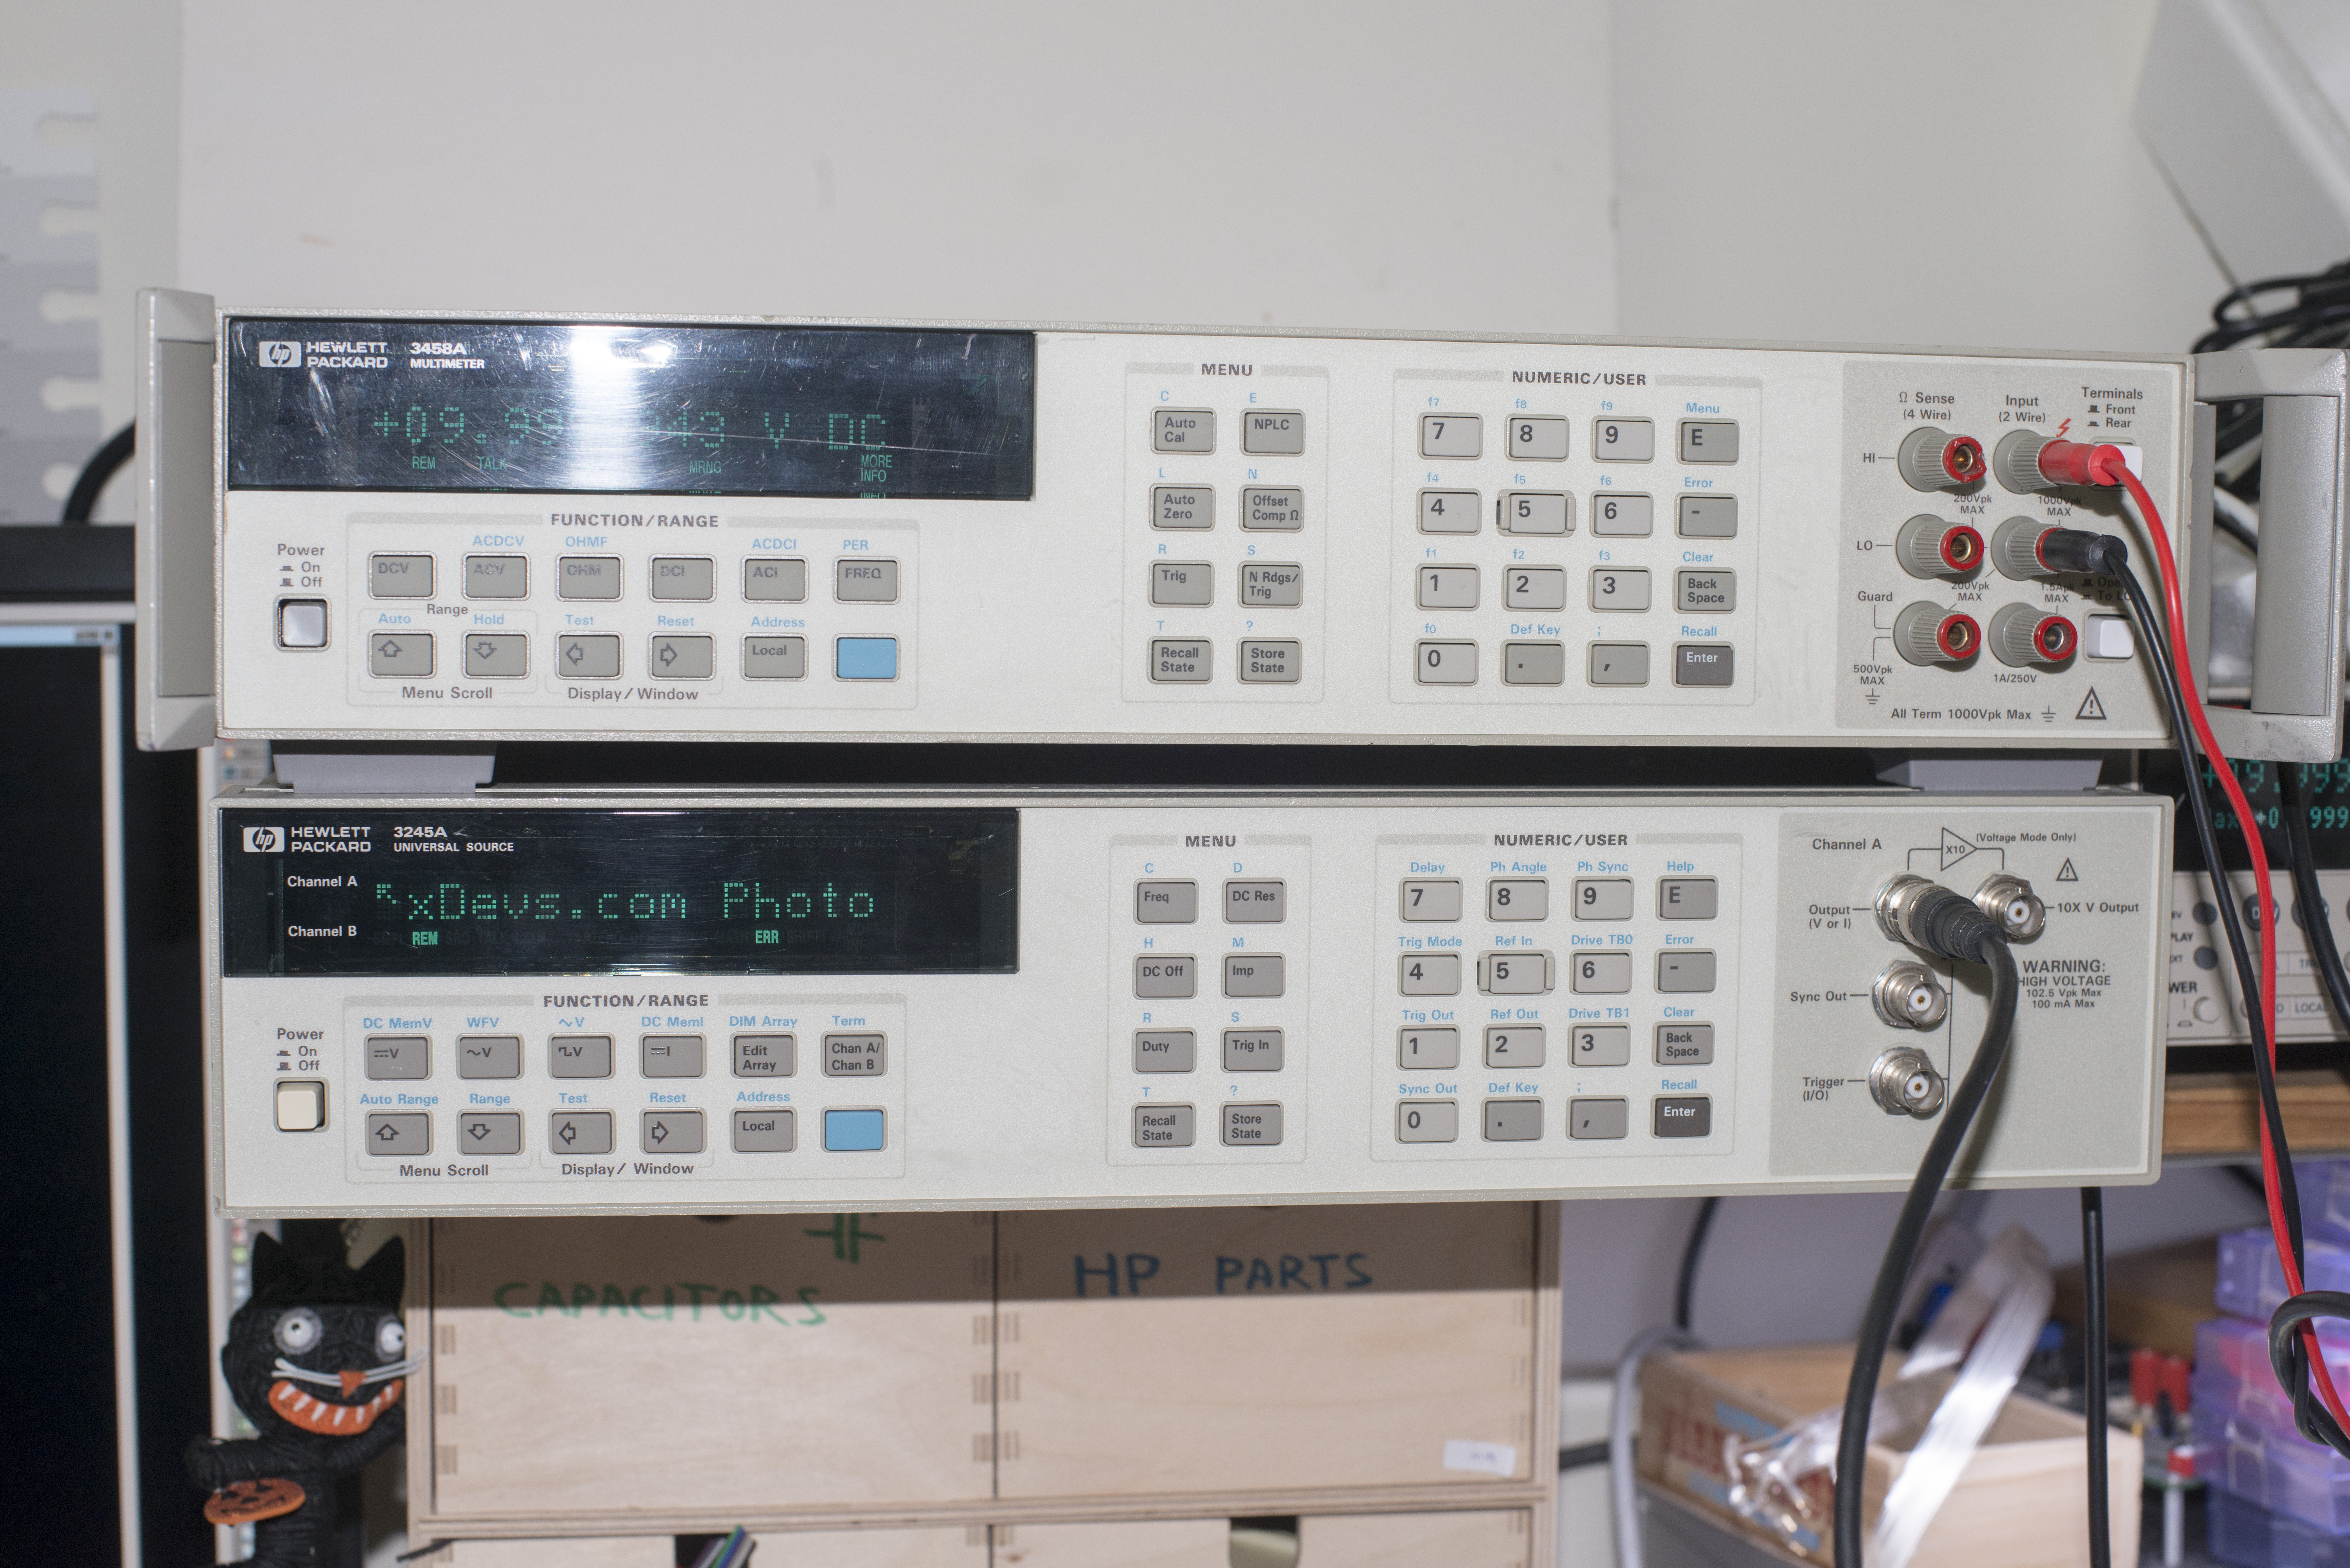
Photo A(left): Flash used for PCB shot. Photo B (right): Flash used for instruments shot
Try to read IC labels on SDRAM and PCB on photo above, or what is exact voltage displayed on DMM?
Remember, photography is process of capturing direct and reflected light from different objects in a view. Does not matter what camera you use, either 50$ USD point-and-shoot or highly expensive professional gear, correct light is a must. While it sounds complicated, making a good setup is really easy and possible with just stuff lying on everybody’s desk.
Let’s take a look of exactly same photos, with same camera and lens, but without a flash. Exposure was adjusted to compensate for low ambient light conditions. In both cases with and without flash camera was positioned on fixed tripod.

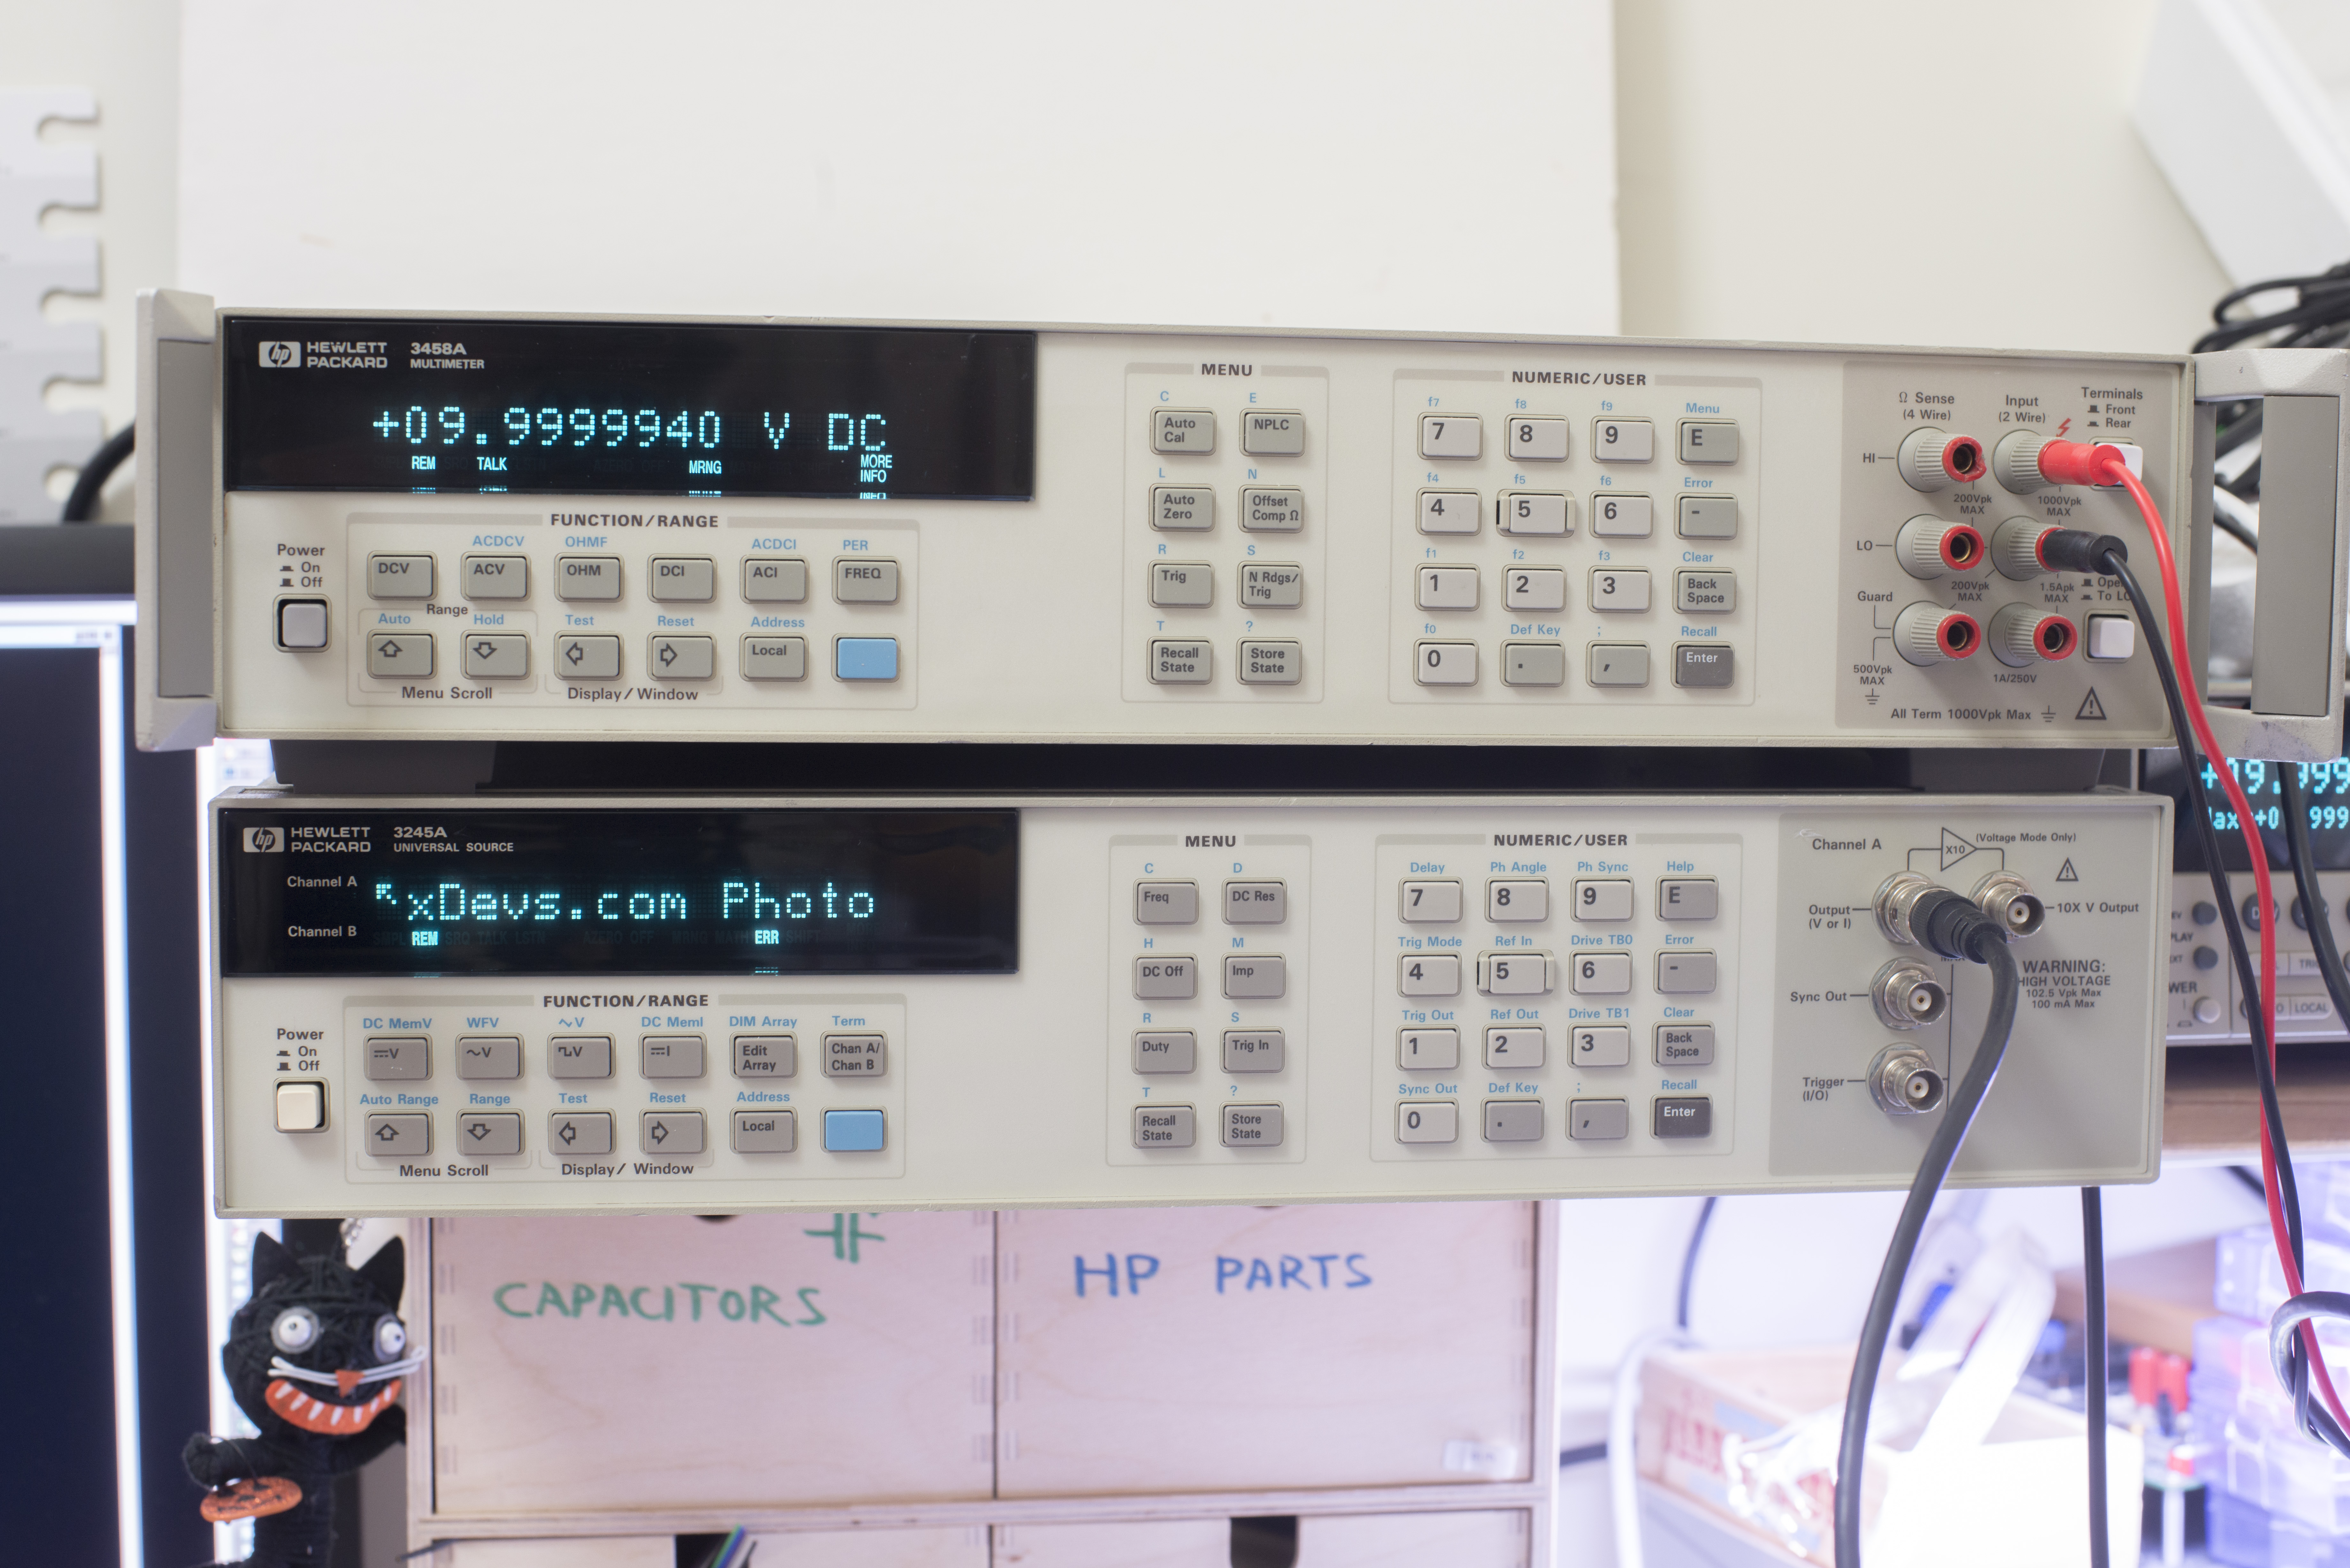
Photo A (left): Ambient light used for PCB shot. Photo B (right): Ambient light used for instruments shot
In rare case, when you have to use flash, here is a handy tip to get at least usable shots, for example if you visiting client site or in remote location. If you have white roof, you can use reflected light from camera flash to light up object. You can use any suitable reflector, just hold it by hand in front of camera pop-up flash, at ~45° to ceiling, so all light from flash will go up. To get enough light it’s often required to force maximum flash power in camera settings. For such photos I usually have 1/100 – 1/200 second exposures and f/5.6 to f/8 focal settings, with ISO 400-800. Shiny foil from chocolate bar or glossy credit card can work really well as reflectors ;)
Photos taken with plastic card reflector with ~45°C angle to ceiling, held in front of pop-up flash on Nikon DSLR camera.
- A4 or A3 blank white paper or plastic sheet – can work as a reflector or diffuser. Place sheet near your object, and direct white light source to it, so object will get only soft diffused light. This will keep sharp black shadows away, and improve overall contrast.
Dark environment, not enough light
If you don’t have space or capacity to have good lightning, get a regular tripod and use long exposures. It will work out very well for most of cases.
Taking photos at daily basis, I can definately say, that studio or big dedicated area for photography is NOT required for usual engineering photoshoots.
Most of engineers at lab environment don’t have need to take photo of large objects. Most of items we interested in are small to medium sized PCBA’s and expriments we have around, so this rather makes camera be part of overall setup, instead of making setup around camera.
Bold reflections on shiny surfaces
If you need to take photograph of object with polished sides and faces, make sure you don’t have unwanted lights reflection or objects in your viewfinder.
Sometimes it’s cool to see photographer in shiny chassis face or mirrored glass, but most of the time it’s not a welcome technique. If you taking photograph of glossy LCD panel or screen, make sure it’s clean and not covered with dust particles and fingerprints.
Wise to use gloves when taking photos of shiny surfaces to avoid constant cleaning and wiping fingerprints off.
Low resolution camera
Avoid using smartphones and web cameras to take hardware photos, unless you absolutely have to. Even then, try to get even cheap compact camera to get better quality shots.
While some of phones better than others, it’s still lightyears away from even cheap compact cameras. Here are examples, same object in same light conditions photographed by high-end smartphone and DSLR:

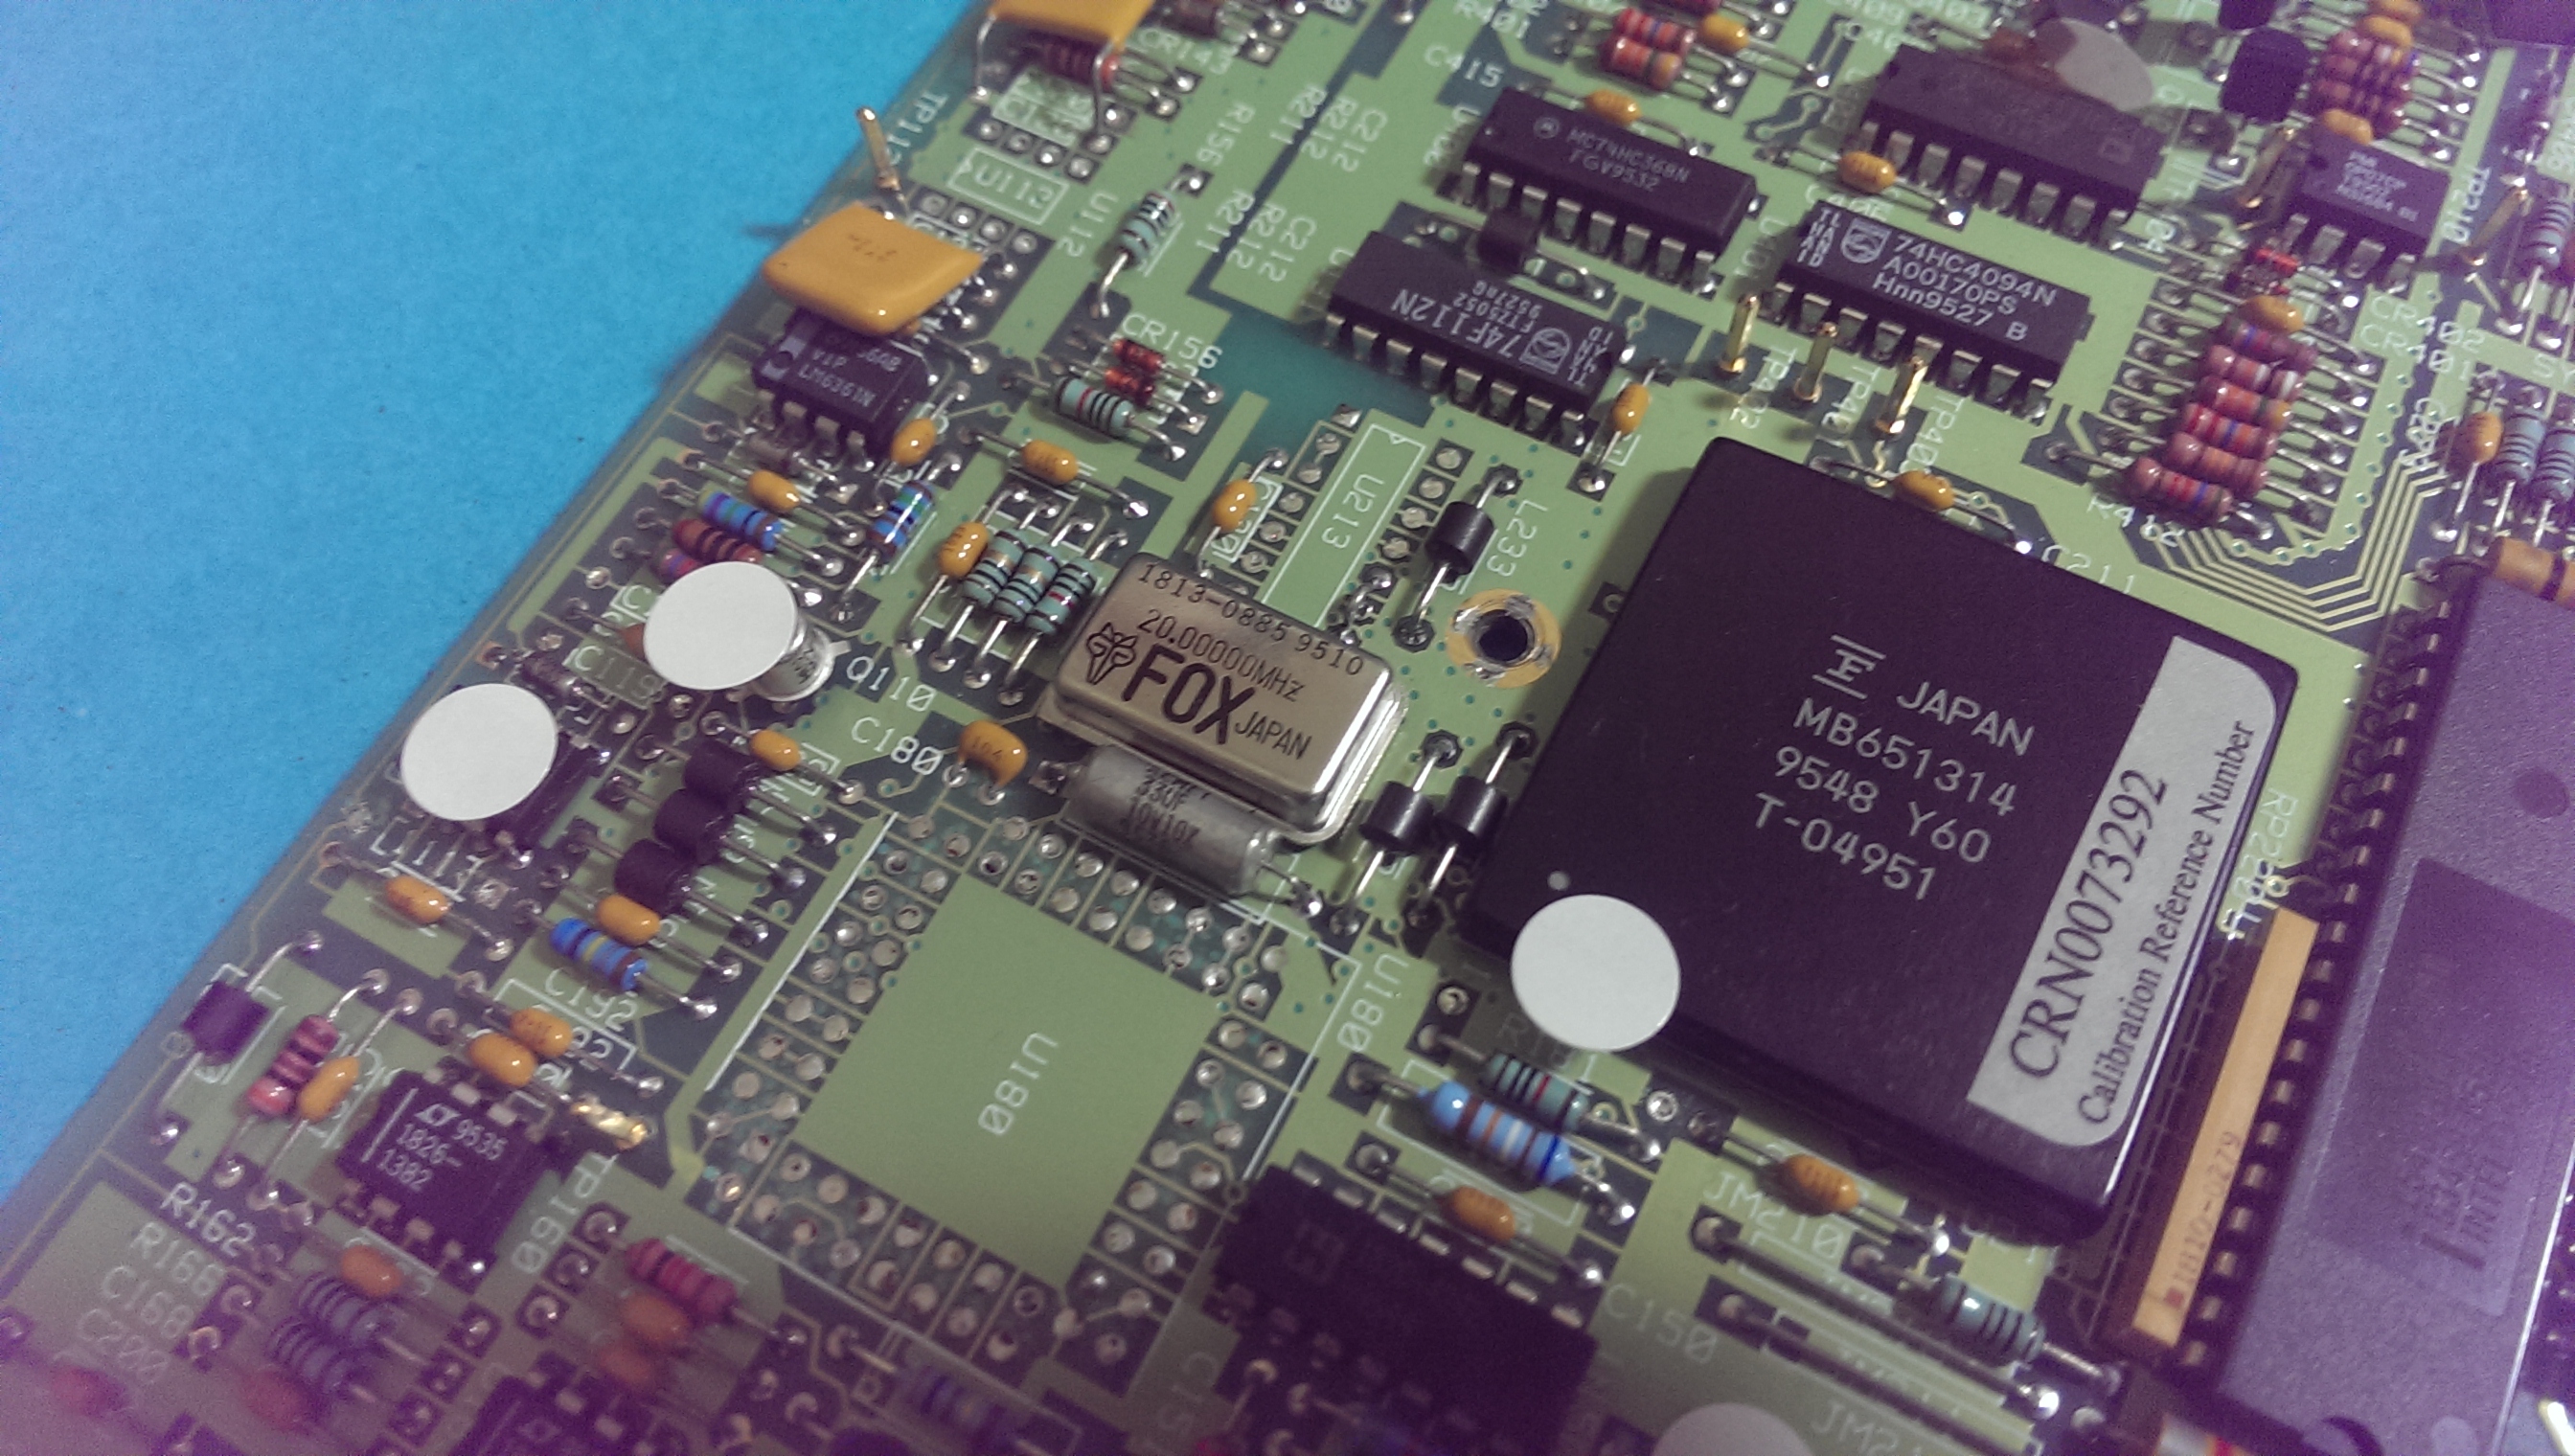
Photo A (left): Smartphone shot, PCB view. Photo B (right): Smartphone shot, closeup shot
Of course, this comparison is pointless to be precise, as any dedicated camera would be better than phone or tablet. We just keep seeing these low-resolution pics in so many places, that some readers even having good photo setup are too lazy to take it out and use it, posting barely readable images instead.

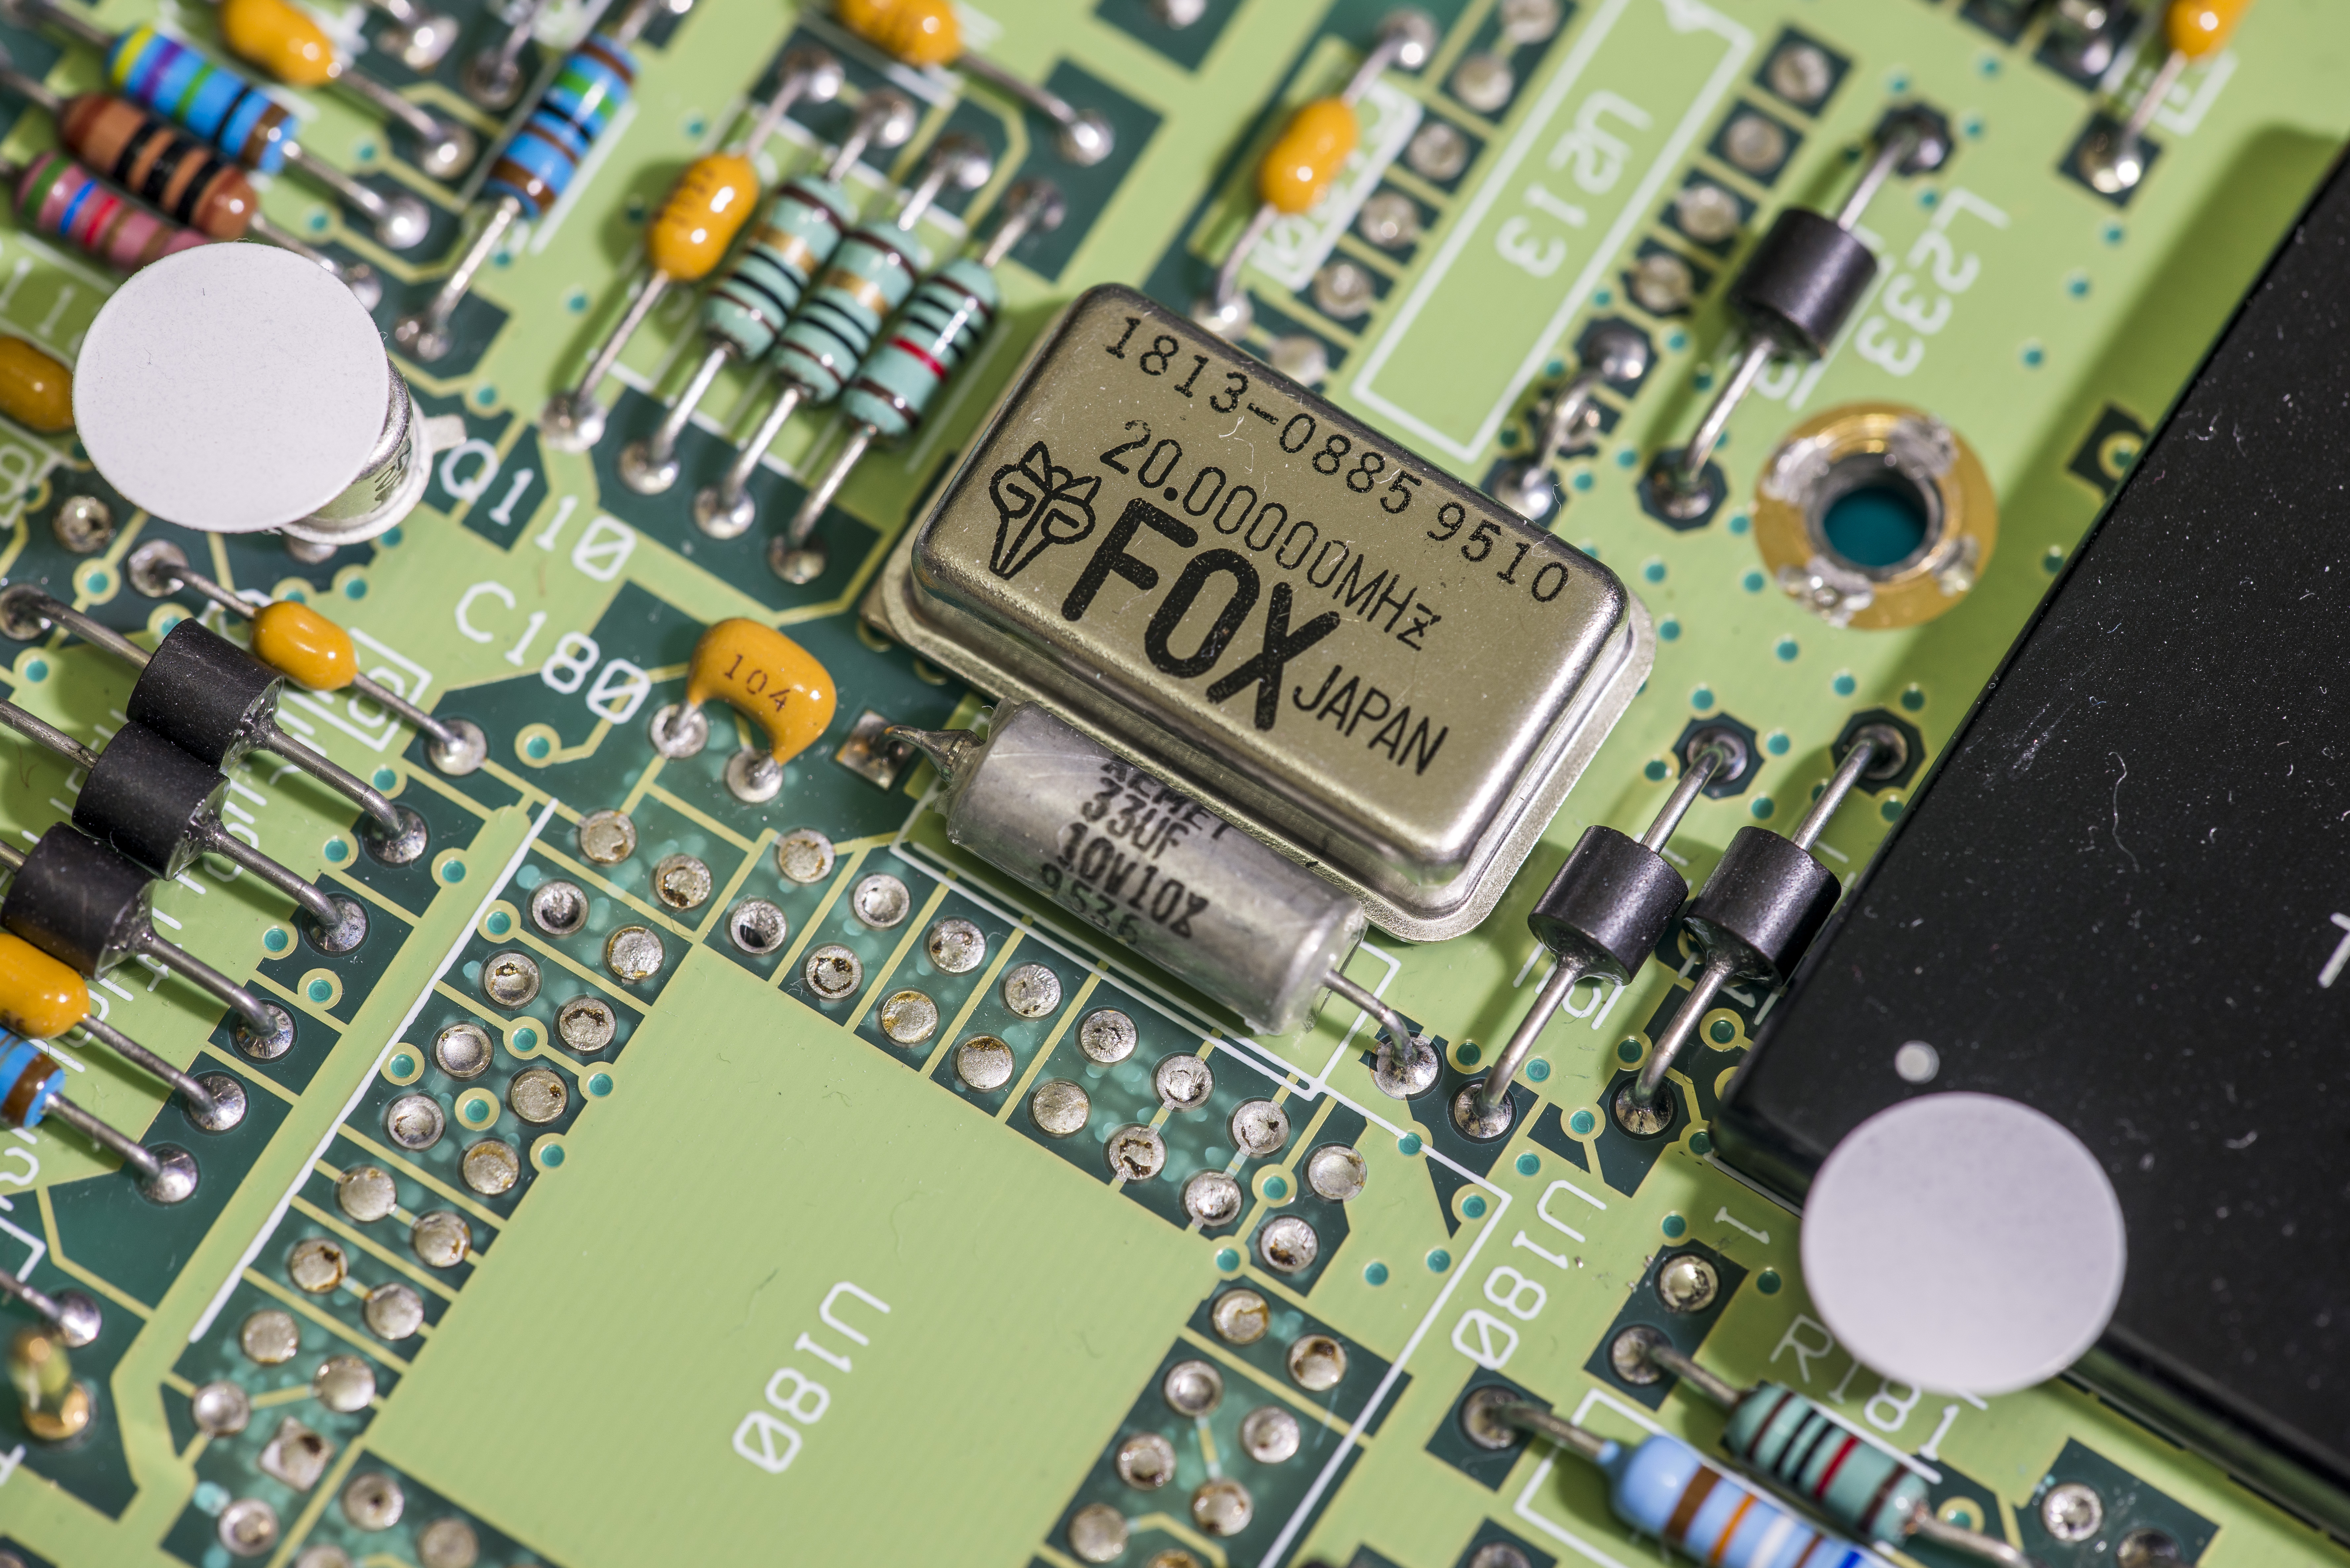
Photo A (left): DSLR image, PCB view. Photo B (right): DSLR macro closeup shot
No comments on this one :)
Incorrect focus or out of focus
Common mistake taking photos of static objects, like PCB lying on the table is to use camera’s autofocus. While it could work fine most of time, it can also result focusing on wrong part or even get completely out of focus at moment of shutter release. For most of mid-range cameras it’s easy and convenient to use manual focusing, to point exactly object and view you want. For example, close-up image on small TSSOP IC marking would be ruined if camera decides to change focus on nearest bulky 7805 TO-220 case with heatsink. You will get super sharp image of regulator, but unlikely to read anything on TSSOP package which just 10 mm away. More expensive DSLR cameras have this problem even wider, due their narrow sharp focus area and sensor size.
Again it’s not because all these people cannot take photos, or don’t know what they are doing, it’s due to lack of experience in new area, such as photography, for most of them.
Surface alignment for straight PCBA shots
It’s not rare to see top photo of circuit board, on which everything in center is sharp and nice, but features on left/right side are all blurred out. It’s usually happening when focal plane of camera’s image sensor is not parallel to object plane.
This is visible by lack of focus on either left or right side of PCB photograph, while center is perfectly sharp. Spend few minutes to make camera lens looking straight at PCB, not at angle, unless you specifically want that. Use LiveView function with digital zoom function on camera, to see that focus is good on both sides of photo.
Background
Most of engineering caves are messy. Some are more, some are less. While it’s up to you, how to keep lab running, having non-relevant mess on photo would not be such a great idea for reader. Unless it’s really hard to do, try to remove not related items from your photo, to focus on things which really matter. You don’t have to clean your lab for every photo, as often it’s enough just to cover bits and wires with sheet of white printer paper. Here are example below:
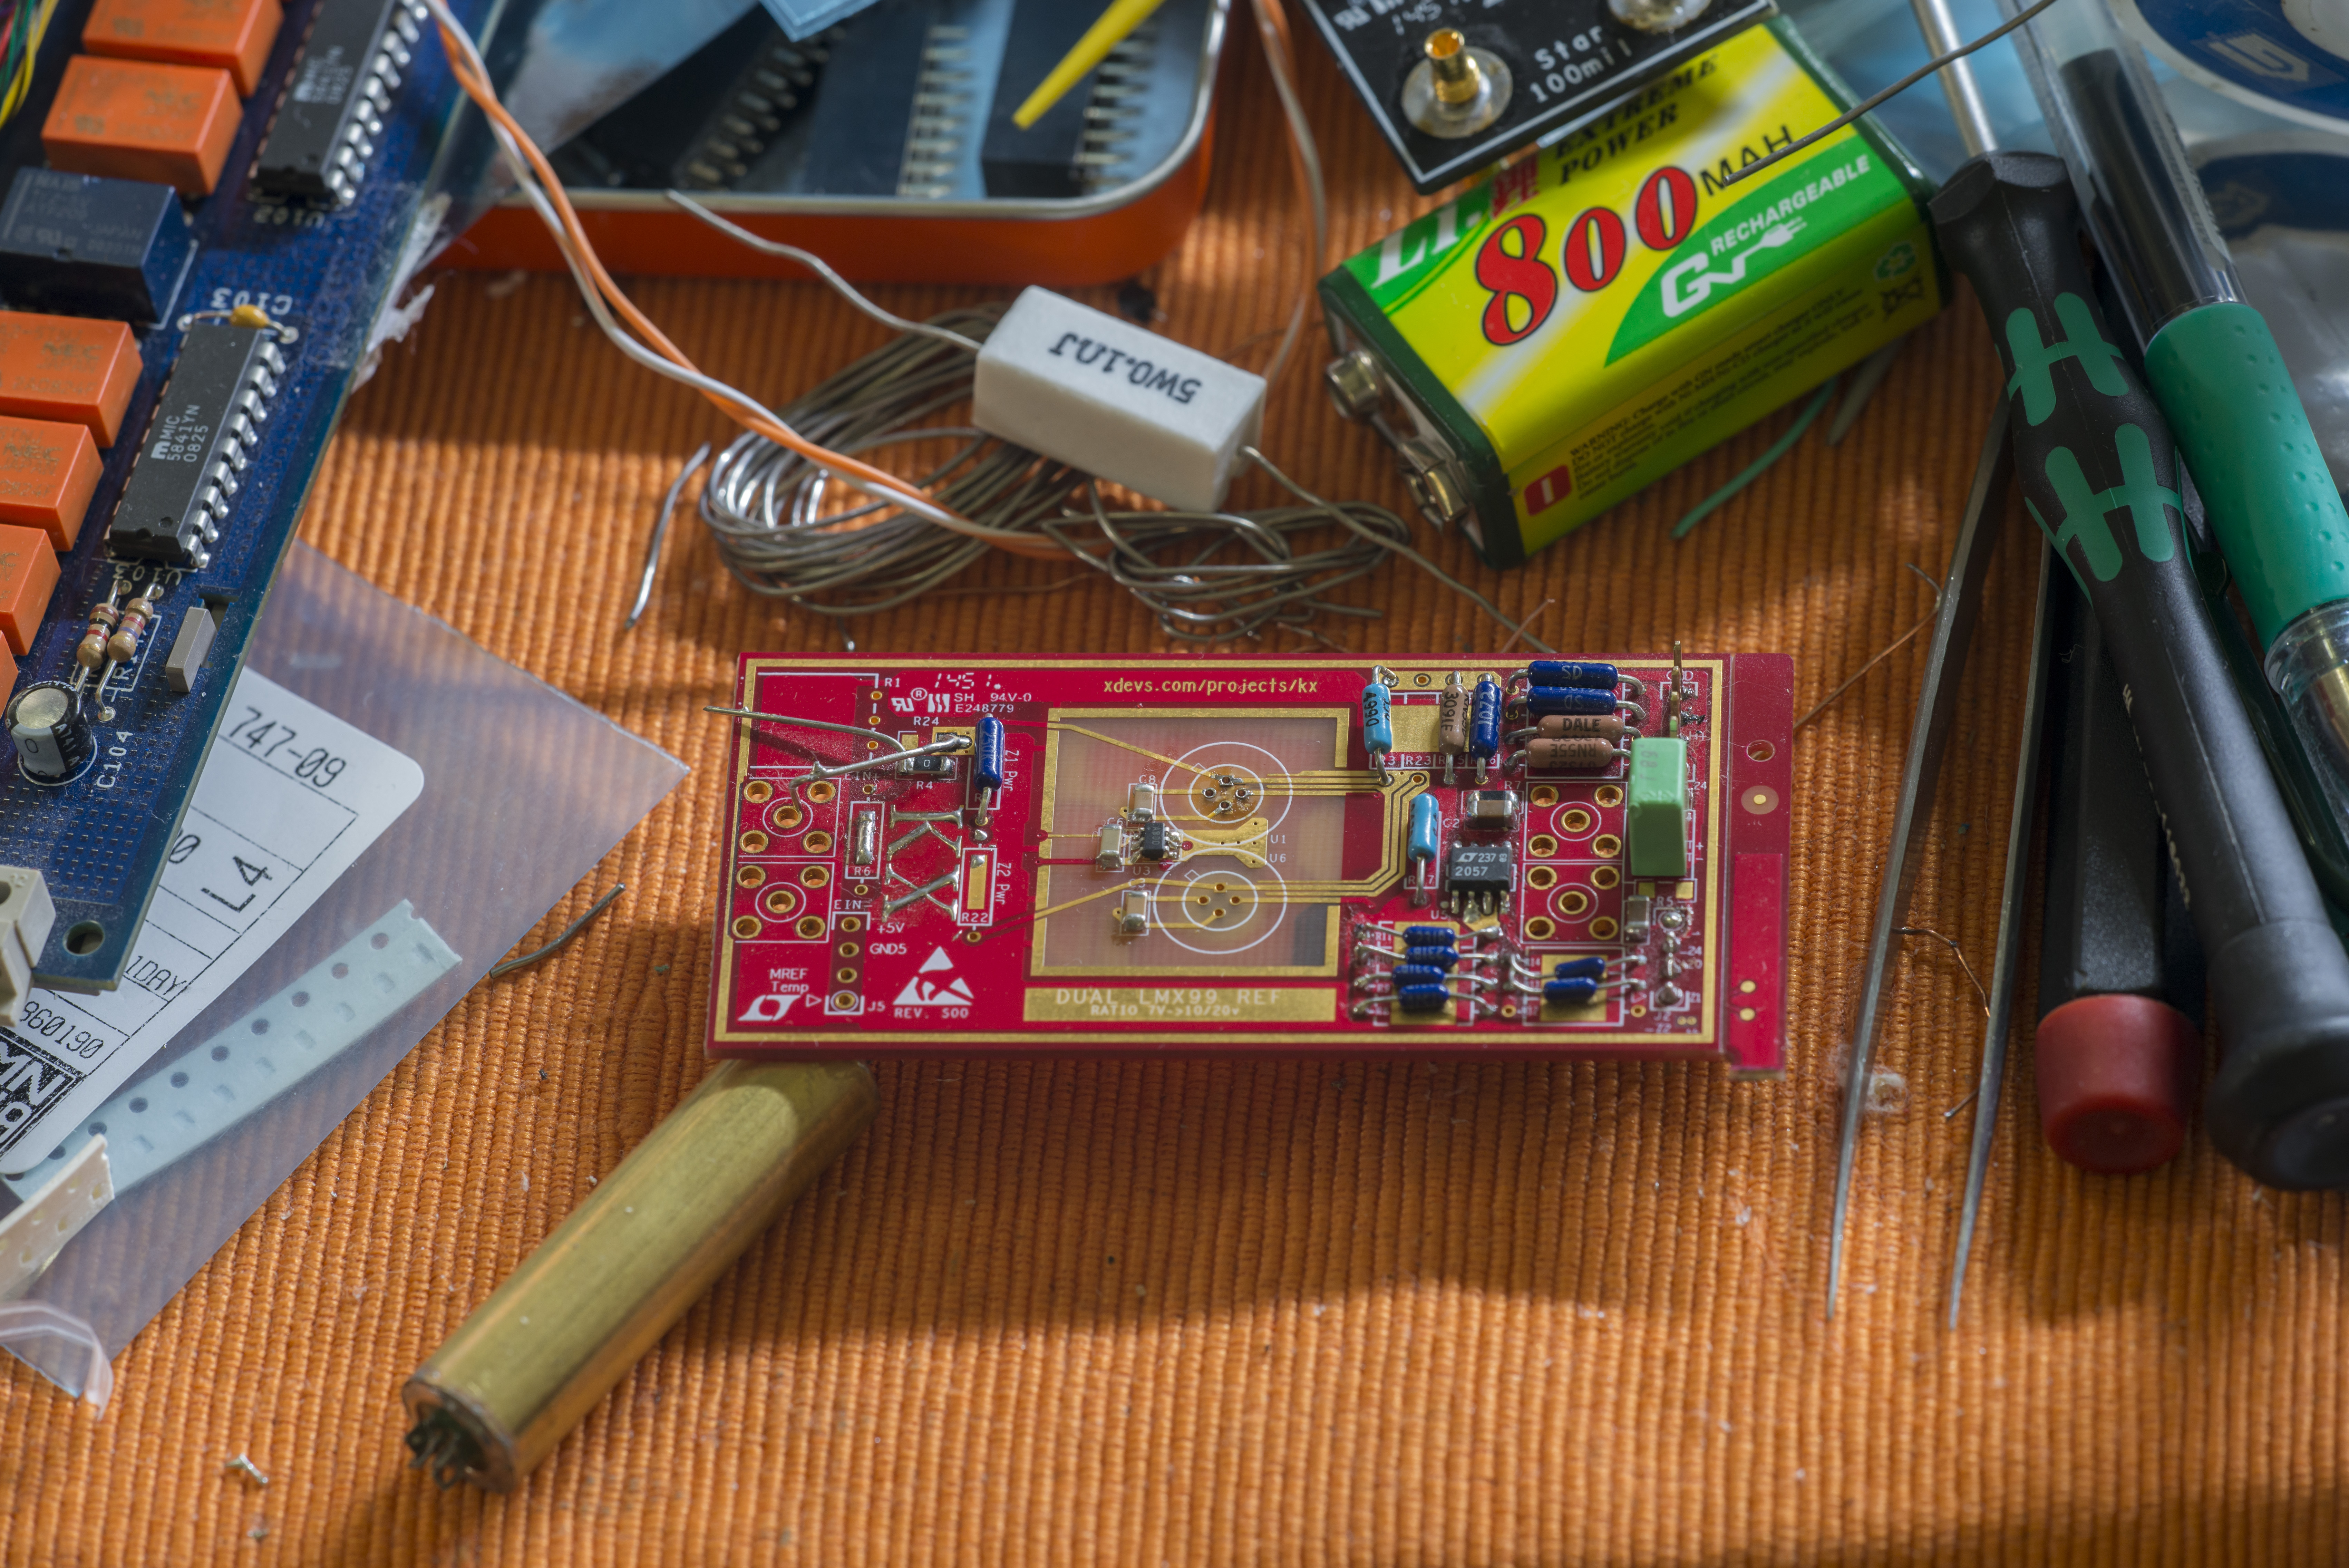
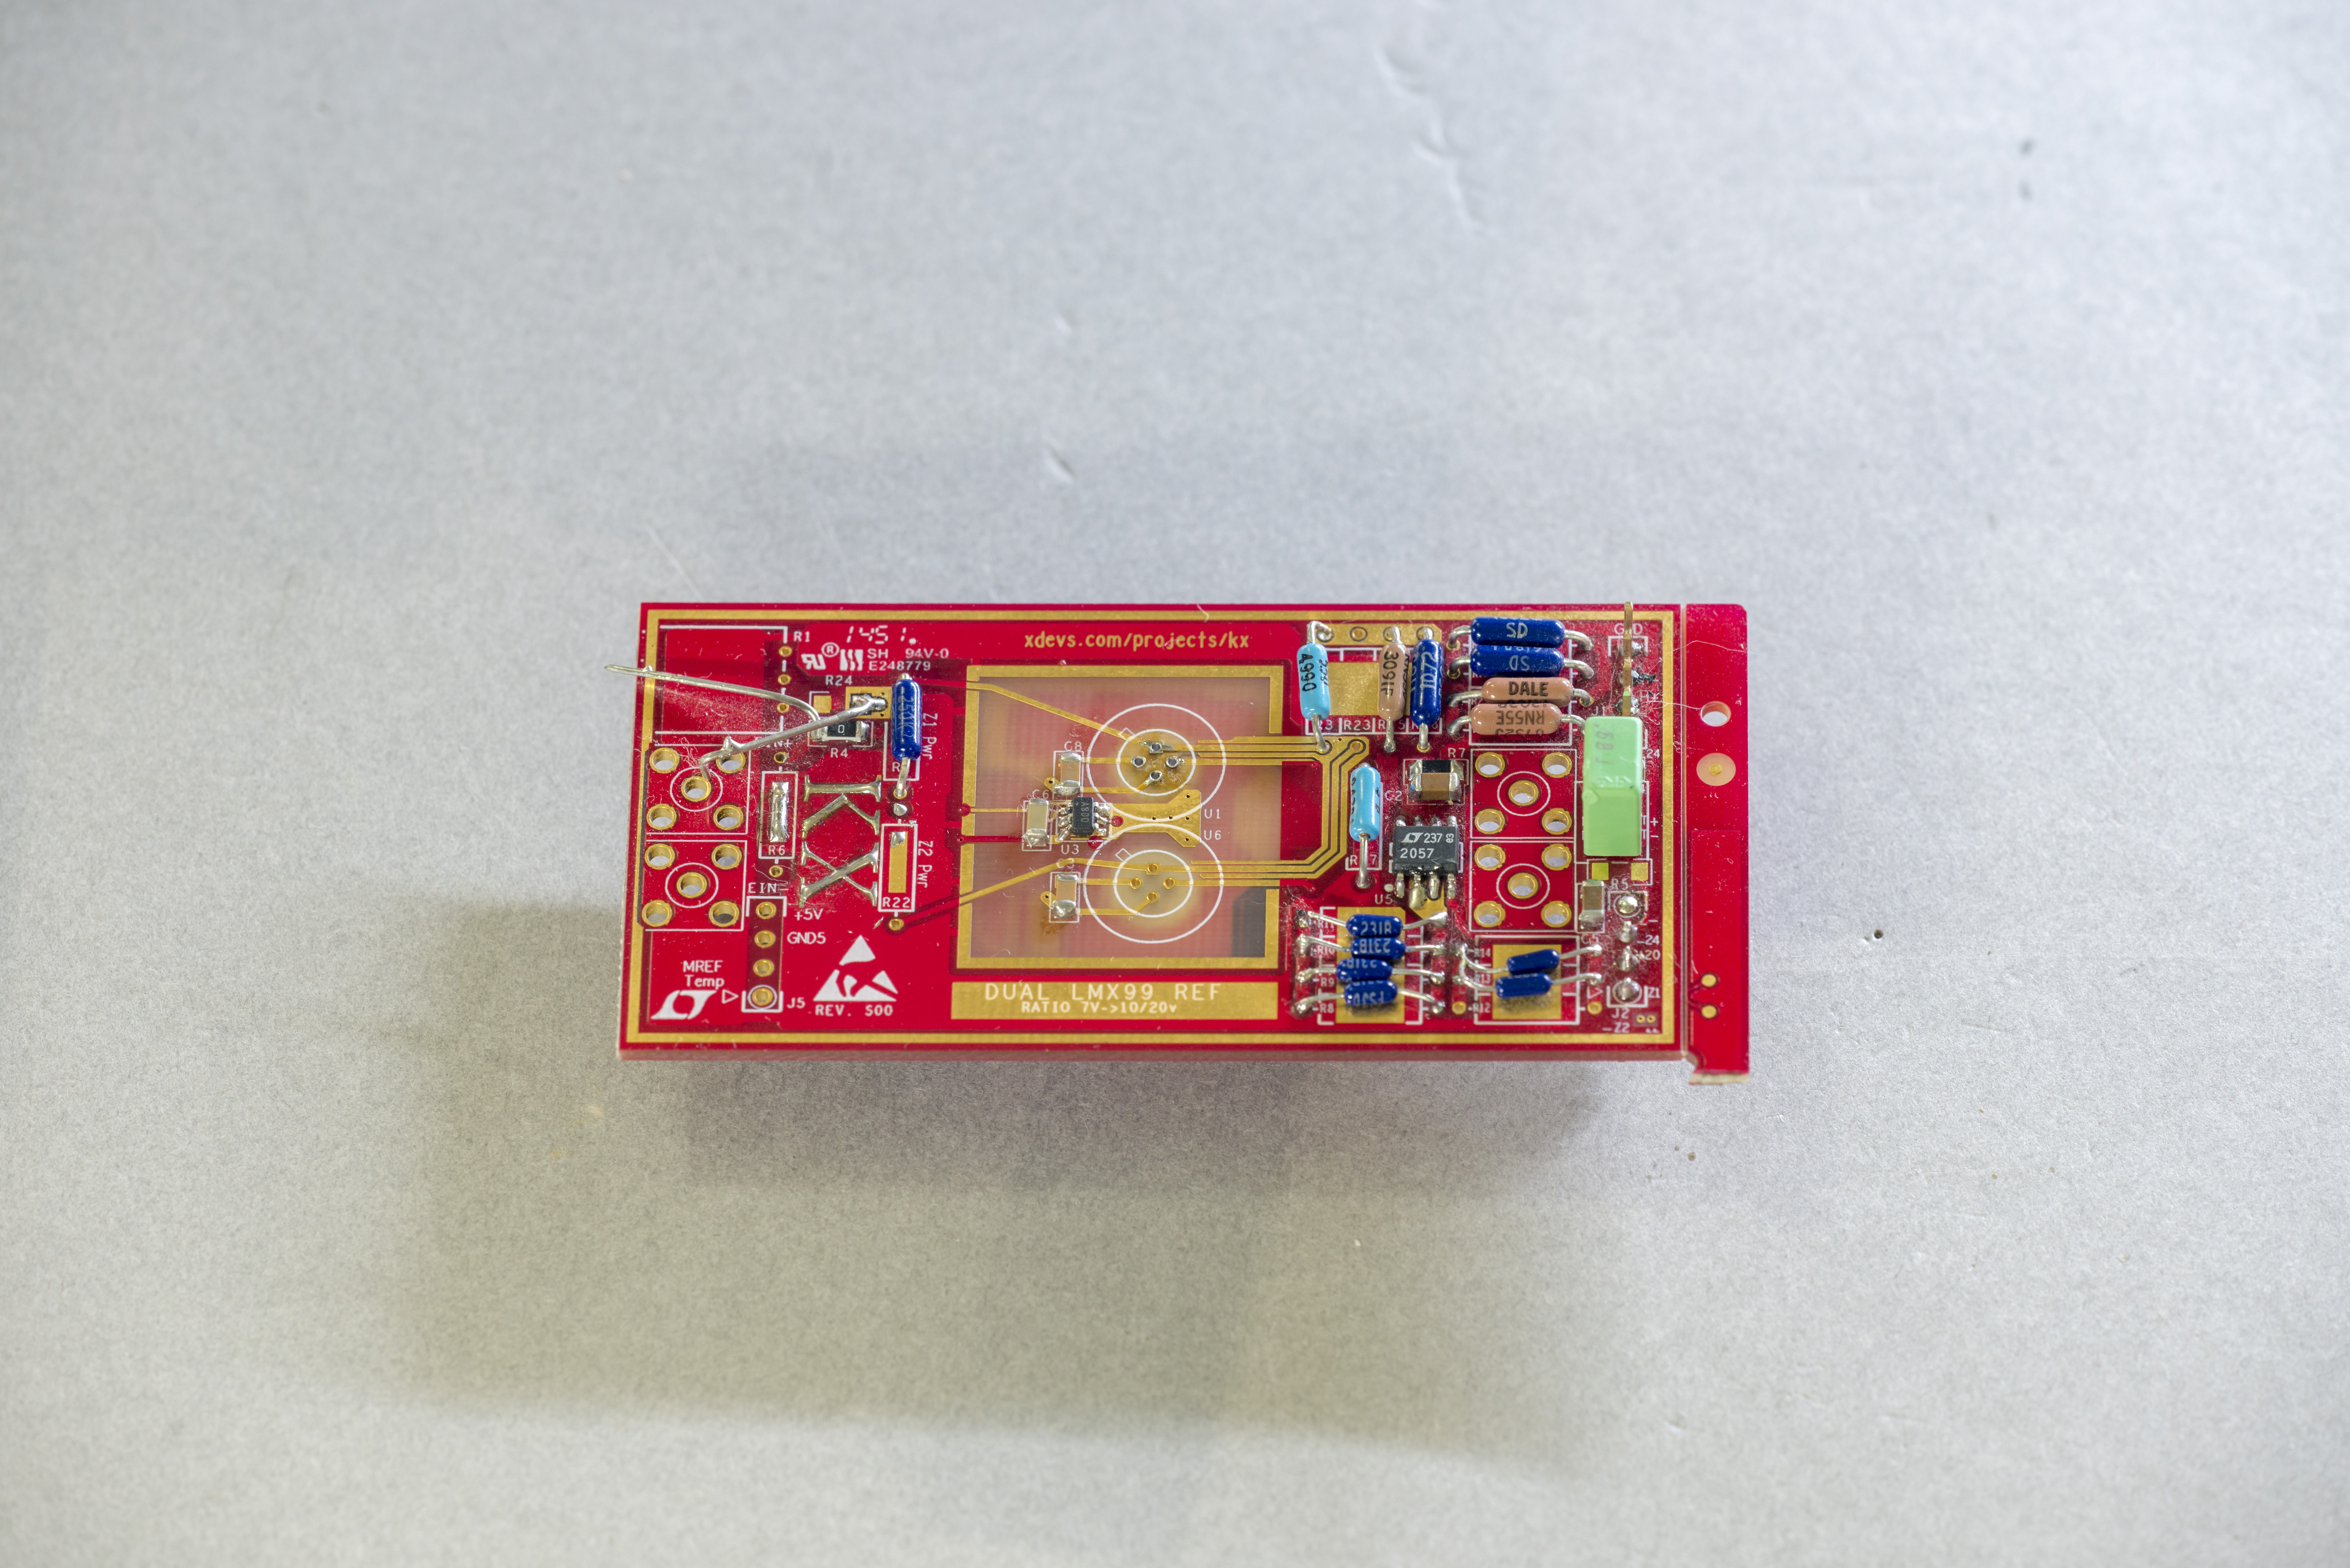
Photo A: Mess on the table around test board (left photo). Photo B: Test board with background (right photo)
Can you tell what I was trying to show on left shot? While message of test board looks is clear on right image. Having few sheets of regular colored paper sheets handy to make a quick photography background. Having them in big A3 size can provide enough area to have even rather big PCB shots without problems.
Super-macro trick
Sometimes on rare condition, one might need to have photo of very tiny component or detail. Usually such photos involve use of expensive microscope optics and specialized coupling with camera body, but for one-off case it’s possible to do something without spending any money, just with common prime lens.
Lens has two light planes, front and rear. In usual cases, we have light entering lens front element and directed to camera sensor thru lens optics. What will happen if you reverse the lightpath, by positioning lens in reverse direction, with front of lens facing camera sensor? You will get magnified image on sensor, which can be used as extreme case of macro. This works best with 20-28mm focal length compact prime lenses. You can try with 35 or 50mm as well, but magnification is usually too big and focusing DOF is really narrow to get decent results. There are even cheap reversing rings and adapters available from various eBay sellers to make this all easy to operate.
There are numerous examples on web of using this trick to get insane amount of magnification, such as here or here, or here.
Benefit of this trick is that it cost almost nothing to try.
Tips for beginner hardware photographers
Now, knowing all discussed in previous chapter, we can make a list of handy first-aid tools to save your photos. It is kept inexpensive, but yet providing maximum outcome for best result.
- Tripod, any generic cheap model would do fine, can be bought for ~25-50$. Better to have one which can extend tall enough to take overview shots.
- Simple LED flashlight for long-exposure lightning/difficult areas. Almost any engineer have bunch of white LEDs laying in jellybean box, so it can be even DIY, just 10-20 white LEDs and battery will do the job. 5-15$
- Few clean A2/A3/A4 sheets to use as diffusers and reflectors for lightning or backgrounds. 1-10$
Use 5-10seconds timer when using camera on tripod. This will save photo from shaking blur, and will allow getting most of camera resolution and sharpness.
Wise to set highest resolution and quality for JPEGs in your camera, so quality would not be compromised. Much better to have high-resolution source file to work with cropping/resizing on your big computer big screen, than thinking what to do with 800×600 pixel photo already cropped before on camera, and there is no possibility to retake photo again.
Don’t forget to clean your board/hardware prior to taking photos, it’s not very visually appealing to look at dirty boards with dust specks and hair stuck between pins and components :).
Photo examples and setups used to make them
Few example images were shot, to provide you an example of used gear setup. Let’s go with each one, and discuss applied technique.
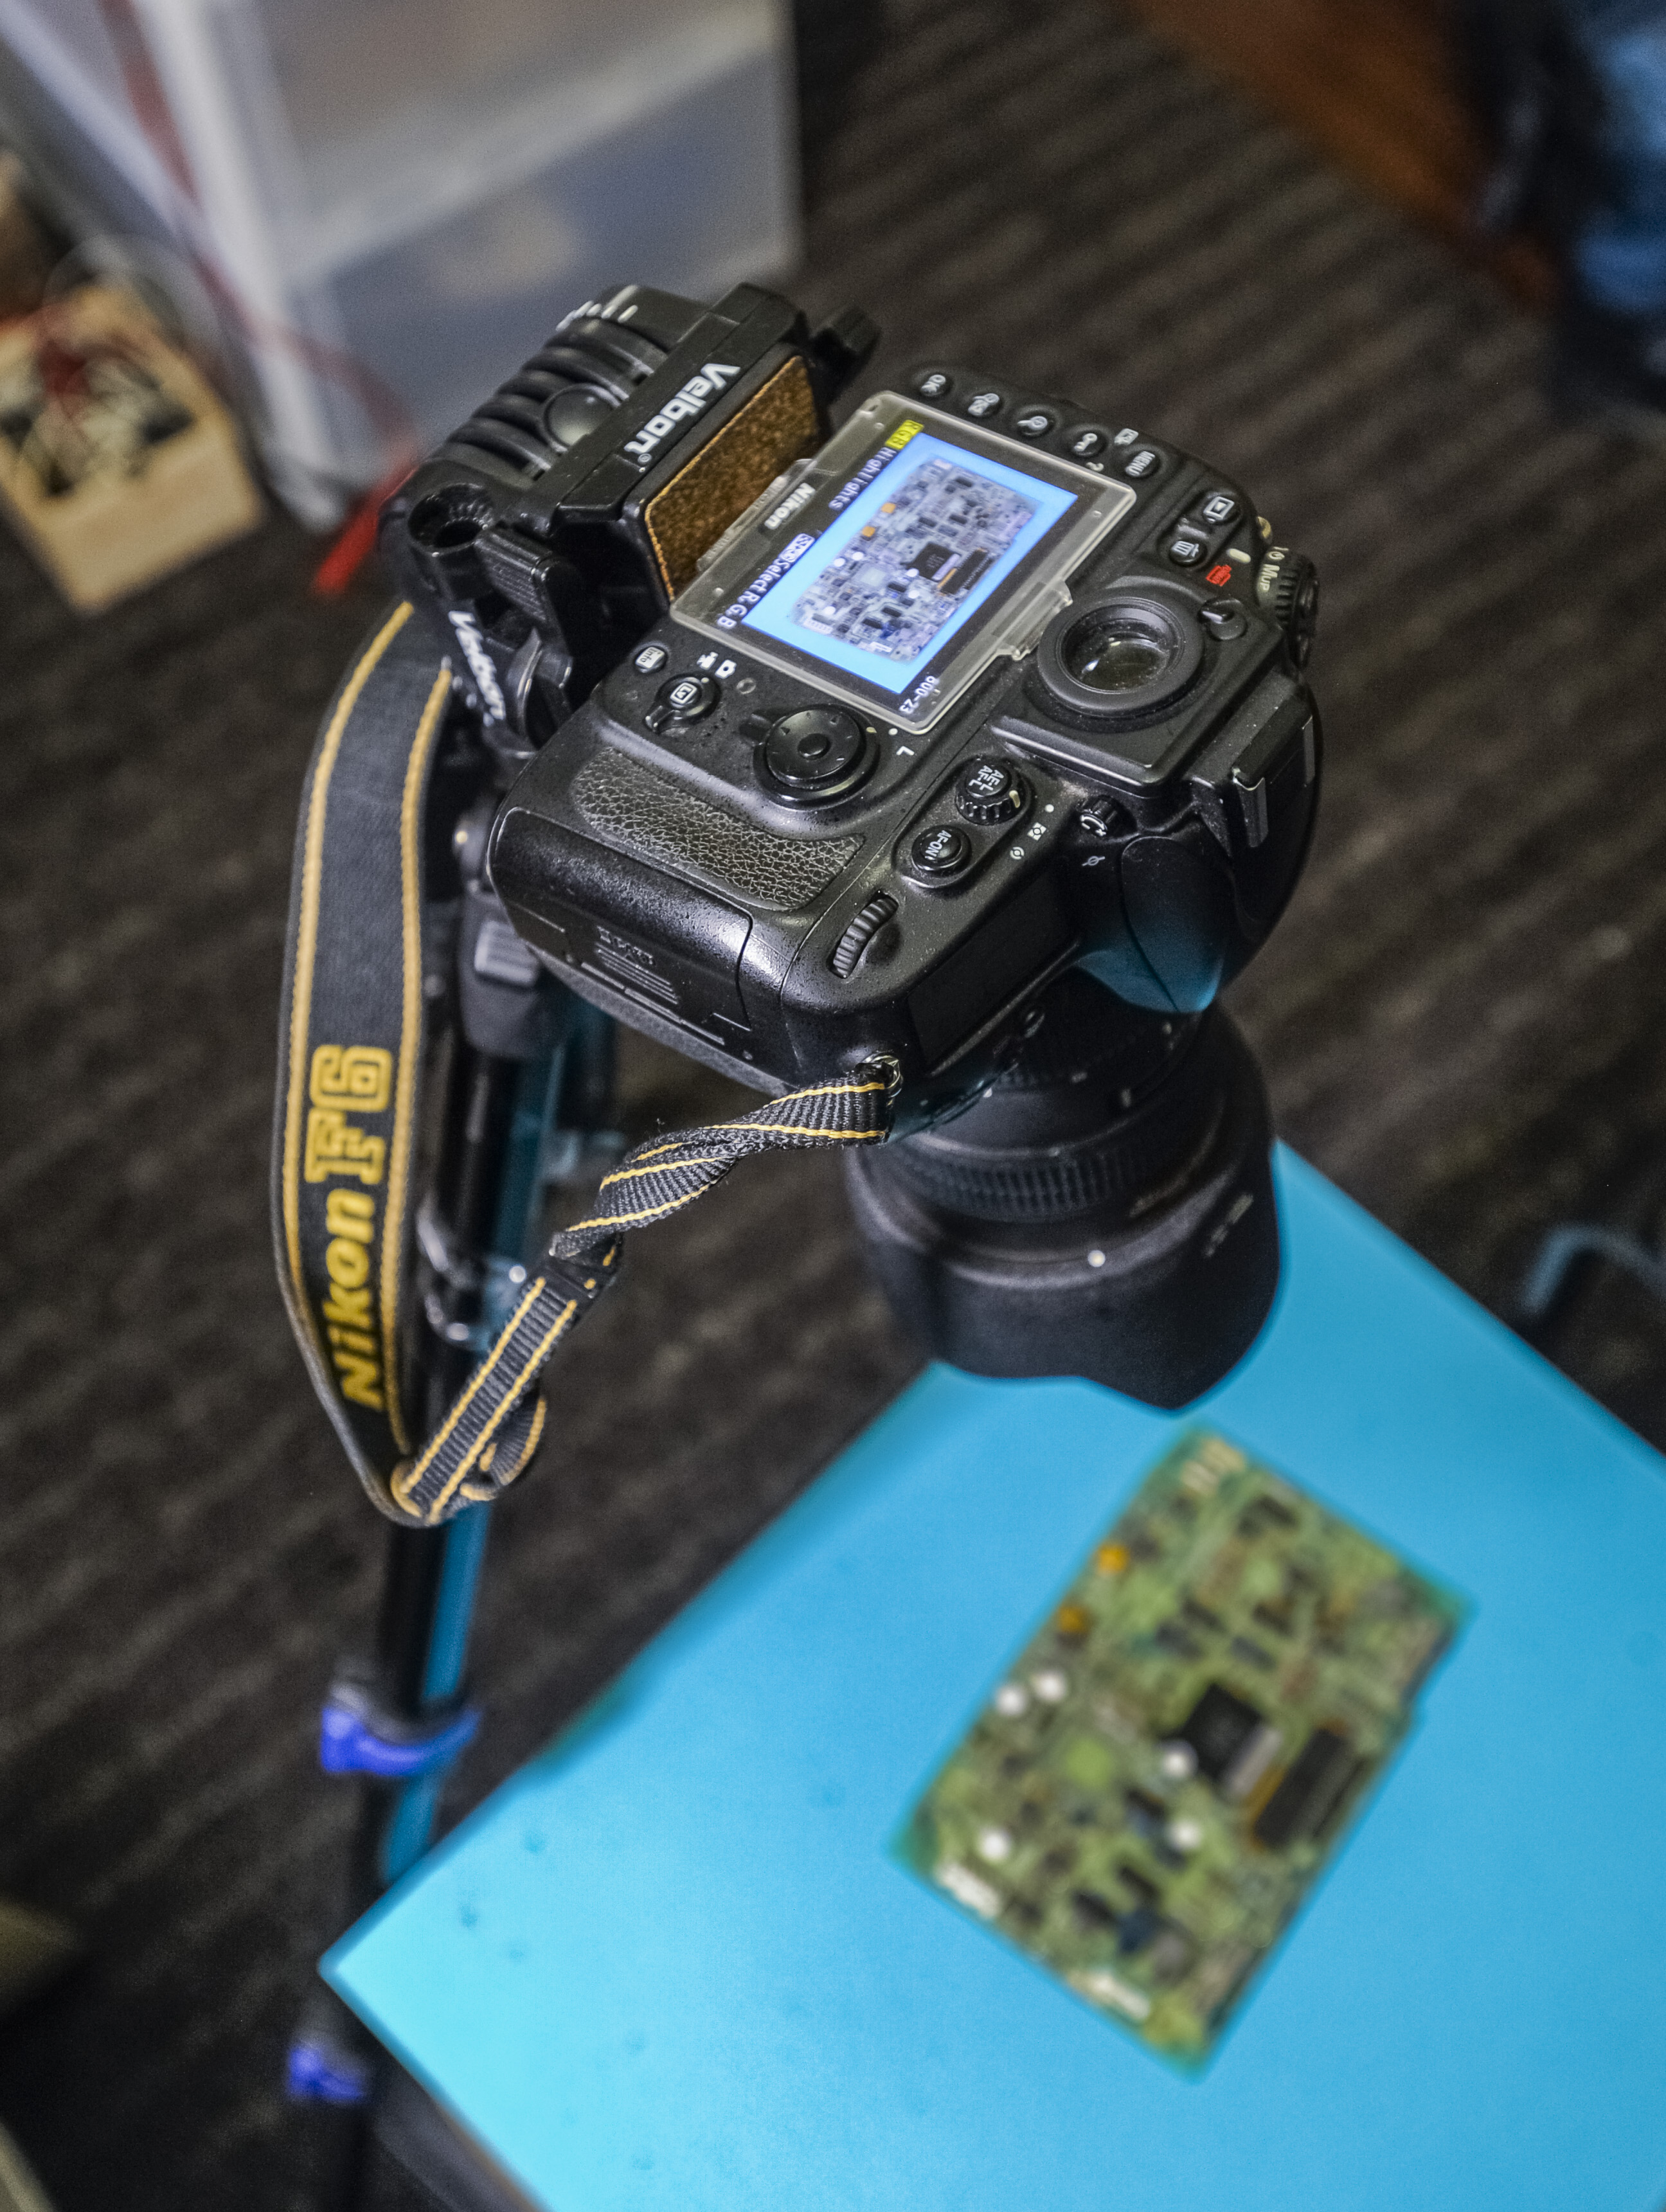
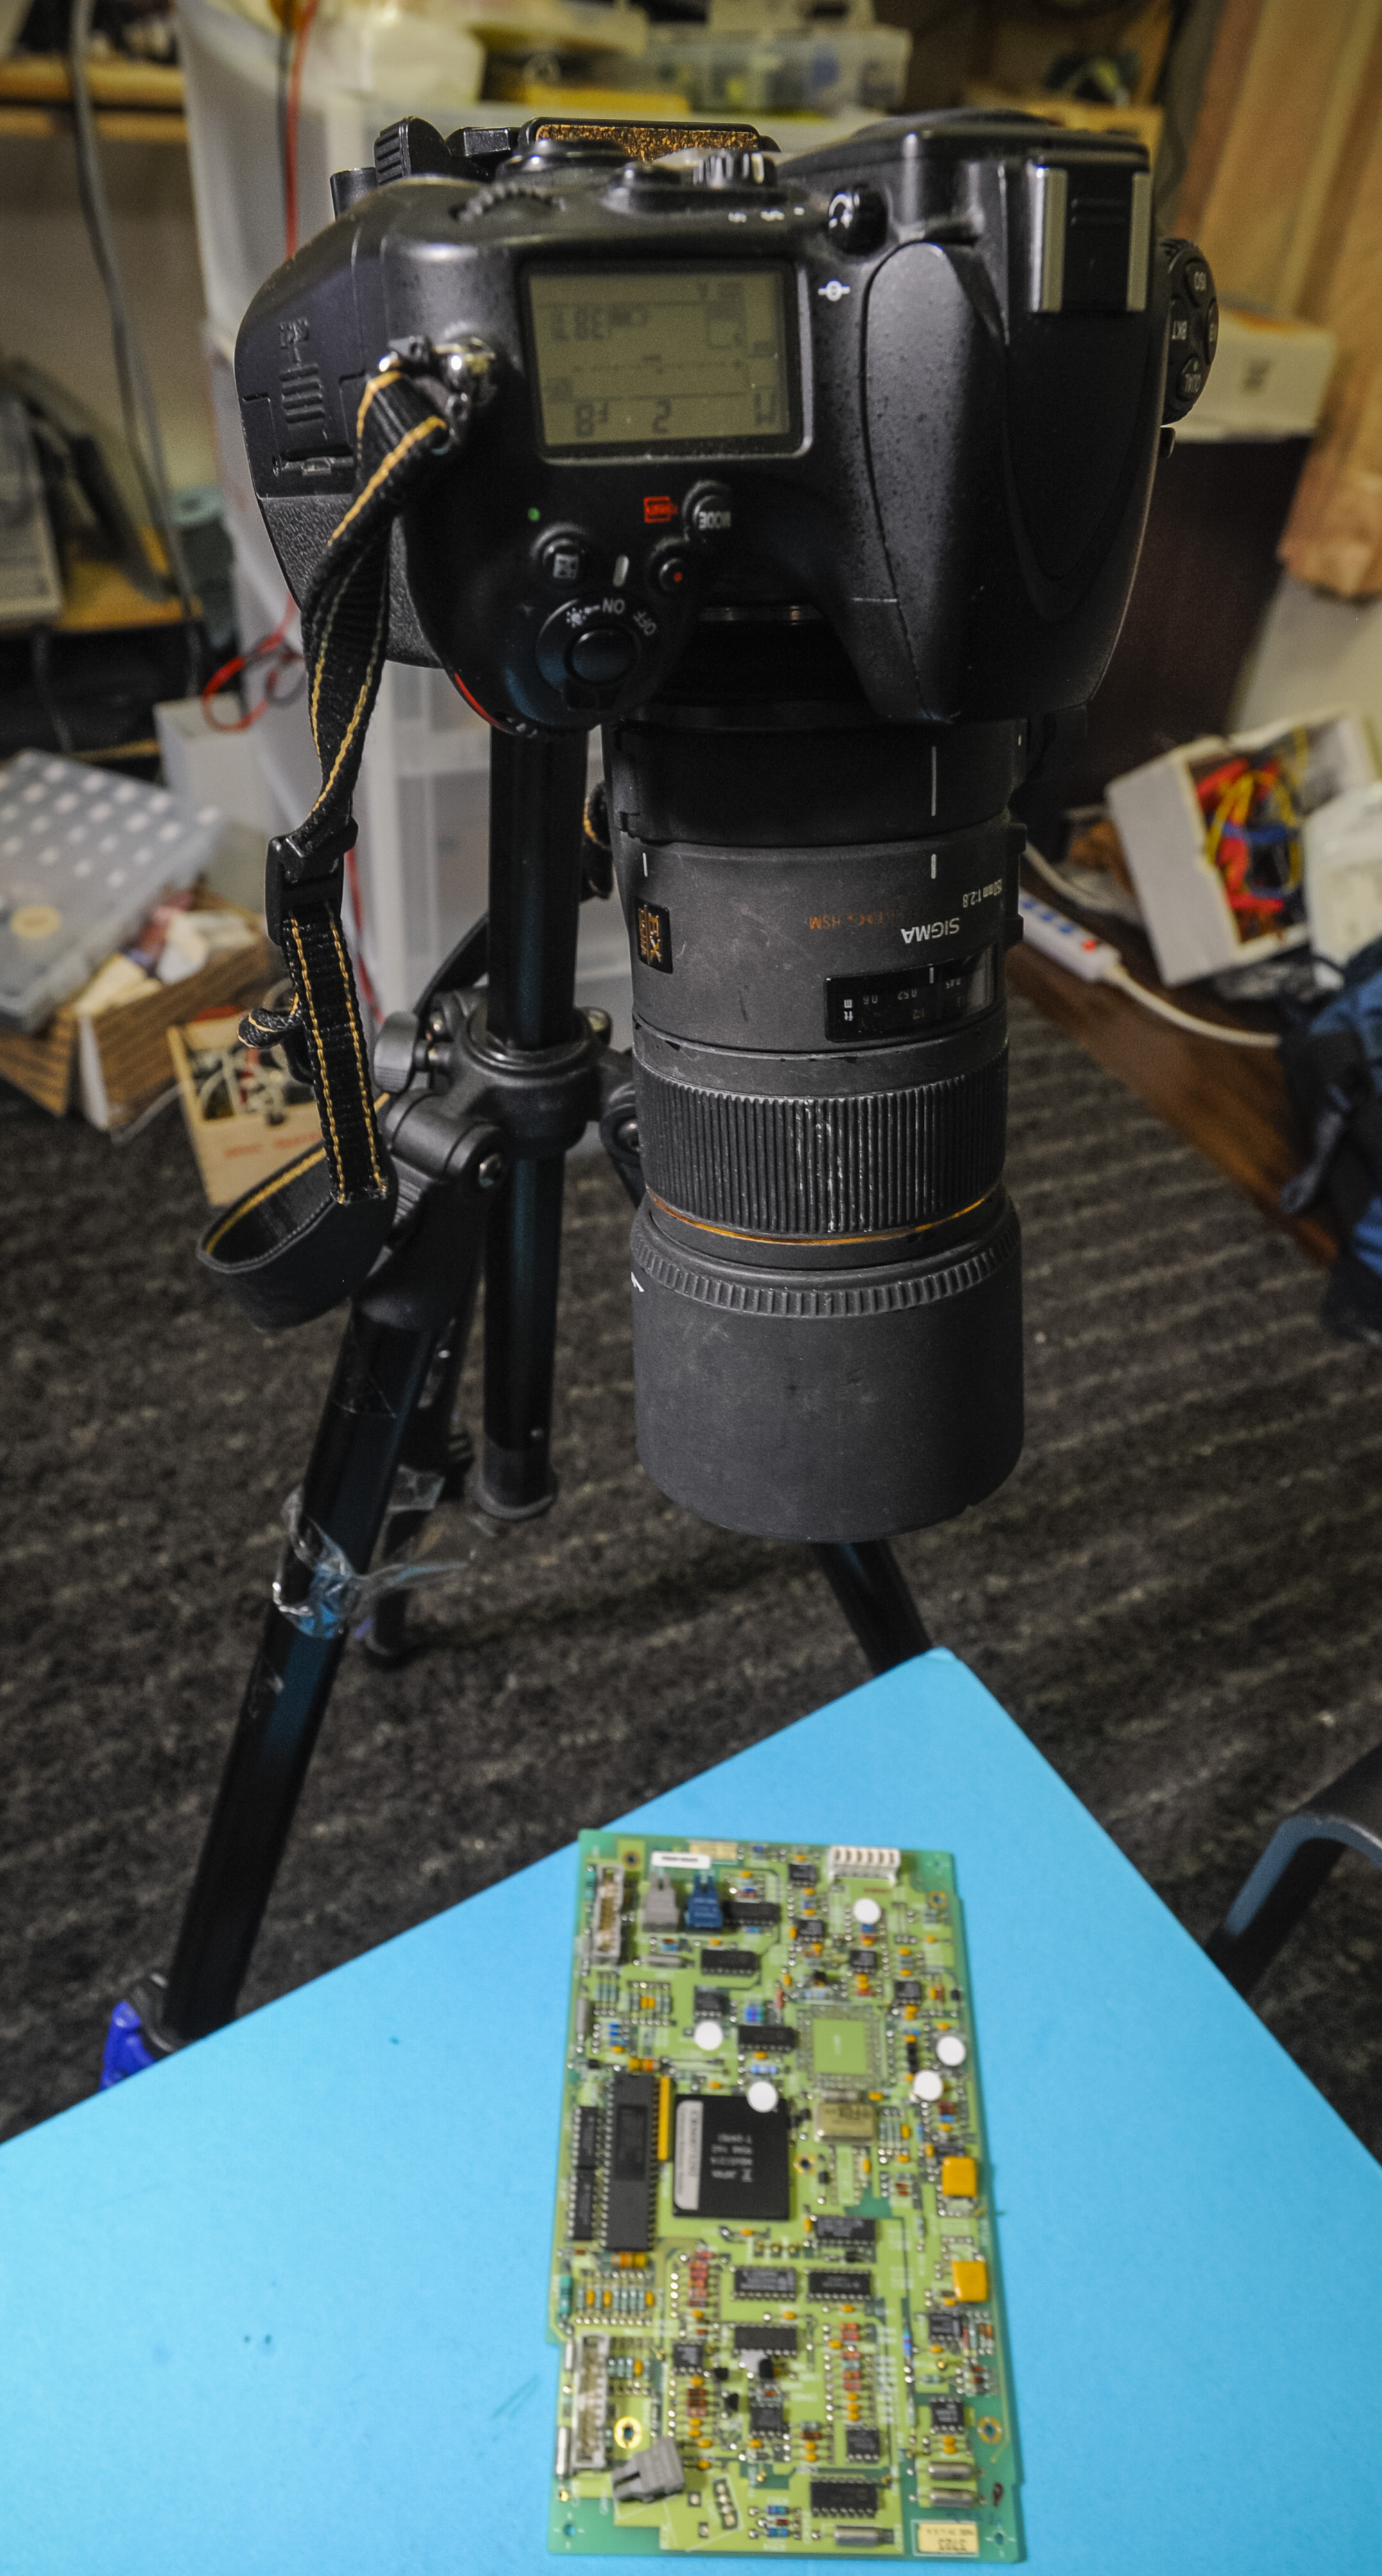

Photo A: Random quick shot of PCB using normal zoom, 28-70 (left), macro lens (middle) and overall ambient lighting in room (right)
Keithley 2002 A/D board photo

Used gear:
- Nikon D800 camera
- Sigma APO DG Marco 180mm f/2.8 lens
- Tripod
- LED flashlight
EXIF Data
F-Number                         : 7.1
ISO speed ratings                : 100
Shutter speed [s]                : 1.00
Max aperture                     : F2.8
Metering mode                    : Multi-segment (5)
Flash                            : No flash
Focal length [mm]                : 150
Exposure mode                    : Manual (1)
White balance                    : Auto (0)
This photograph was taken in dark room, with only 15W of soft ambient light, with white LED flashlight pointed around. Hence longer exposure was used to get proper exposure, 1 second in this case. Aperture was closed up to f/7.1 to improve sharpness on thicker components like DIP8 packages and PLCC socket.
Focus was adjusted manually using LiveView to have SMD 1206 components surface in focus. Minimum ISO 100 is active to keep pixel noise low.
Camera was fixed on tripod about 1 meter away from PCB, and released by using 10 seconds automatic timer to avoid blur.
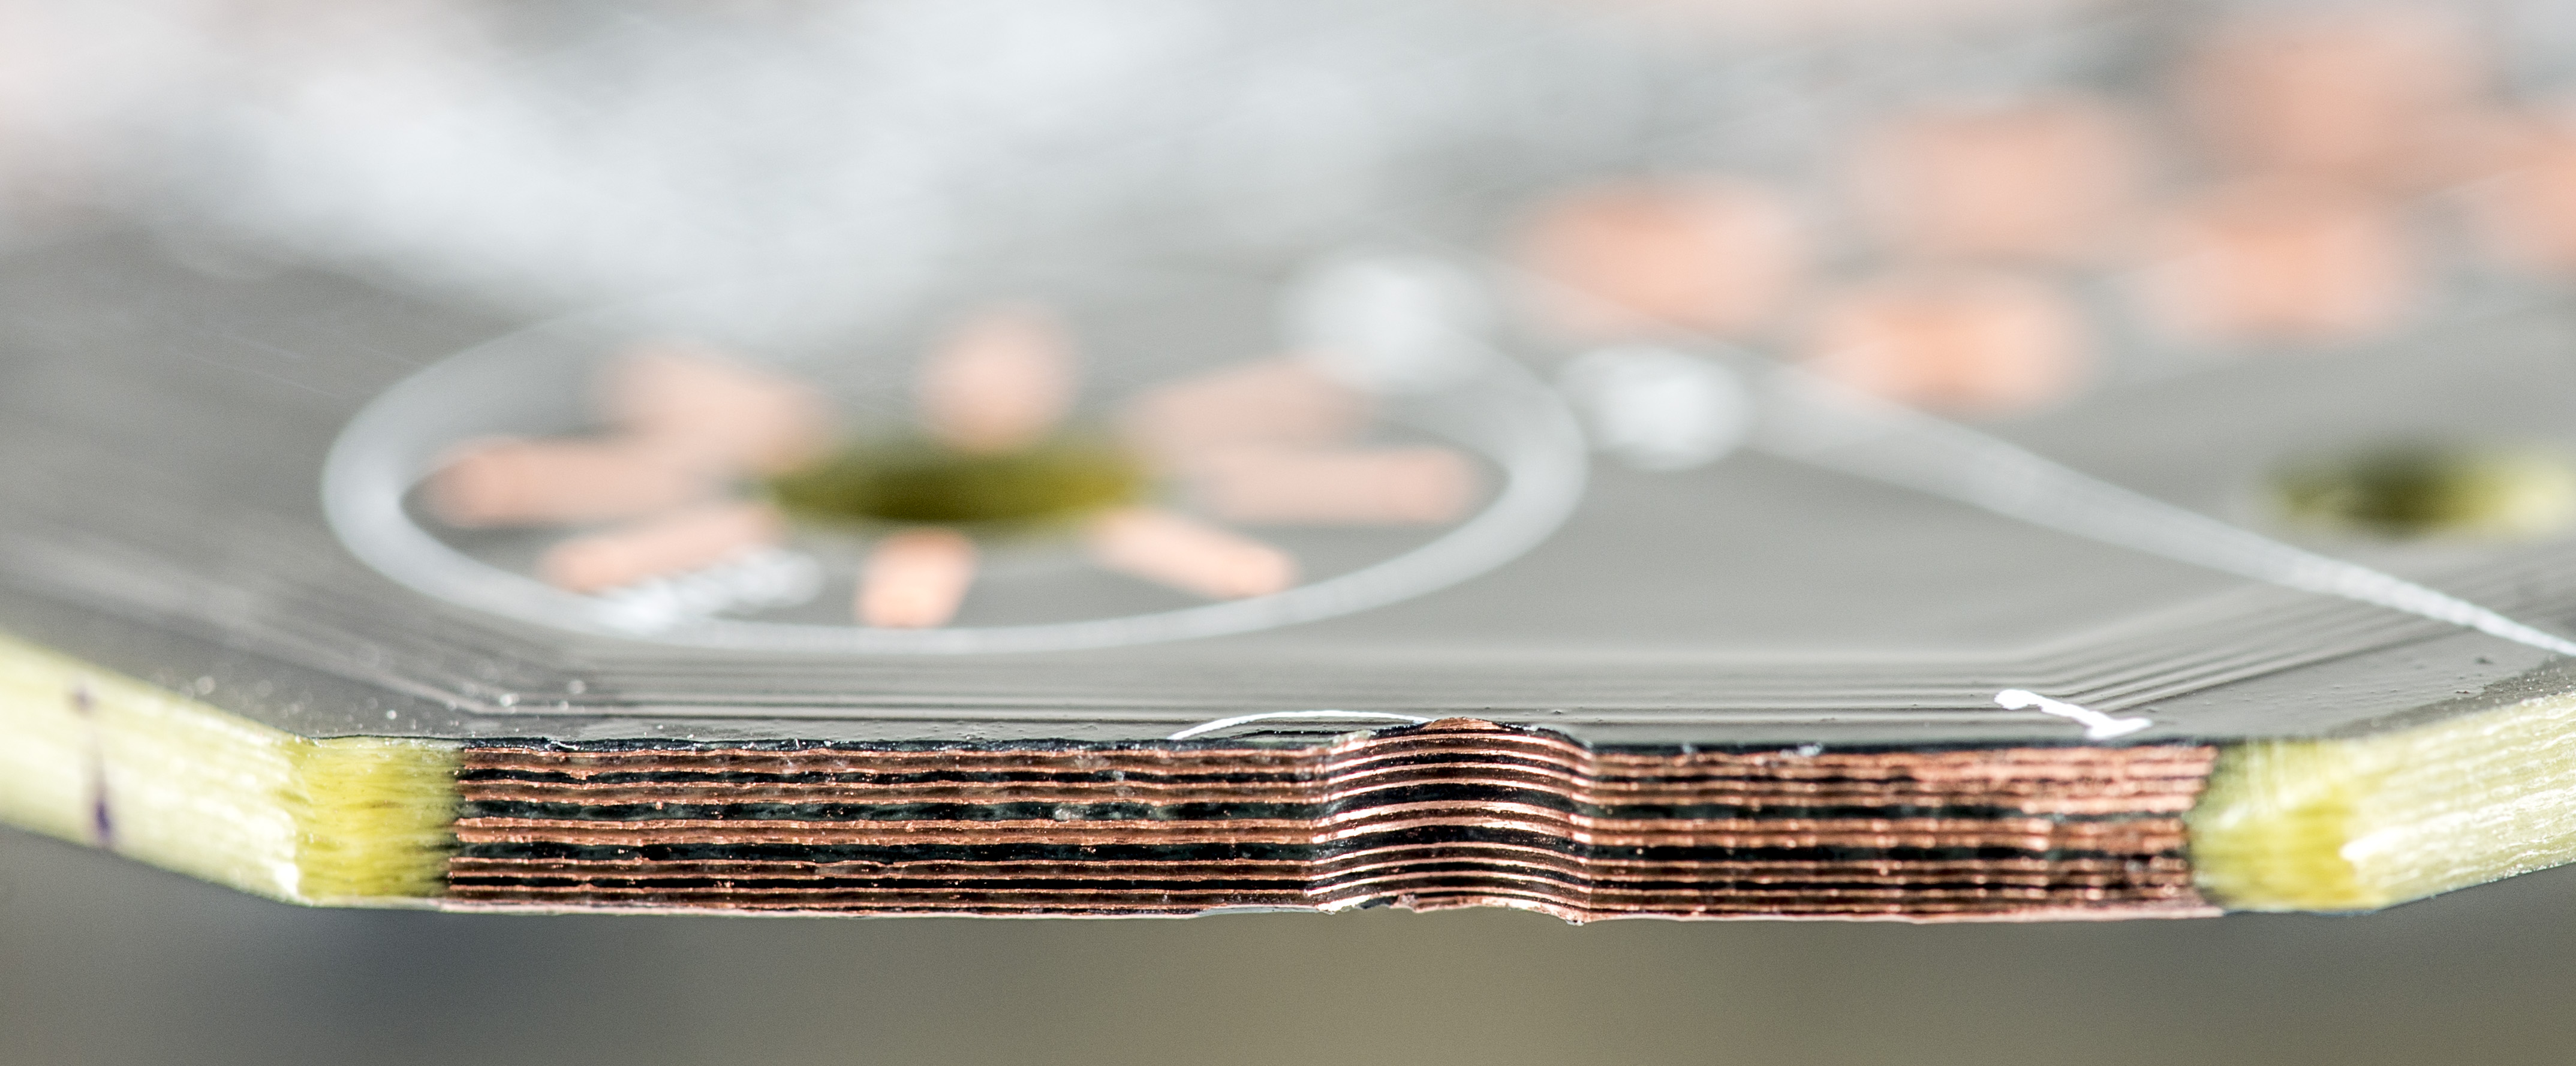
Close-up photo PCB stackup
Used gear:
- Nikon D800 camera
- Sigma APO DG Macro 150mm f/2.8 lens
- Tripod
- LED flashlight
EXIF Data
F-Number                         : 8.0
ISO speed ratings                : 100
Shutter speed [s]                : 0.33
Max aperture                     : F2.8
Metering mode                    : Multi-segment (5)
Flash                            : No flash
Focal length [mm]                : 150
Exposure mode                    : Manual (1)
White balance                    : Auto (0)
Sometimes even closer look required, such as this 12-layer FR4 PCB stackup photo. Same setup was used, as in ADC PCBA photo case, but this time camera and lens were located only 35cm away from PCB corner. LED flashlight was used to lit layers of copper in PCB, so image have good contrast and clear visibility of shining copper layers. Aperture closed at f/8.0 for optimal sharpness, and shutter speed is 1/3 of a second. PCB thickness is 1.75mm only, so this gives you idea about amount of detail possible to show using care with usual DSLR and macro lens. Minimum ISO 100 is active to keep pixel noise low.
If you are serious and taking photos of hardware on regular basis, consider investing into good one of 90..150mm range specialized Macro prime lens with repro ratio 1:1, which will allow to bring sharpness, quality and resolution of your photos to whole new level. These lenses specially designed to provide maximum sharpness and no distortion to image geometry. Also they can give really good close-up, since ability of focusing from near distance.
DSL module teardown
One could say that it’s not hard to take great photo with hi-end DSLR and macro lens. But it’s not the gear which takes good photos, but photographer which spend a little effort to make result good, with decent lights and setup. Photo below was shot 8 years ago, by cheap entry-level lens and old mid-range camera.
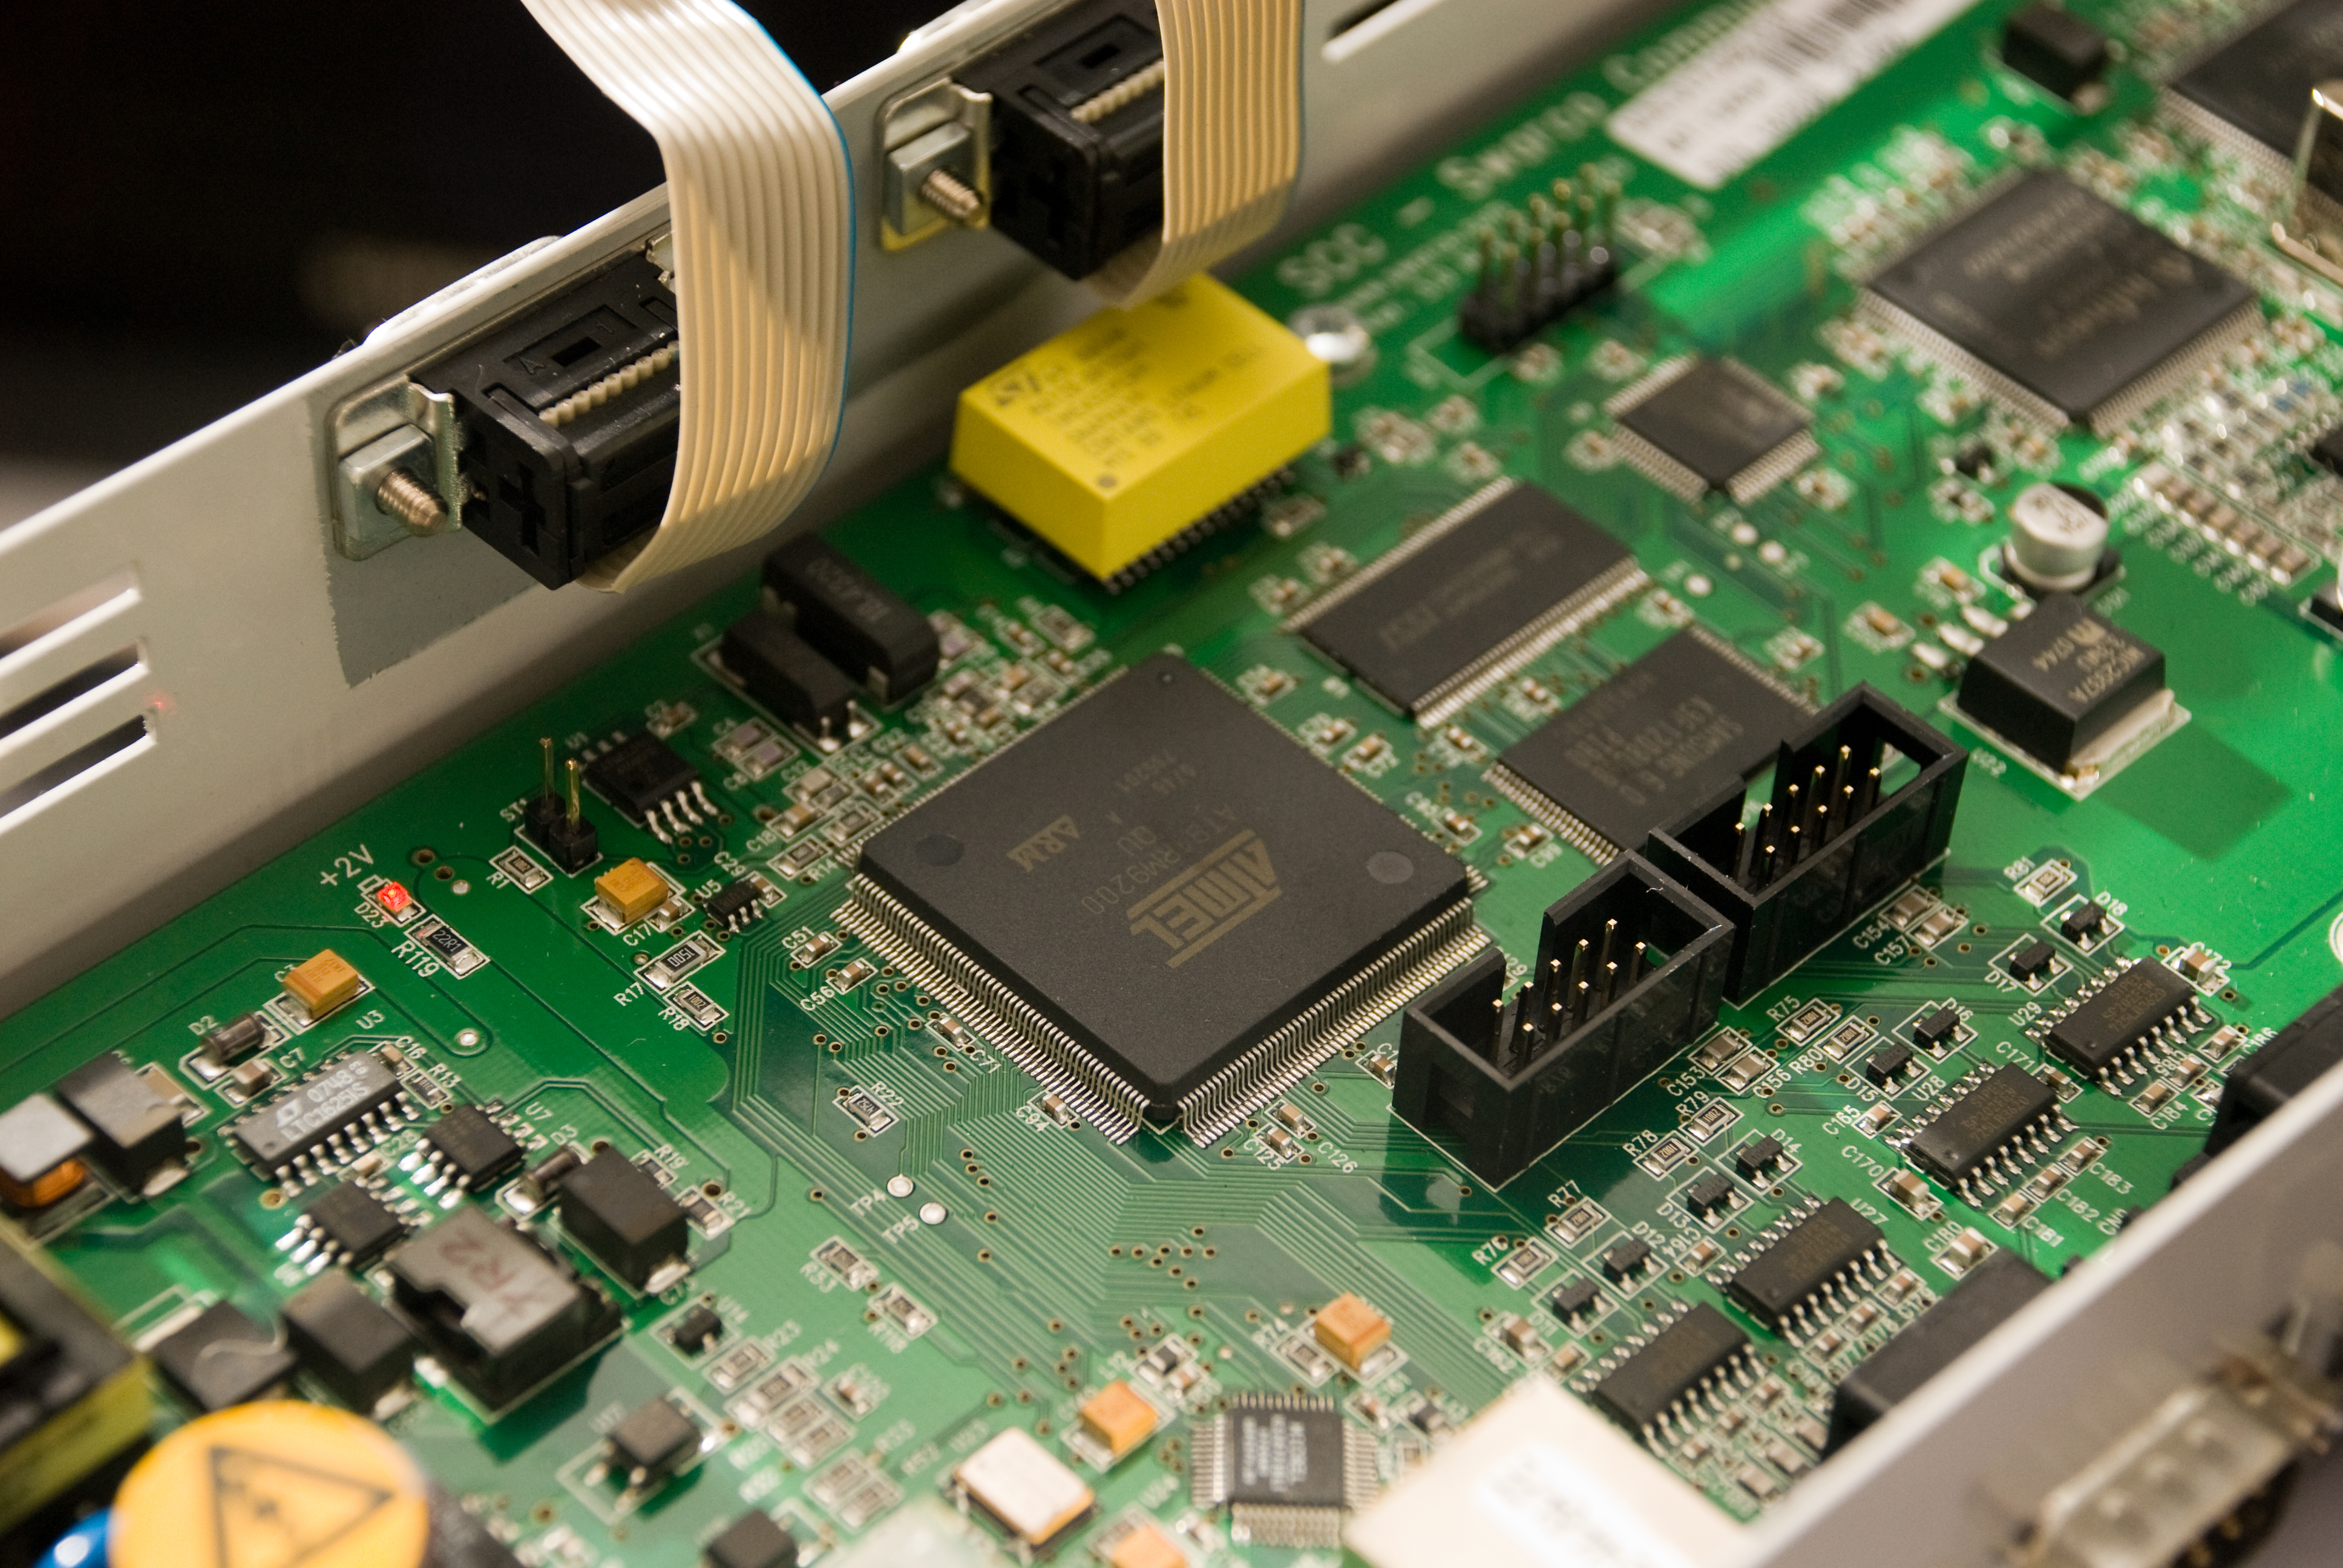
Used gear:
- Nikon D200 camera
- Nikkor AF-S 18-135mm f/3.5-5.6 lens
- Tripod
- Ambient light
EXIF Data
F-Number                         : 5.0
ISO speed ratings                : 400
Shutter speed [s]                : 1/250
Max aperture                     : F5.1
Metering mode                    : Spot (3)
Flash                            : No flash
Focal length [mm]                : 62
Exposure mode                    : Manual (1)
Focal length (35mm)              : 93
If one would show this photo and one of photos above – could you tell the difference in used gear, without knowing technical details or looking into EXIF data? Nikon D200 on second-hand market today goes for 100-200$, and it’s image sensor is far worse than today’s technology. At ISO 800 this camera is already become very noisy, so ISO 400 was used to get good result. Entry-level kit 18-135mm lens is not fancy one, and it stops to f/5.1 at 62mm focal distance used for this shot. No flashlight was used, only ambient light around in the room.
Still the result is decent, and not too shabby to post on forums, articles, and such.
Editing software
If you serious into making good articles or documents, you will likely be questioning yourself, what to use to further improve or resize your photos. It’s not good to post 7000×4000 pixel photos on the forum post, so there is need to make smaller resized thumbnails. There are plenty of choice for freeware software for simple resize, but we can take it a step further and talk a bit about using edited images from your camera.
I found Adobe Lightroom useful and easy to use even for beginners. Some cameras already have bundled software, such as Nikon CaptureNX which is useful, but might need some learning.
For viewing and resizing, as well as batch processing (resize, crop and such) I found useful freeware, XnView. For example, in our articles most of photos are sized to 900 pixels width for page-size shots, or 450 pixels width for two-in-row sets. XnView can do resize for all your hundreds of high-resolution JPEGs in one simple batch operation.
Final set of photos and resized thumbnails I upload to web-server location and that is ready to post in traditional formatting. Let’s imagine, we have two shots, image_hires.jpg with 5000×3000 resolution and its resized version, image_lowres.jpg with 900×540 pixels size. We have uploaded both into same folder /doc/Example/ and would like to have smaller low-resolution image be inserted into forum post. We want to have image clickable, with link to hi-res version for bigger details. This is easy to do by inserting code below into your post:
- BBCode (used on many forums)
•[url=https://xdevs.com/doc/Example/image_hires.jpg][img]https://xdevs.com/doc/Example/image_lowres.jpg[/img][/url]
- Textile markdown
"!https://xdevs.com/doc/Example/image_lowres.jpg!":https://xdevs.com/doc/Example/image_hires.jpg
Good practice to name both photos identically, except low-resolution version have _1 added to name. This allow me to automate tag management, by having all photos inserted in batch, with only changing name to image_1.jpg for preview image. If you want to insert non-clickable low-res photo only (for example, small section of schematics), you simplify code as below:
- BBCode (used on many forums)
•[img]https://xdevs.com/doc/Example/image_lowres.jpg[/img]
- Textile markdown
!https://xdevs.com/doc/Example/image_lowres.jpg!
xDevs.com photo setup
One of readers asked me once, what camera setup I use for photographs in articles and forum posts. So here it is, all listed below. Note, that it is not target or reference equipment rig, it’s just something I got during a decade of of photography hobby. I ended up with set here due to different reasons, many of which not include any electronics-related engineering projects at all. Originally my first camera was Olympus C4000 zoom compact camera, which later was upgraded to Olympus E-20N. I used that for over 5 years till finally got into DSLR, with Nikon D50 and Nikkor AF-S 18-55 as starter. Later change to D80, D200 had way less visible impact on image quality, and mostly had usability benefits.
Today I have two DSLR bodies from Nikon, D800 and D3. Why two? Well, both serve for different purposes. D800 being high resolution 36MP camera is best for macro and static photography, so it is primary tool for best detailed images possible. Vast majority of photos published on this site are come from D800 sensor. It’s also much easier to work with high-resolution photos by cropping needed area of shot and still having enough details. D800 also used as HD-video capture camera for YouTube videos and such. D3 on opposite side is used mostly for time-lapse shots for video.
As for lens choice, I got Nikkor AF-S 28-70/2.8D main zoom and Sigma Macro APO 150/2.8 for close-ups. Also used Nikkor AF-S 35/1.8G DX and sometimes use Nikkor AF 50/1.4D for hand-held quick snaps, such as workbench photos or setup overall shots. For time-lapse wide-angle zoom, Nikkor AF-S 17-35/2.8D often used with D3 to get perspective view over a working zone. Since everything done in usual rather small living room, having zoom is good way to get best angle on project details.
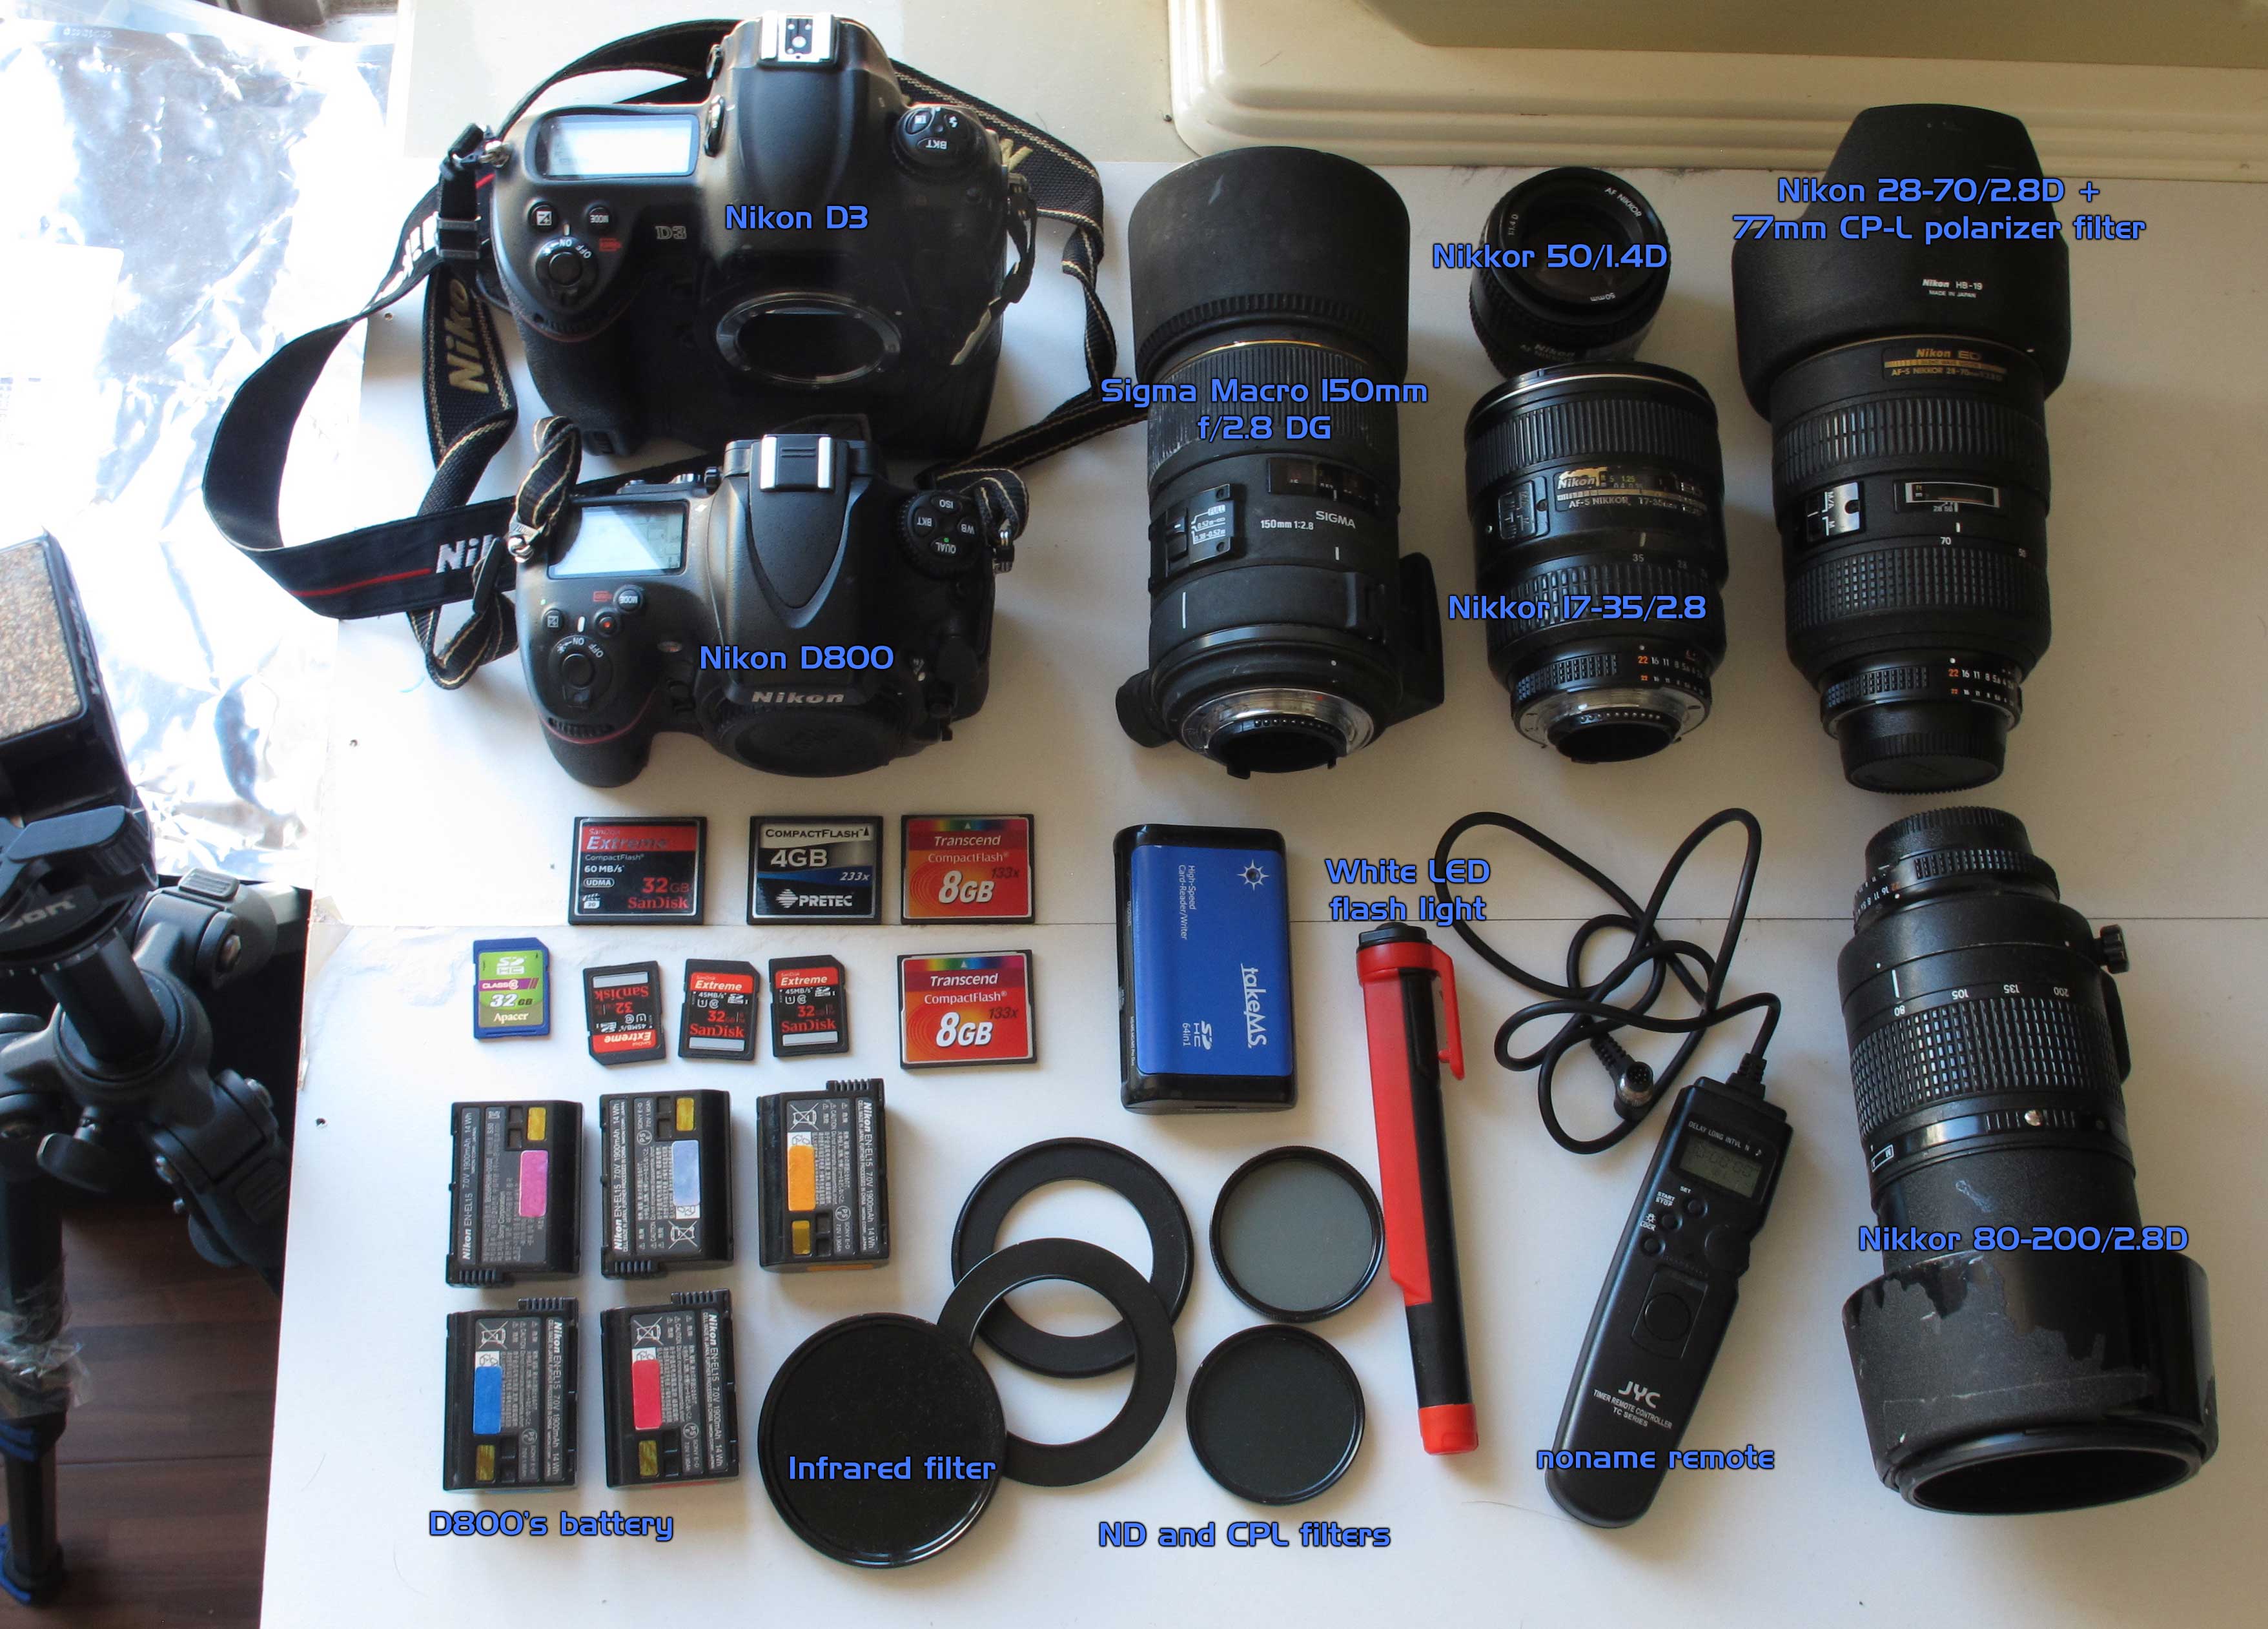
Photo A: xDevs.com’s photography gear set
Most of these lenses I bought broken from eBay for decent prices, as all I needed are good optics and manual focusing. I use manual focus only to have camera fixed and focused exactly on what needed, and does not change at any times. Some of the lens, like AF-S 28-70/2.8 needed little attention, but it’s not a big problem for hardware engineer. Nikkor AF 80-200/2.8D is not used for hardware photography, as it’s focusing range is far too long for indoor use.
There is no dedicated lightning elsewhere, only ambient light or local 15-20W lamps at bench. For long-exposure shots I dim room light and use handheld white LED flashlight, to manually lit subject from all sides. I did a quick video on this technique as shown below:
This allows making even light around subject with soft shadows. By doing few shots I can get best angles, to make IC markings and cramped areas lit well and uniform.
Regular cheap tripod is used to hold camera. While I have remote control, I usually don’t use it to avoid wiring at camera, as I move tripod and camera setup a lot during photoshoot. Nikon’s mirror-up-delay MUP release function working a treat to automatic timer release. Any other cameras can use self-timer release delay function, set to 5-10 seconds to get camera stable before the shot. I don’t touch or walk around camera during exposure time, as even minor movement around easily render blurred shots when using 150mm macro lens.
As of power, there are few batteries for D800 and AC brick power supply for D3, which I often use to avoid any delays during photographing. For memory cards, I have random 4 and 8GB CompactFlash cards for D3 and SanDisk Extreme SD and CF cards for D800. Since we are not shooting anything dynamic, it’s not important to use any special high-speed memory cards. It’s not like Keithley multimeter going to run away from the table due to delay during data writing on card. Having fast cards helps a bit with downloading speed on computer though.
Conclusion
Hope this short article will help you to make good illustrations and photographs for articles, forum posts and documentation. Making readers enjoy reading your publication may make them want to have your product and convert them into customers. Keep producing quality content, and quantity will come eventually.
Now, knowing all that, don’t just sit here! Take camera, and go try photograph something. After all, experience is a best teacher. There is absolutely nothing wrong in taking hundred of photos with different settings to find sweet spot condition which works best, and perhaps in just few weeks you would be able to write your own “How to take photo” guide as well! It is OK to fail at first tries, that will teach you what NOT to do next time.
Learning photography by books is typical example, with checking of understanding against provided answers in the book by author. While this is good approach, there is a much better and faster way to do things. You will likely to learn better by actually taking photo and experimenting with real subjects and camera knobs, letting your eye to provide the “answers” and judgement instead of a book guide. Remember, your photo should give the viewer a subject or a problem, which you trying to show, in nice and pleasant way, not more, not less.
In case of hardware photography, we all encountered situations with having gear which nobody online talked about or serviced, and lack of documentation and reference photos leaving us wondering where this or that wire went originally, or which was that component label. Try to address these problems when taking internal photos, covering as much as possible, and it will surely save somebody from hours of guesswork.
Have something to say? Jump in the comments!
Modified: April 2, 2016, 5:21 p.m.