Raspberry Pi SOC actually does have more than one I2C controller, but standard B Pi have only one available to user. On latest (non plus) revision it’s I2C1 (/dev/i2c-1) on pins 3 and 5 of P1 header. But it is possible to use I2C0 controller as well to access external world.
There will be both hardware and software work required to make it possible.
Hardware
There is unpopulated 8-pin 2.54mm pitch header near P1. It’s pinout with top orientation view (looking on top of RPI) is next:
| +3.3V | Pin 2 | Pin 1 | +5V |
| GPIO29 / SCL | Pin 4 | Pin 3 | GPIO28 / SDA |
| GPIO31 | Pin 6 | Pin 5 | GPIO30 |
| GND | Pin 8 | Pin 7 | GND |
Schematics show us it’s four GPIOs and power nets routed to it.
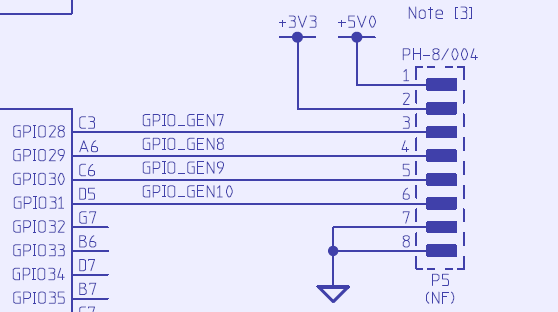
And GPIO28 and GPIO29 have alternate function for I2C port 0:
| GPIO28 | SDA | P5.3 |
| GPIO29 | SCL | P5.4 |
As you can see from schematics, there is no pullup resistors for +3.3V rail on this pins, so we must add those first.
I used pair of 2.2K 0603 resistors soldered straight on Raspberry Pi pin header pads. If you don’t want to modify Pi, you can add resistors externally.
Hardware part is finished now.
Software
Newer RPI distributions may have /dev/i2c-0 disabled on Rev2 boards, so adding options to boot cmdline may be needed, such as:
Open /boot/cmdline and at the end of the line add key as shown below. Make sure that you don’t add a new line, it should be added to first line end only with a single space.
bcm2708.vc_i2c_override=1
If you using Linux kernel with version 3.18 or newer, method how hardware access is changed with Device Tree introduction. To enable your interfaces add next lines to /boot/config.txt file
dtparam=i2c_arm=on
dtparam=i2c1=on
dtparam=i2c0=on
dtparam=spi=on
Now both I2C ports should be visible, but we are not done yet.
root@tin:/home/pi# ls /dev/i2c*
/dev/i2c-0  /dev/i2c-1
Now we need to boot our Pi and configure redefinition of GPIO pins for I2C port 0.
One of the ways to do so, is to use BCM2835 library from Mike McCauley.
wget http://www.airspayce.com/mikem/bcm2835/bcm2835-1.38.tar.gz
tar xzvf bcm2835-1.38.tar.gz
cd bcm2835-1.38
./configure
make
make check | make install
By the time you read this, there might be a new version of the library, so check on Mike’s site to use latest library version.
Now we can write little tool using C to do switching and configuration of I2C0 port pins:
#include <bcm2835.h>
#include <stdio.h>#define BCM2835_GPIO_FSEL_INPT 0
#define BCM2835_GPIO_FSEL_ALT0 4main() { bcm2835_init();. printf(“
iInit I2C BCM2835 library….”); bcm2835_i2c_setClockDivider(BCM2835_I2C_CLOCK_DIVIDER_148); bcm2835_i2c_set_baudrate(100000); bcm2835_gpio_fsel(0, BCM2835_GPIO_FSEL_INPT);. bcm2835_gpio_fsel(1, BCM2835_GPIO_FSEL_INPT);. bcm2835_gpio_fsel(28, BCM2835_GPIO_FSEL_INPT);. bcm2835_gpio_fsel(29, BCM2835_GPIO_FSEL_INPT);. bcm2835_gpio_fsel(28, BCM2835_GPIO_FSEL_ALT0);. bcm2835_gpio_set_pud(28, BCM2835_GPIO_PUD_UP);. bcm2835_gpio_fsel(29, BCM2835_GPIO_FSEL_ALT0);. bcm2835_gpio_set_pud(29, BCM2835_GPIO_PUD_UP);. printf(“\r\n-i- I2C Port 0 is routed to P5 header\r\n”); bcm2835_close();
}
All we need is to compile it with GCC. Command can be look like below:
cc i2c_port0.c -o i2c_port0 -lbcm2835
And after compilation without any messages should be able to run executable:
./i2c_port0
Output looks like this:
-i- Init I2C BCM2835 library....
-i- I2C Port 0 is routed to P5 header
Now usual i2c_tools commands can be used to access port 0 like on examples below:
root@tin:/repo/src/i2c_p0# ./i2c_p0
-i- Init I2C BCM2835 library....
-i- I2C Port 0 is routed to P5 header
root@tin:/repo/src/i2c_p0# i2cdetect -y 0
     0  1  2  3  4  5  6  7  8  9  a  b  c  d  e  f
00:          -- -- -- -- -- -- -- -- -- -- -- -- --
10: -- -- -- -- -- -- -- -- -- -- -- -- -- -- -- --
20: -- -- -- -- -- -- -- -- -- -- -- -- -- -- -- --
30: -- -- -- -- -- -- -- -- -- -- -- -- -- -- -- --
40: 40 -- -- 43 -- -- -- -- -- -- -- -- -- -- -- --
50: 50 -- -- -- -- -- -- -- -- -- -- -- -- -- -- --
60: -- -- -- -- -- -- -- -- -- -- -- -- -- -- -- --
70: -- -- -- -- -- -- -- --
To make this switching permanent for system, you can run tool executable from rc.local
/etc/rc.local
#!/bin/sh -e
#
# rc.local
#
# By default this script does nothing.
/i2c_port0
exit 0
For popular library wiringPi there is extra function need to be added in your C programs to
select I2C port 0, as by default wiringPi selects I2C port based on Raspberry Pi board revision.
This is done in function wiringPiI2CSetup().
We need to call wiringPiI2CSetupInterface instead of just wiringPiI2CSetup and pass correct device string along with slave device address to access.
// I2C access code block in your C program

// …

// …
    const char *device;
    uint8_t devID = 0×50;       // Your slave I2C device, for example EEPROM 0×50
    device = “/dev/i2c-0”;      // select i2c-0 port

    wiringPiI2CSetupInterface (device, devID);
// Code to read/write I2C data
// Rest of the program
Projects like this are born from passion and a desire to share how things work. Education is the foundation of a healthy society - especially important in today's volatile world. xDevs began as a personal project notepad in Kherson, Ukraine back in 2008 and has grown with support of passionate readers just like you. There are no (and never will be) any ads, sponsors or shareholders behind xDevs.com, just a commitment to inspire and help learning. If you are in a position to help others like us, please consider supporting xDevs.com’s home-country Ukraine in its defense of freedom to speak, freedom to live in peace and freedom to choose their way. You can use official site to support Ukraine – United24 or Help99. Every cent counts.
Modified: Aug. 15, 2015, 5:45 p.m.