Contents
- Agilent/Keysight 82357B dongle overview
- Raspberry Pi setup
- Firmware upload for Agilent 82357A/82357B GPIB dongles
- Configuration for linux-gpib and interfacing
- Testing GPIB operation
- Python-application to talk GPIB from Raspberry Pi
- Interfacing thru VISA with Python and PyVISA
While GPIB interface is slowly replaced by USB, LAN and other less popular modern interfaces, lot of instrumentation are still rely on GPIB as industry standard. Majority of production systems and automated measurements setups using GPIB for decades already. All these usually require a host GPIB controller to run program and issue operations over the bus.
Using PC is easiest thing, especially Windows-based machines, as most of vendors already supply ready to use libraries and packages to interface their instruments via GPIB. But if you go little aside, using Linux-based OS, things get tricky very quick, especially for engineers who are not familiar of *nix environment and way of things. Often simple plugging GPIB adapter into system and expecting things to work cause havoc and countless hours wasted, resolving dependencies, compiling pieces of code, tweaking kernels and such.
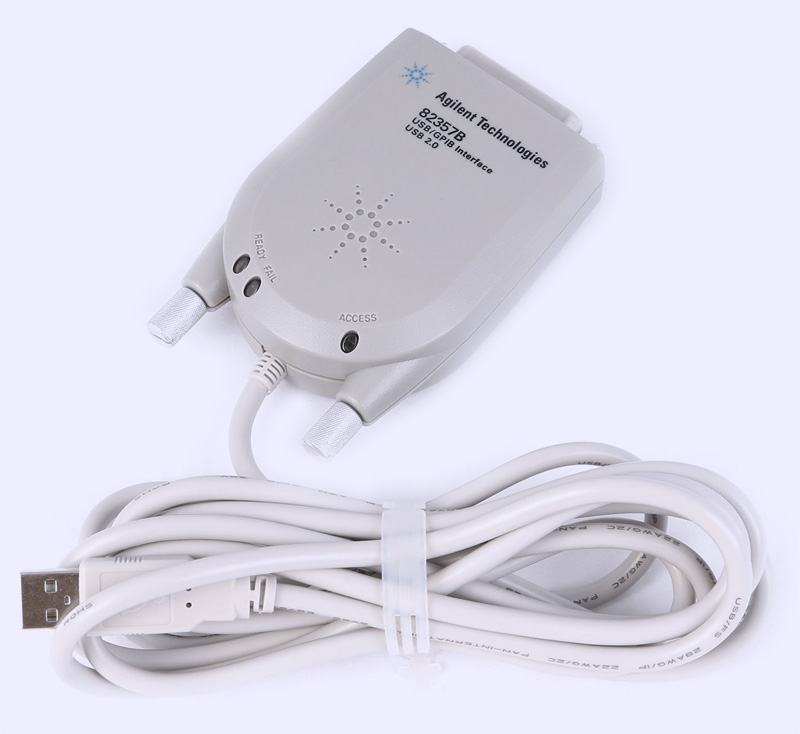
Agilent/Keysight 82357B dongle overview
First, let’s take a look on hardware interface which we will be using in this tutorial.
There are multiple versions of USB-GPIB interfaces, but this article is tailored to Keysight’s 82357B. While genuine unit price ~570 USD new, there are lot of clones and compatible units are available on secondary market as well.
Somebody even reverse engineered schematics of it.
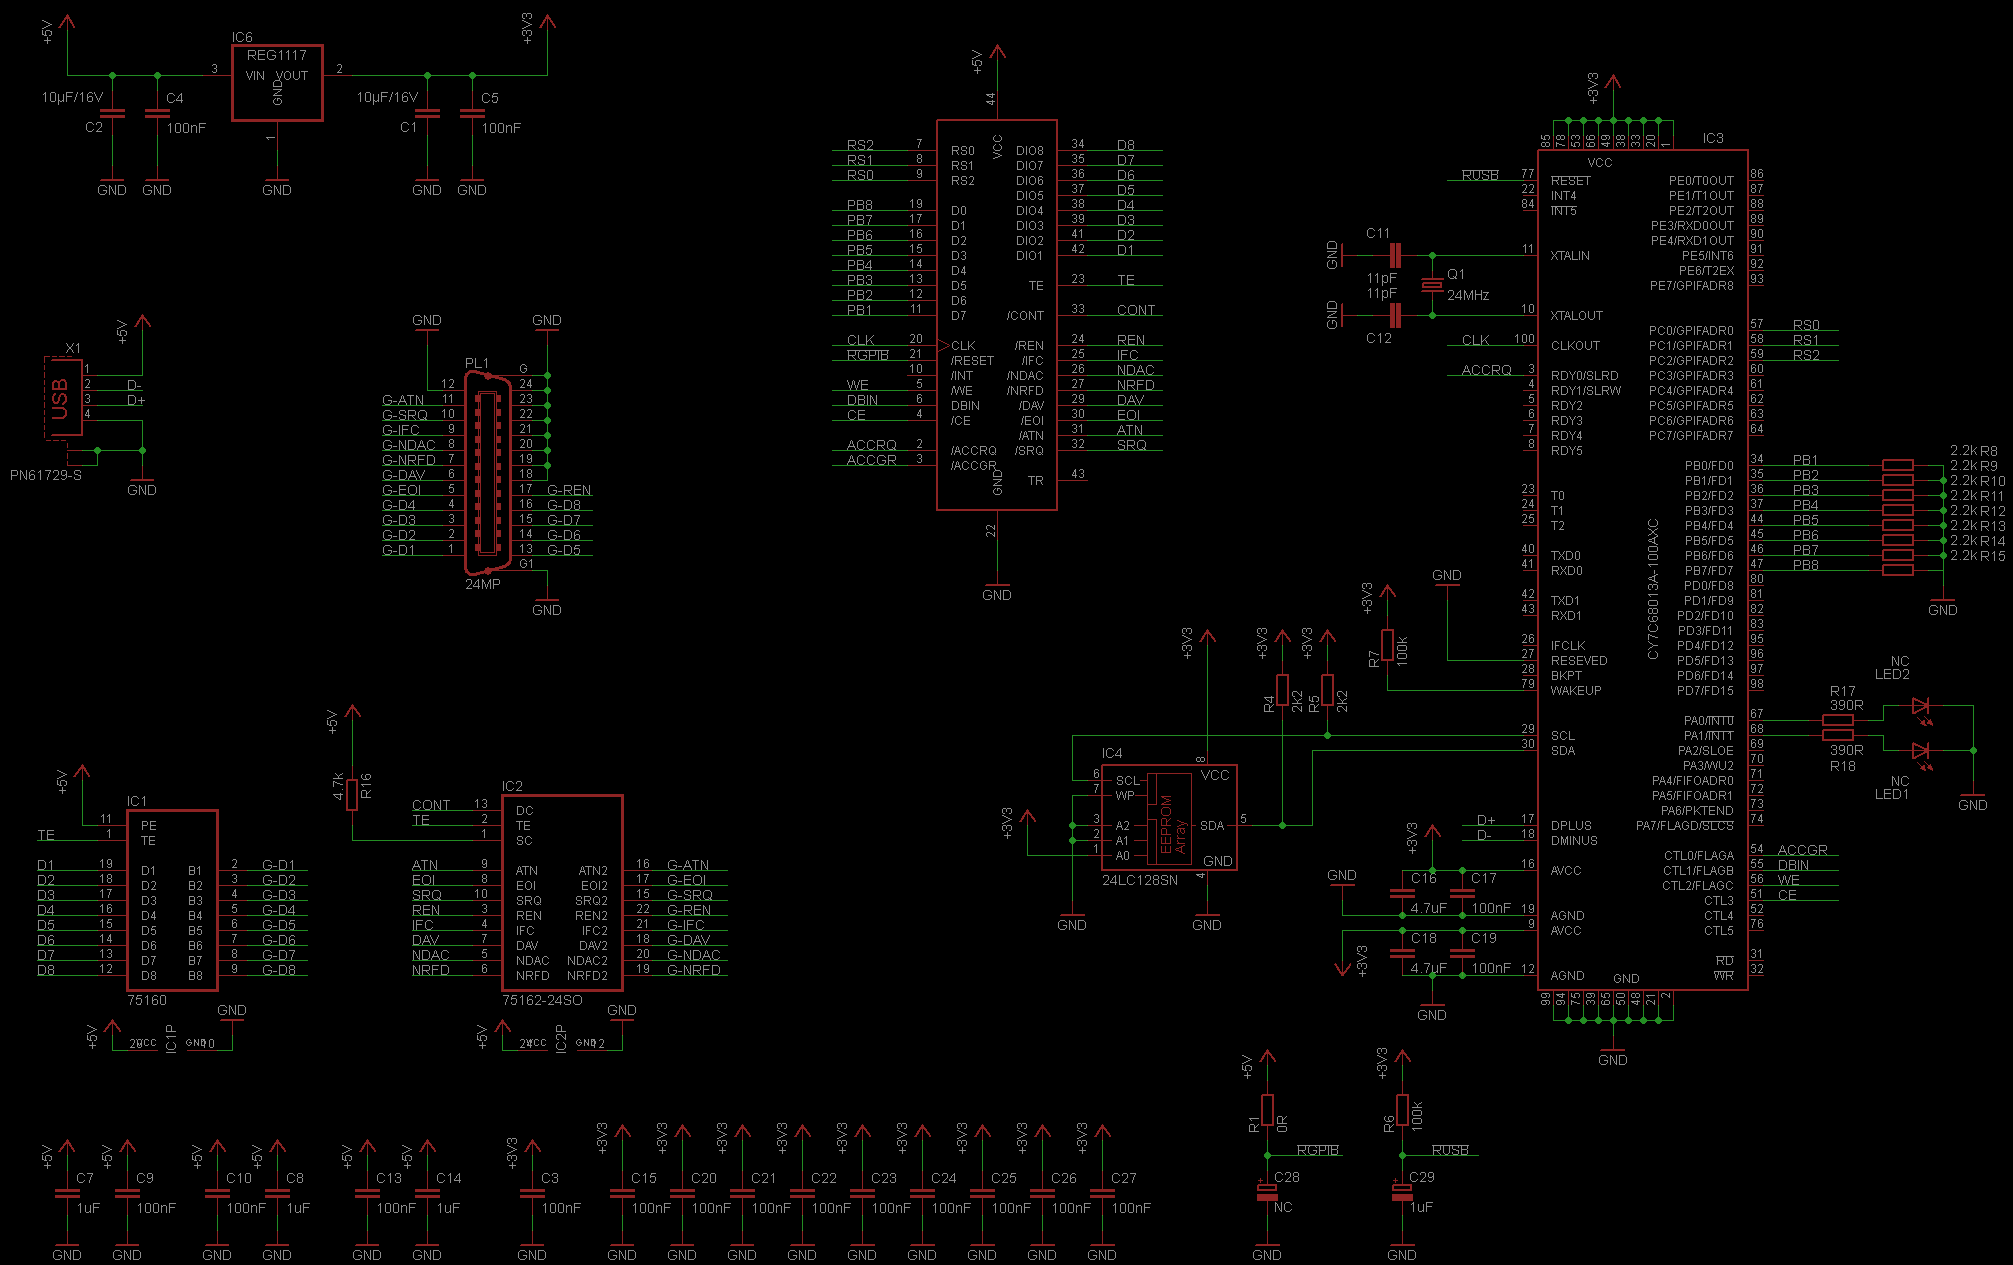
If you have National GPIB pod, such as GPIB-USB-HS, you can check similar article regarding it’s use and setup right here.
Enough hardware, let’s dig into Linux world to set everything up, using one of clones to this 82357B, acquired from eBay seller.
Raspberry Pi setup
All information below is tested on Raspberry Pi 1 model B revision 2, using on-board USB connection. Linux version used was RASPBIAN Debian Wheezy, which we already go through basic setup doing I2C stuff before, in this article. If you need to setup system from scratch on blank SD card, suggest to reference that article first.
There is known issue with newer kernels 4.x.x and linux-gpib (<R1654 versions) + Agilent 82357B GPIB dongles. Issue shows as return of TIMEO error after any command/operation with GPIB. Since all Pi 3.0 ship with kernel 4.x.x by default, these were affected by this problem. Linux-gpib from SVN R1654+ have fixes related to DMA buffers from Dave Penkler to resolve this.
Below we go step by step for whole process of getting 82357B working with Raspberry Pi system. Forum thread on EEVBlog.com from member bingo600 was a great help, and definitely saved loads of time and efforts. He also used Beiming S82357 and Agilent 82357B.
- Before we start installing stuff, highly recommended to update current packets. All commands below are issued under admin root rights, so if you don’t usually logon under root, you may need use sudo.
apt-get update
- Install Linux kernel image, as linux-gpib module versions are specific for each kernel branch, and they both need match.
apt-get install linux-image-rpi-rpfv
In my case it put kernel version 3.18.0. You can locate it in /boot directory, where two files should be present, such as initrd.img-3.18.0-trunk-rpi and vmlinuz-3.18.0-trunk-rpi
If you are using newer Raspberry Pi 2, please use linux-image-rpi2-rpfv instead of linux-image-rpi-rpfv
- In boot/config.txt append this at end of file , or it will boot the default “Foundation kernel”
************* SNIP ***********************
# Set params for "raspbian debian-style kernel" boot
kernel=vmlinuz-3.18.0-trunk-rpi
initramfs initrd.img-3.18.0-trunk-rpi followkernel
If you are on Raspberry Pi 2, kernel would be indexed rpi2 such as:
kernel=vmlinuz-3.18.0-trunk-rpi2
initramfs initrd.img-3.18.0-trunk-rpi2 followkernel
- Double check filenames and presence of files in /boot, otherwise your Raspberry Pi will not boot. If such happens, fix is easy. Just remove SD card, plug it into your PC and change config.txt file, as it’s accessible from FAT filesystem under usual OS, unlike rest of linux partitions on Raspberry’s SD card.
- After success with kernel change and boot, we can check kernel version and install header package:
root@rpi:/home/pi# uname -a
Linux rpi.xdevs.com 3.18.0-trunk-rpi #1 PREEMPT Debian 3.18.5-1~exp1+rpi19 (2015-08-08) armv6l GNU/Linux
pi@tin ~ $ sudo apt-get install linux-headers-rpi-rpfv
Here’s example output with RPI2:
root@raspberrypi:~# uname -a
Linux raspberrypi 3.18.0-trunk-rpi2 #1 SMP PREEMPT Debian 3.18.5-1~exp1+rpi19 (2015-08-08) armv7l GNU/Linux
root@raspberrypi:~# apt-get install linux-headers-rpi2-rpfv
- Let’s check that pod itself is detected and module can be used:
root@rpi:/home/pi# lsusb
*Bus 001 Device 004: ID 0957:0518 Agilent Technologies, Inc. 82357B GPIB Interface*
Bus 001 Device 003: ID 0424:ec00 Standard Microsystems Corp. SMSC9512/9514 Fast Ethernet Adapter
Bus 001 Device 002: ID 0424:9514 Standard Microsystems Corp.
Bus 001 Device 001: ID 1d6b:0002 Linux Foundation 2.0 root hub
Adapter red LED should be lit at this point, as it’s controller require firmware upload to initialize and operate.
Commands below should execute without any error messages:
root@rpi:/home/pi# depmod -a
root@rpi:/home/pi# ldconfig
- Since we will be compiling stuff later, worth to install all packages and libraries, to make sure dependency are met correctly.
apt-get install build-essential texinfo texi2html libcwidget-dev tcl8.6-dev tk8.6-dev libncurses5-dev libx11-dev binutils-dev bison flex libusb-1.0-0 libusb-dev libmpfr-dev libexpat1-dev tofrodos subversion autoconf automake libtool
- Now install linux-gpib itself. Enter home directory and run next:
root@tin:/home/# mkdir linux-gpib
root@tin:/home/# cd linux-gpib
root@tin:/home/linux-gpib# svn checkout svn://svn.code.sf.net/p/linux-gpib/code/trunk linux-gpib-code
A    linux-gpib-code/linux-gpib
A    linux-gpib-code/linux-gpib/test
A    linux-gpib-code/linux-gpib/test/runtest
...
...
Checked out revision 1654.
root@tin:/home/linux-gpib# cd linux-gpib-code/linux-gpib/
Make sure linux-gpib revision is 1654 or later, as previous revisions have issue with Agilent 82357B adapters and 4.x.x kernels (any GPIB operation is aborted with timeout Error 14).
- At this moment we have latest linux-gpib from SVN and ready to configure and install it.
root@tin:/home/linux-gpib# cd linux-gpib-code/linux-gpib/
root@tin:/home/linux-gpib/linux-gpib-code/linux-gpib# ./bootstrap
libtoolize: putting auxiliary files in `.'.
libtoolize: copying file `./ltmain.sh'
libtoolize: putting macros in AC_CONFIG_MACRO_DIR, `m4'.
libtoolize: copying file `m4/libtool.m4'
libtoolize: copying file `m4/ltoptions.m4'
libtoolize: copying file `m4/ltsugar.m4'
libtoolize: copying file `m4/ltversion.m4'
libtoolize: copying file `m4/lt~obsolete.m4'
configure.ac:102: installing `./compile'
configure.ac:39: installing `./config.guess'
configure.ac:39: installing `./config.sub'
configure.ac:20: installing `./install-sh'
configure.ac:20: installing `./missing'
examples/Makefile.am: installing `./depcomp'
...
...
- linux-gpib is using kernel headers, which version must match our kernel version. So make sure those installed as well. Here’s example for older kernel 3.18 to use on Raspberry Pi V1:
root@tin:/home/gpib/linux-gpib-3.2.21# apt-get install linux-headers-3.18.0
Reading package lists... Done
Building dependency tree
Reading state information... Done
...
...
The following NEW packages will be installed:
  linux-headers-3.18.0-trunk-all linux-headers-3.18.0-trunk-all-armhf
  linux-headers-3.18.0-trunk-rpi2
0 upgraded, 3 newly installed, 0 to remove and 0 not upgraded.
Need to get 857 kB of archives.
After this operation, 6,807 kB of additional disk space will be used.
Do you want to continue [Y/n]? Y
...
...
Fetched 857 kB in 2s (365 kB/s)
Selecting previously unselected package linux-headers-3.18.0-trunk-rpi2.
(Reading database ... 97166 files and directories currently installed.)
Unpacking linux-headers-3.18.0-trunk-rpi2 (from .../linux-headers-3.18.0-trunk-rpi2_3.18.5-1~exp1+rpi16_armhf.deb) ...
Selecting previously unselected package linux-headers-3.18.0-trunk-all-armhf.
Unpacking linux-headers-3.18.0-trunk-all-armhf (from .../linux-headers-3.18.0-trunk-all-armhf_3.18.5-1~exp1+rpi16_armhf.deb) ...
Selecting previously unselected package linux-headers-3.18.0-trunk-all.
Unpacking linux-headers-3.18.0-trunk-all (from .../linux-headers-3.18.0-trunk-all_3.18.5-1~exp1+rpi16_armhf.deb) ...
Setting up linux-headers-3.18.0-trunk-rpi2 (3.18.5-1~exp1+rpi16) ...
Setting up linux-headers-3.18.0-trunk-all-armhf (3.18.5-1~exp1+rpi16) ...
Setting up linux-headers-3.18.0-trunk-all (3.18.5-1~exp1+rpi16) ...
New headers can be downloaded from https://www.niksula.hut.fi/~mhiienka/Rpi/linux-headers-rpi/ and installed with dpkg.
As my test RPI3 used kernel 4.4.34-v7+, example process listed below. bc packet need to be installed as well.
rpi3:/repo/linux-gpib/linux-gpib-code/linux-gpib# uname -a
Linux rpi3.xdevs.com 4.4.34-v7+ #930 SMP Wed Nov 23 15:20:41 GMT 2016 armv7l GNU/Linux
root@rpi3:/repo/linux-gpib/linux-gpib-code/linux-gpib# cd ..
root@rpi3:/repo/linux-gpib/linux-gpib-code# mkdir headers
root@rpi3:/repo/linux-gpib/linux-gpib-code# cd headers
root@rpi3:/repo/linux-gpib/linux-gpib-code/headers# wget https://www.niksula.hut.fi/~mhiienka/Rpi/linux-headers-rpi/linux-headers-4.4.34-v7%2B_4.4.34-v7%2B-2_armhf.deb
--2017-01-15 12:48:35--  https://www.niksula.hut.fi/~mhiienka/Rpi/linux-headers-rpi/linux-headers-4.4.34-v7%2B_4.4.34-v7%2B-2_armhf.deb
Resolving www.niksula.hut.fi (www.niksula.hut.fi)... 130.233.43.7, 2001:708:20:e337:8:20ff:fedd:f36a
Connecting to www.niksula.hut.fi (www.niksula.hut.fi)|130.233.43.7|:443... connected.
HTTP request sent, awaiting response... 200 OK
Length: 6895644 (6.6M) [application/octet-stream]
Saving to: ‘linux-headers-4.4.34-v7+_4.4.34-v7+-2_armhf.deb’

linux-headers-4.4.34-v 100%[===========================>]   6.58M  1.58MB/s   in 4.2s

2017-01-15 12:48:42 (1.58 MB/s) - ‘linux-headers-4.4.34-v7+_4.4.34-v7+-2_armhf.deb’ saved [6895644/6895644]

root@rpi3:/repo/linux-gpib/linux-gpib-code/headers# apt-get install bc
root@rpi3:/repo/linux-gpib/linux-gpib-code/headers# sudo dpkg -i linux-headers-4.4.34-v7+_4.4.34-v7+-2_armhf.deb
...
- If you have new Raspberry Pi 3.0, then you’d find using python script rpi-source very useful to pre-install kernel sources and headers. This is important step to do, otherwise linux-gpib modules will not be built correctly. Download script to your src folder and execute script by python ./rpi-source.py command. This should not return any errors, so we can run ./configure in linux-gpib directory to prepare it for our system environment now.
root@tin:/home/linux-gpib/linux-gpib-code/linux-gpib# ./configure
checking for a BSD-compatible install... /usr/bin/install -c
checking whether build environment is sane... yes
checking for a thread-safe mkdir -p... /bin/mkdir -p
checking for gawk... no
checking for mawk... mawk
checking whether make sets $(MAKE)... yes
checking whether to enable maintainer-specific portions of Makefiles... no
checking build system type... armv6l-unknown-linux-gnueabihf
checking host system type... armv6l-unknown-linux-gnueabihf
checking Linux kernel directory... ok
checking Linux kernel compile flags... Makefile:10: *** mixed implicit and normal rules: deprecated syntax ok
checking for gcc... gcc
- Compile and install linux-gpib
root@tin:/home/gpib/linux-gpib-3.2.21# make
make  all-recursive
make[1]: Entering directory '/home/gpib/linux-gpib-3.2.21'
Making all in include
make[2]: Entering directory '/home/gpib/linux-gpib-3.2.21/include'
make  all-am
make[3]: Entering directory '/home/gpib/linux-gpib-3.2.21/include'
make[3]: Nothing to be done for 'all-am'.
...
...
root@tin:/home/gpib/linux-gpib-3.2.21# make install
Firmware upload for Agilent 82357A/82357B GPIB dongles
Agilent dongle using micro-controller to bridge USB data interface and GPIB controller IC. This controller store only bootloader firmware and require to have it’s main firmware to be uploaded on each power on. Software package fxload can be used for this task. First, install it:
root@rpi:/home/pi# sudo apt-get install fxload
Reading package lists... Done
Building dependency tree
Reading state information... Done
The following NEW packages will be installed:
  fxload
0 upgraded, 1 newly installed, 0 to remove and 29 not upgraded.
Need to get 16.1 kB of archives.
After this operation, 65.5 kB of additional disk space will be used.
Get:1 http://mirrordirector.raspbian.org/raspbian/ jessie/main fxload armhf 0.0.20081013-1 [16.1 kB]
Fetched 16.1 kB in 1s (10.2 kB/s)
Selecting previously unselected package fxload.
(Reading database ... 53011 files and directories currently installed.)
Preparing to unpack .../fxload_0.0.20081013-1_armhf.deb ...
Unpacking fxload (0.0.20081013-1) ...
Processing triggers for man-db (2.7.0.2-5) ...
Setting up fxload (0.0.20081013-1) ...
Now we need actual firmware. Download it from SourceForge repository or our local mirror
wget http://linux-gpib.sourceforge.net/firmware/gpib_firmware-2008-08-10.tar.gz
tar xvzf gpib_firmware-2008-08-10.tar.gz
Now update Cypress FX2 micro-controller with firmware. To correctly operate this required to be done two times:
root@rpi:/home/pi/gpib_firmware-2008-08-10/agilent_82357a# sudo fxload -t fx2 -D /dev/bus/usb/001/004 -I ./measat_releaseX1.8.hex
Make sure your device /dev/bus/usb/001/004 match your previous lsusb address. After first upload Agilent adapter changed it’s ID to 001/005 in our system:
root@rpi:/home/pi/gpib_firmware-2008-08-10/agilent_82357a# lsusb
Bus 001 Device 005: ID 0957:0518 Agilent Technologies, Inc. 82357B GPIB Interface
Bus 001 Device 003: ID 0424:ec00 Standard Microsystems Corp. SMSC9512/9514 Fast Ethernet Adapter
Bus 001 Device 002: ID 0424:9514 Standard Microsystems Corp.
Bus 001 Device 001: ID 1d6b:0002 Linux Foundation 2.0 root hub
So repeat same command with 001/005 address now.
sudo fxload -t fx2 -D /dev/bus/usb/001/005 -I ./measat_releaseX1.8.hex
Now both green LEDs on adapter should be lit, and ID of USB dongle become 0957:0718:
root@rpi:/home/pi/gpib_firmware-2008-08-10/agilent_82357a# lsusb
Bus 001 Device 006: ID 0957:0718 Agilent Technologies, Inc.
Bus 001 Device 003: ID 0424:ec00 Standard Microsystems Corp. SMSC9512/9514 Fast Ethernet Adapter
Bus 001 Device 002: ID 0424:9514 Standard Microsystems Corp.
Bus 001 Device 001: ID 1d6b:0002 Linux Foundation 2.0 root hub
To avoid doing this manually each time you plug in Agilent 82357B pod into USB, you can copy firmware file measat_releaseX1.8.hex to /usr/share/usb/agilent_82357a/ and linux-gpib hotplug function will take care of firmware upload automatically on each connection.
Configuration for linux-gpib and interfacing
After everything successfully installed without errors, let’s connect Agilent GPIB adapter to Raspberry Pi and try to talk with it.
Make sure your Pi powered with good high-current USB cable and +5 VDC power supply with at least 1 Amp , as GPIB dongle can take some decent amount of power and with cheap USB cable connected to PC port it was causing unstable operation, LAN LEDs on Pi were blinking like crazy and nothing worked, as voltage drop too much.
Check if module was correctly used as well by lsmod.
root@rpi:/etc#
lsmod
Module                  Size  Used by
agilent_82357a         17997  0
gpib_common            31027  1 agilent_82357a
Now I tried using gpib_config tool to test operation, but got nasty error instead:
Modify /etc/gpib.conf like below to support Agilent board:
interface {
        minor = 0                     /* board index, minor = 0 uses /dev/gpib0, minor = 1 uses /dev/gpib1, etc. */
        board_type = "agilent_82357a" /* type of interface board being used, agilent_82357a or ni_usb_b for NI USB-GPIB-HS */
        name = "violet"               /* optional name, allows you to get a board descriptor using ibfind() */
        pad = 0                       /* primary address of interface             */
        sad = 0                       /* secondary address of interface           */
        timeout = T100s               /* timeout for commands, 100s for slow stuff like DMMs with filtering on */

/* settings for boards that lack plug-n-play capability */
        base = 0        /* Base io ADDRESS                  */
        irq  = 0        /* Interrupt request level */
        dma  = 0        /* DMA channel (zero disables)      */

        master = yes<-->/* interface board is system controller */
}
You also may get error on RPI2, like shown below
root@raspberrypi ~/linux-gpib/linux-gpib-code/linux-gpib $ gpib_config: error while loading shared libraries:
To fix this, just execute command ldconfig before gpib_config.
Everything working well now:
root@tin:/home/gpib/linux-gpib-3.2.21# gpib_config
root@tin:/home/gpib/linux-gpib-3.2.21#
No errors, great! Time to test if Pi can actually talk to instrument, such as Agilent bench PSU.
Testing GPIB operation
To test connect GPIB to instrument. Instrument in example below configured with GPIB Address = 10.
root@tin:/# ibtest
Do you wish to open a (d)evice or an interface (b)oard?
        (you probably want to open a device): d
enter primary gpib address for device you wish to open [0-30]: 10
trying to open pad = 10 on /dev/gpib0 ...
You can:
        w(a)it for an event
        ...
        ...
        (r)ead string
        perform (s)erial poll (device only)
        change (t)imeout on io operations
        request ser(v)ice (board only)
        (w)rite data string
: w
enter a string to send to your device: *IDN?
sending string: *IDN?

gpib status is:
ibsta = 0x2100  < END CMPL >
iberr= 0

ibcnt = 6
You can:
        w(a)it for an event
        ...
        ...
        (r)ead string
        perform (s)erial poll (device only)
        change (t)imeout on io operations
        request ser(v)ice (board only)
        (w)rite data string
: r
enter maximum number of bytes to read [1024]: 1024
trying to read 1024 bytes from device...
received string: 'Agilent Technologies,E3649A,0,1.7-5.0-1.0
'
Number of bytes read: 42
gpib status is:
ibsta = 0x2100  < END CMPL >
iberr= 0

ibcnt = 42
Now we can confirm that interface is working, and data send/received correctly.
Python-application to talk GPIB from Raspberry Pi
It’s time to write some simple program to talk with our instruments over GPIB.
One of easy choices would be using Python, as this high-level language is very easy to write data-logging programs and format data, without worry much about low-level coding.
To use GPIB in Python we need to have python-dev library installed and working. If you have it already, you can omit this step.
root@tin:/# apt-get install python-dev
Reading package lists... Done
Building dependency tree
Reading state information... Done
The following extra packages will be installed:
  libssl-dev libssl-doc python2.7-dev
The following NEW packages will be installed:
  libssl-dev libssl-doc python-dev python2.7-dev
0 upgraded, 4 newly installed, 0 to remove and 0 not upgraded.
Need to get 2,699 kB/31.4 MB of archives.
After this operation, 41.4 MB of additional disk space will be used.
Do you want to continue [Y/n]? Y
....
Setting up python2.7-dev (2.7.3-6+deb7u2) ...
Setting up python-dev (2.7.3-4+deb7u1) ...
Python-dev library is needed to access GPIB module.
Now we can install python egg to include Gpib module with our python system environment:
root@tin:/home/linux-gpib-code/linux-gpib/language/python# python ./setup.py  install
running install
running build
running build_py
creating build
creating build/lib.linux-armv6l-2.7
copying Gpib.py -> build/lib.linux-armv6l-2.7
running build_ext
building 'gpib' extension
creating build/temp.linux-armv6l-2.7
gcc -pthread -fno-strict-aliasing -DNDEBUG -g -fwrapv -O2 -Wall -Wstrict-prototypes -fPIC -I../../include -I/usr/include/python2.7 -c gpibinter.c -o build/temp.linux-armv6l-2.7/gpibinter.o
gcc -pthread -shared -Wl,-O1 -Wl,-Bsymbolic-functions -Wl,-z,relro build/temp.linux-armv6l-2.7/gpibinter.o -L../../lib/.libs -lgpib -lpthread -o build/lib.linux-armv6l-2.7/gpib.so
running install_lib
copying build/lib.linux-armv6l-2.7/Gpib.py -> /usr/local/lib/python2.7/dist-packages
copying build/lib.linux-armv6l-2.7/gpib.so -> /usr/local/lib/python2.7/dist-packages
byte-compiling /usr/local/lib/python2.7/dist-packages/Gpib.py to Gpib.pyc
running install_egg_info
Writing /usr/local/lib/python2.7/dist-packages/gpib-1.0.egg-info
Simple Python test can help to check access, for multimeter sitting on GPIB bus with address 17. Test is simple sending IDN? request and reading back 100 bytes:
root@tin:/home/linux-gpib/linux-gpib-code/linux-gpib/language/python# python
Python 2.7.3 (default, Mar 18 2014, 05:13:23)
[GCC 4.6.3] on linux2
Type "help", "copyright", "credits" or "license" for more information.
>>> import Gpib
>>> inst = Gpib.Gpib(0,17) # Device address 17
>>> inst.write("*IDN?")
>>> inst.read(100) # read 100 bytes
'KEITHLEY INSTRUMENTS INC.,MODEL 2002,1167961,A09  /A02  \n'
>>>
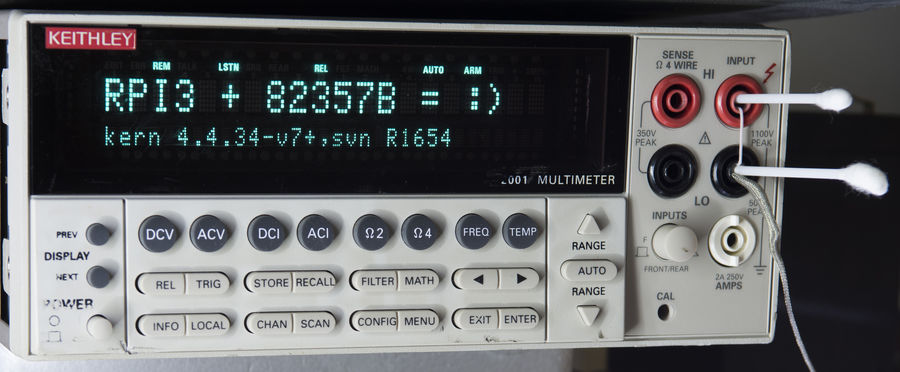
Test application on python:
# xDevs.com Python test GPIB app
# http://xdevs.com/guide/agilent_gpib_rpi/
import sys
import Gpib
inst = Gpib.Gpib(0,17) # Instrument GPIB Address = 17
inst.write(":DISP:WIND:TEXT:DATA 'Raspberry Pi GPIB;)'")
inst.write(":DISP:WIND2:TEXT:DATA 'xdevs.com/g/agilent_gpib_rpi'")
inst.write(":DISP:WIND:TEXT:STAT ON")
inst.write(":DISP:WIND2:TEXT:STAT ON")
Interfacing thru VISA with Python and PyVISA
Another way, often used on Windows-based hosts is to use VISA I/O framework with help of pyvisa. This framework helps to write platform-independent code, which can work on multiple hosts with no modification (or minor).
This section is shown here just as example, as it was run on Windows system, not Raspberry Pi.
Let’s install pyvisa, which is version 1.8 at the moment of writing.
# pip install pyvisa
Collecting pyvisa
  InsecurePlatformWarning
  Downloading PyVISA-1.8.tar.gz (429kB)
    100% |################################| 430kB 939kB/s
Collecting enum34 (from pyvisa)
  Downloading enum34-1.1.6-py2-none-any.whl
Installing collected packages: enum34, pyvisa
  Running setup.py install for pyvisa ... done
Successfully installed enum34-1.1.6 pyvisa-1.8
Now simple test app can we used to check operation.
# xDevs.com Python test VISA GPIB app
# http://xdevs.com/guide/agilent_gpib_rpi/
import sys
import pyvisa

rm = pyvisa.ResourceManager()
rm.list_resources()

inst = rm.open_resource('GPIB::10::INSTR')   # Instrument GPIB Address = 10
print (inst.query("*IDN?") )
Output is with HP 33120A as test device:
# python ./testvisa.py
HEWLETT-PACKARD,33120A,0,7.0-5.0-1.0
Hope this article help to use little, with getting well-known Raspberry Pi interface industry standard GPIB instrumentation and toolkit. Size and capabilities of small microcomputer, such as Raspberry Pi can make many use scenarios possible, such as integrating it into old GPIB-interfaced instruments to bring modern computing power and interfacing, such as interactive web via LAN port or even having instrument on remote location, controlled thru internet. No need big bulky computer with Windows tied to it anymore.
If you found mistakes or have suggestions – feel free to join in comments!
Projects like this are born from passion and a desire to share how things work. Education is the foundation of a healthy society - especially important in today's volatile world. xDevs began as a personal project notepad in Kherson, Ukraine back in 2008 and has grown with support of passionate readers just like you. There are no (and never will be) any ads, sponsors or shareholders behind xDevs.com, just a commitment to inspire and help learning. If you are in a position to help others like us, please consider supporting xDevs.com’s home-country Ukraine in its defense of freedom to speak, freedom to live in peace and freedom to choose their way. You can use official site to support Ukraine – United24 or Help99. Every cent counts.
Modified: Jan. 21, 2017, 6:29 p.m.