- Introduction and motivation of this article
- Disclaimer
- Exterior condition inspection
- Teardown and internal design
- Sample images after repair
- Fujifilm GF 32-64/4 damaged lens repair
- Summary and conclusion
Introduction and motivation of this article
One person’s loss another person’s joy and find. Today we have broken Fujifilm GFX 100 II camera on the surgery table for experiments and tear-down. It does not power up, eating just 5V 0.4 amps from USB-C port and doesn’t react to buttons or knobs. Sometimes top information display shows some information but that’s about it. This camera was submerged into water on the beach and sat for a while wet. Water got inside and now it’s dead.
Usually liquid damaged stuff is the worst kind and in 90% of the cases such electronics is a write-off beyond economical repair. But since such GFX 100 II is very expensive and one of the best cameras on the market even today, we can spend number of hours trying to doctor it. I don’t have big hopes up and most likely this cool camera end up as a very pretty desk paperweight. At least we can learn a bit about its internal design and hardware. Sadly, Fujifilm does not release any service or repair information or manuals for their products, so the best to do here is to apply the common engineering logic and knowledge and investigate.
To remind people who are not familiar with Fujifilm GFX system, this model GFX 100 II we looking at today is a top of the line mirrorless digital camera with amazing photographing image quality and quite powerful video capabilities.
Key features of this GFX 100 II:
- Sensor: Derivative of SONY IMX461 sensor, 43.8mm x 32.9mm 102 Megapixel sensor with primary color filter.
- Image Processing Engine: FUJIFILM X-Processor 5.
- ISO: Standard Output: ISO 80-12800 (1/3 step)
- Image Stabilizer: 5-axis in-body image stabilization (IBIS) offering up to 8 stops of compensation.
- Video Recording: 8K at 30fps, 4K up to 60fps, and Full HD at 120fps.
- Internal Recording: 10-bit 4:2:2 internally, F-log2 C support for high dynamic range video
- Cinema Formats: Supports GF Format, Premista Format, 35mm Format, and Anamorphic (35mm) Format.
- Continuous Shooting: Up to 8 fps with the mechanical shutter.
- Autofocus: Hybrid AF (TTL contrast AF / TTL phase detection AF) with PDAF sensor elements
- Storage Media: SDXC Card and CFexpress Type B Card or external USB-C SSD.
- Shutter Type: Focal Plane Mechanical Shutter + electronic shutter modes
- Interfaces: USB Type C 3.2 (2×1), full-size HDMI with 4K output capability, RJ45 1000/100/10Mbps Ethernet port
- Removable Electronic Viewfinder: 0.64-inch OLED Color Viewfinder with approx. 9.44 million dots.
- LCD Monitor: 3.2 inch Tilt-Type(Three Direction) Touch Screen Color LCD Monitor with approx. 2.36 million dots.
- Lens Mount: FUJIFILM G mount
- Body size: Similar to high-end 35mm camera
Unlike many high-end cameras from Nikon, Sony, and Canon that use a “full-frame” 36 mm × 24 mm sensor, all models in Fujifilm’s GFX lineup are equipped with a significantly larger 44 mm × 33 mm digital sensor developed by Sony. Fujifilm brands GFX sensors as “large format” as it’s slightly smaller than traditional medium format film like 6×7 cm. Still, the these larger sensors on GFX offers distinct image quality and unique visual perspectives that set it apart from standard full-frame systems. Learn more.
Historically, sensors of this size were reserved for ultra-high-end studio and reproduction cameras from manufacturers like Phase One, Leaf, and Hasselblad—systems that often cost as much as a luxury car. That changed in 2016 when Fujifilm launched the GFX 50S, offering medium format-type quality at a price point closer to high-end full-frame digital cameras.
Today, we’re taking a closer look at the GFX 100 II with improved processor and sensor speed as Fujifilm’s top-end camera in the GFX series. It was released back in September 2023. Later model GFX 100S II reused same sensor and processor in a lower cost package as well.
Disclaimer
Redistribution and use of this article, any parts of it or any images or files referenced in it, in source and binary forms, with or without modification, are permitted provided that the following conditions are met:
- Redistribution of this article must retain the above copyright notice, this list of conditions, link to this page (https://xdevs.com/fix/gfx100mk2/) and the following disclaimer.
- Redistribution of files in binary form must reproduce the above copyright notice, this list of conditions, link to this page (https://xdevs.com/fix/gfx100mk2/), and the following disclaimer in the documentation and/or other materials provided with the distribution, for example Readme file.
All information posted here is hosted just for education purposes and provided AS IS. In no event shall the author, xDevs.com site, or any other 3rd party, including Fujifilm be liable for any special, direct, indirect, or consequential damages or any damages whatsoever resulting from loss of use, data or profits, whether in an action of contract, negligence or other tortuous action, arising out of or in connection with the use or performance of information published here.
If you willing to contribute or add your experience regarding instrument repairs or provide extra information, you can do so following these simple instructions.
Overall project results and information presented in this article should not be used as a guideline in repairing expensive photographic equipment. Many of these cameras are covered by warranty or service agreements. Also complex assemblies like this often require proprietary tools, alignment procedures and secret software to bring the product back to specifications and capabilities to deliver amazing image quality.
Exterior condition inspection
All photos as available in high-resolution, so be sure to enjoy them on full screen where possible :)
Magnesium alloy metal body is very solid and nicely designed. Grip is comfortable in large hand and overall build quality feels very nice, as it supposed to be for such expensive device.
GFX 100 II has removable EVF port, just like the predecessor GFX 100. Here photo shows body with EVF removed. Secondary LCD on top displays various settings information or active histogram. All-important controls and customizable buttons are on nice positions reachable by fingers. Overall layout is quite minimalistic yet functional. Modes dial allow selection of automatic, semi-automatic or up to 7 manual modes. Modes are unique for video or stills mode, which can be selected by a separate switch on the left.
Bottom side shows 1/4-20” tripod mount, battery compartment and expansion contacts for optional grip block for portrait handle/extra two batteries.
Nice latch for battery prevents sudden loss of the battery when door is open. There is also a speaker hole protected by the fine fabric mesh on the bottom surface plate.
Tilting main LCD out reveals first evidence of liquid damage – one of the threaded holes for screw has some white chalky-type corrosion.
Closer look on G-mount also shows white corrosion residues near lens contact pins. So we most likely have a swimmer camera here. Liquids and electronics usually do not play well together.
Based on this I’ve decided to code name this teardown as “Project Poseidon”. Here’s artistic representation of this camera past swimming in the lake, based on generative image machine delusions:

The current plan is to perform a full component-level teardown and conduct an analysis of the internal construction, although the likelihood of a successful repair remains theoretical at best. Externally, aside from a few small areas of corrosion, the camera body appears to be in excellent condition—there’s not a single visible scratch.
However, liquid damage can often be misleading. If even one critical proprietary electro-mechanical component inside the camera is compromised, it could render the entire repair unfeasible. Based on my past experience repairing consumer electronics, sourcing internal parts directly from the manufacturer is often extremely difficult, if not impossible.
Teardown and internal design
Time to fish out my trusty Philips screwdriver, some small size flat heads and go into it. At the time of writing these are exclusive photos online as no many owners in the right state of mind would take apart a good working GFX100 II just for curiosity sakes :) Enjoy!
Removing mylar behind LCD and few screws already shows up a sad state of the metal holder plate for optional fan accessory. Let’s continue with removal of the bottom plate with tripod mount.
Auch. Lot of corrosion here already, this is not going to be pretty inside.

We are not talking of “few water droplets” ingress at this point but actually some serious water ingress.
FPC cables to the main LCD have clear evidence of corrosion on the gold contact pads. Confidence of successful repair at this point is starting to fall off pretty quickly at this stage.
Thermal pad shows some rust even, more to the sources of that later… Lot of powdery crystals around magnesium alloy metal body parts.
Major corrosion on the bottom side.

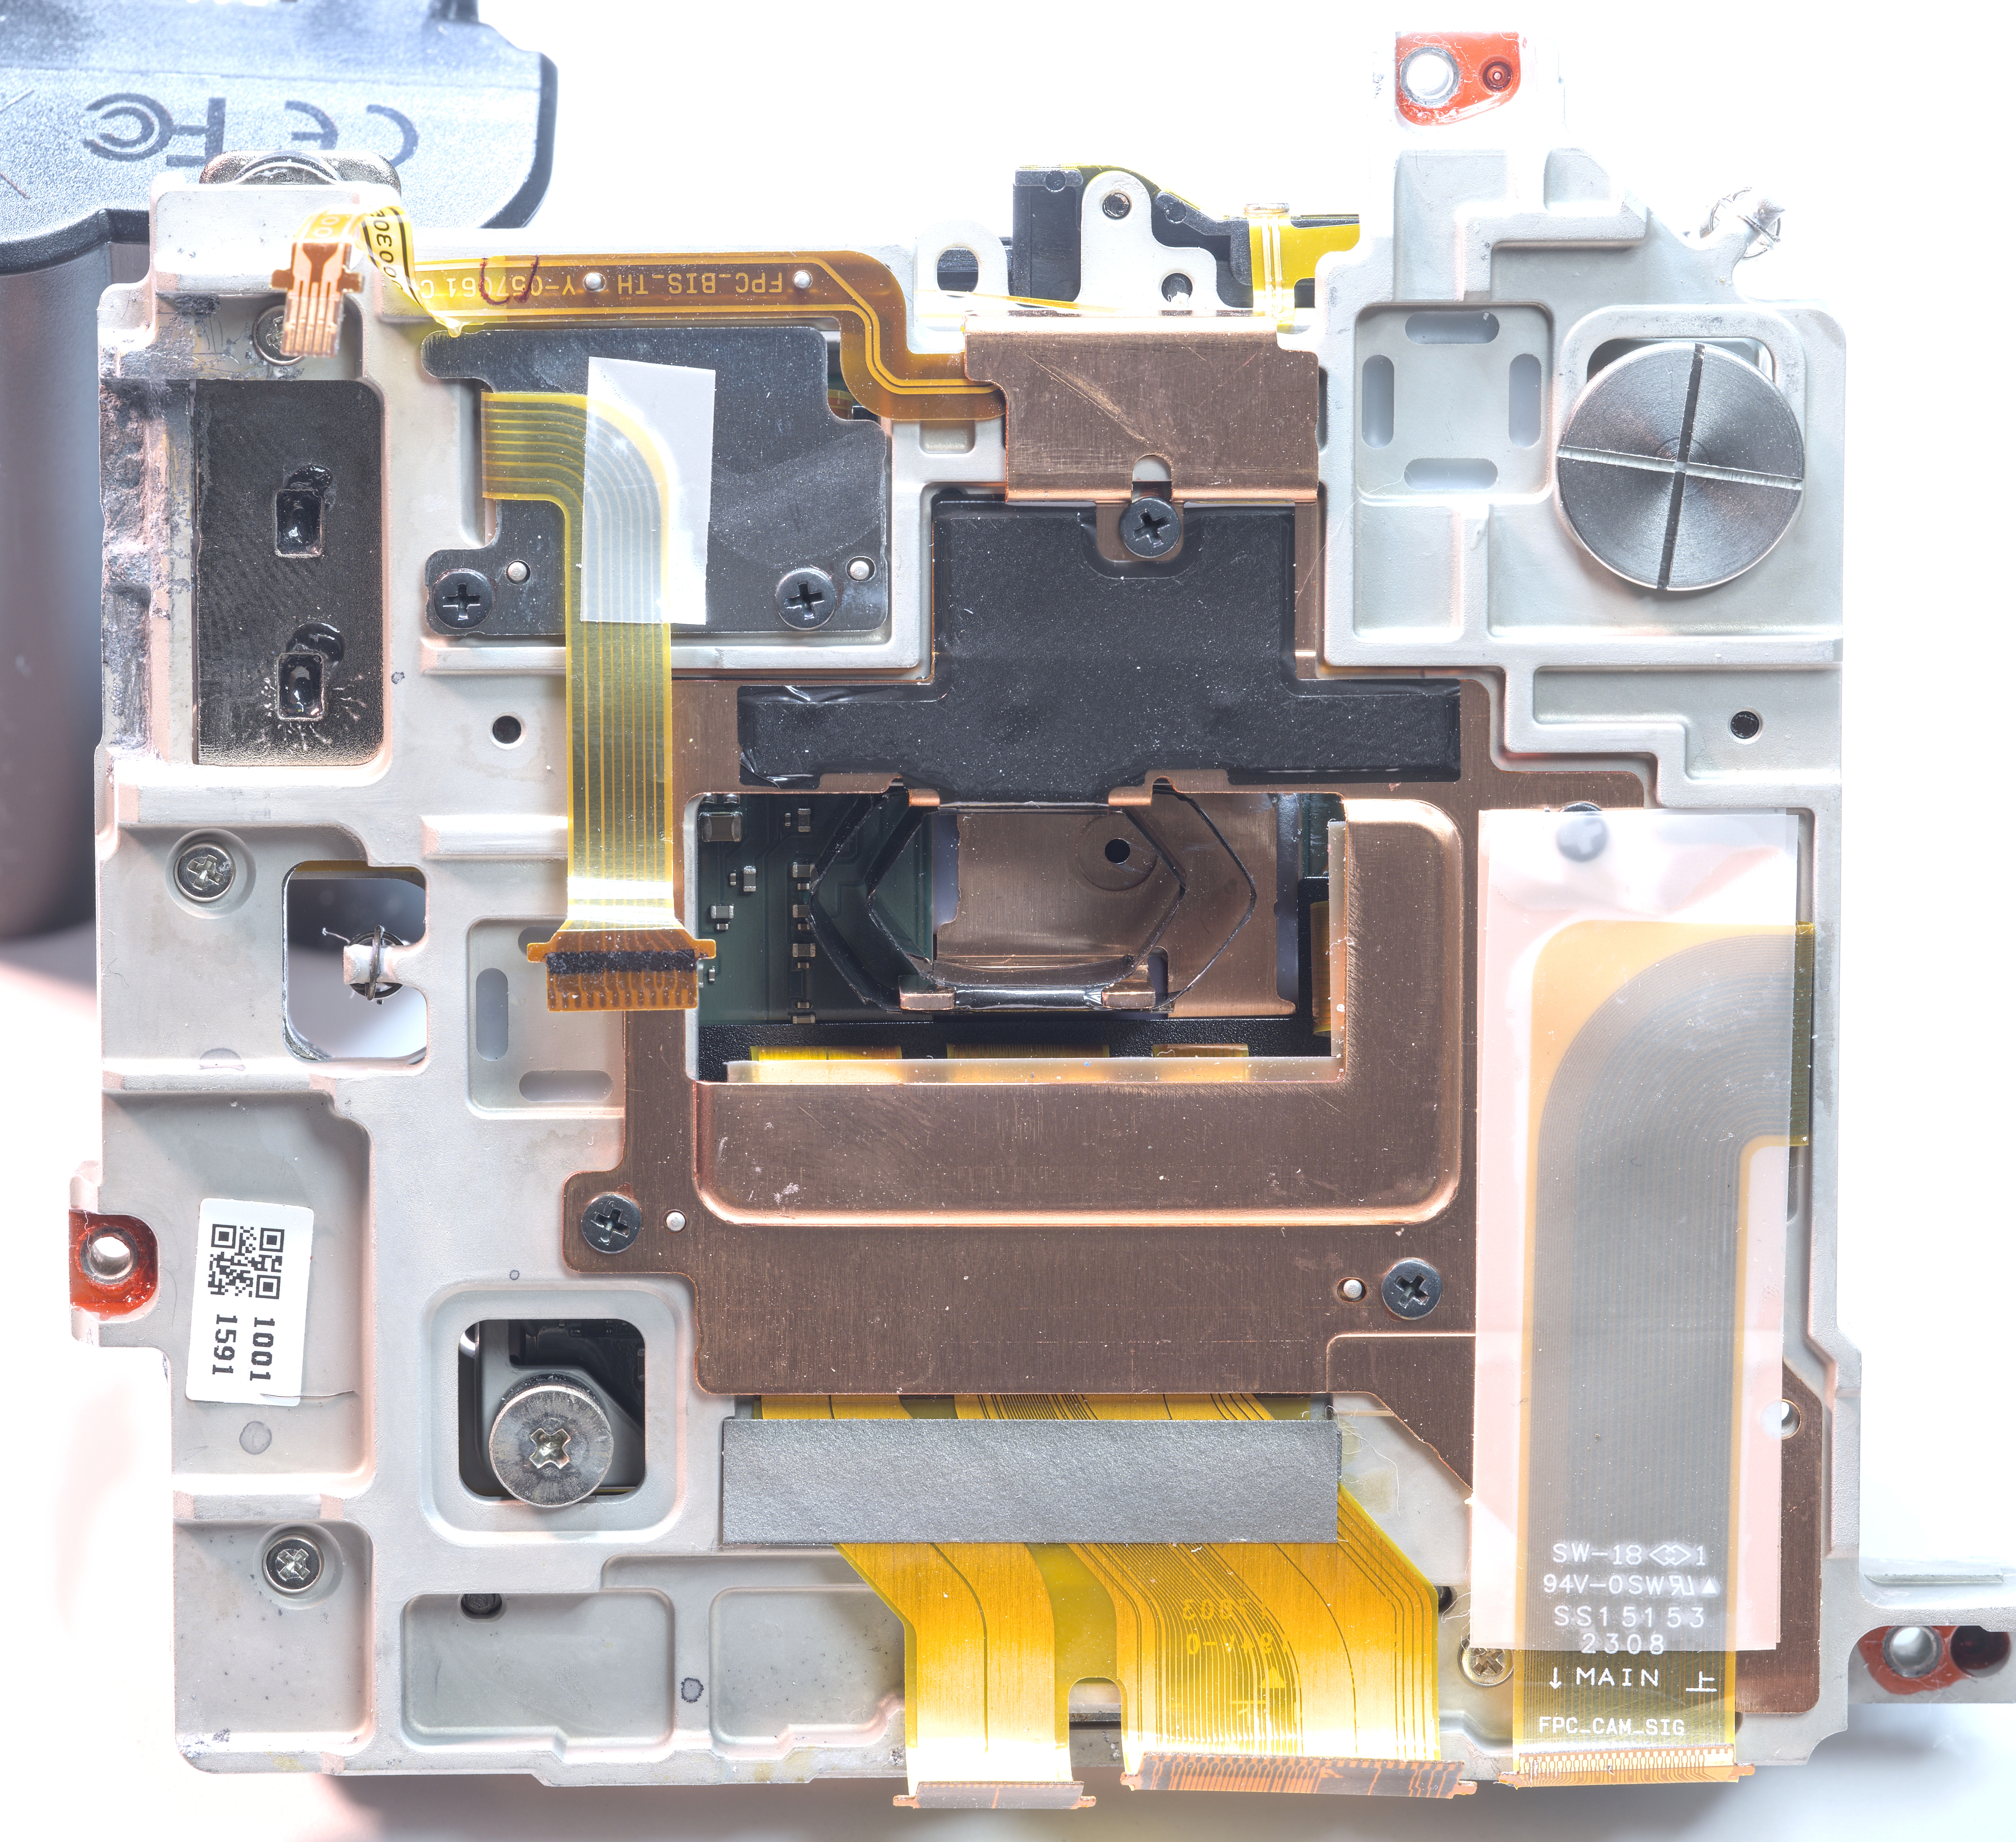
Now we can see main printed circuit board with bunch of FPCs from various electro-mechanical blocks of the camera.
Half of the SDXC card slot seen some water as well.
Major water ingress evidence around expansion port pins that are normally protected by a plastic cap.

Now the star of the show, crusty part near FPC connectors. Section in the center with rusty bits is a DC-DC converter, based around Texas Instruments TPS63070 2V-16V 3.6A switch buck-boost power converter.
Major mayhem in this area. Confidence of successful repair at now at 25%. If due to liquid damage this DC-DC got shorted and supplied some high voltage to the output, then it could take out some major unobtanium component/block that is normally powered from this regulator.
I believe rust came from SMT inductor and larger ceramic MLCC caps metallization. Hopefully we could identify their type/values and find a replacement.

FPC connectors are also badly corroded in this area and some of corrosion damaged FPC contacts as well.
Expansion port pads look pretty clean but area all around them is pretty nasty.

Good news is that damage on main board seem to be somewhat localized to the bottom part and little bit on the right bottom. CPU area and everything on top side looks pristine and clean.

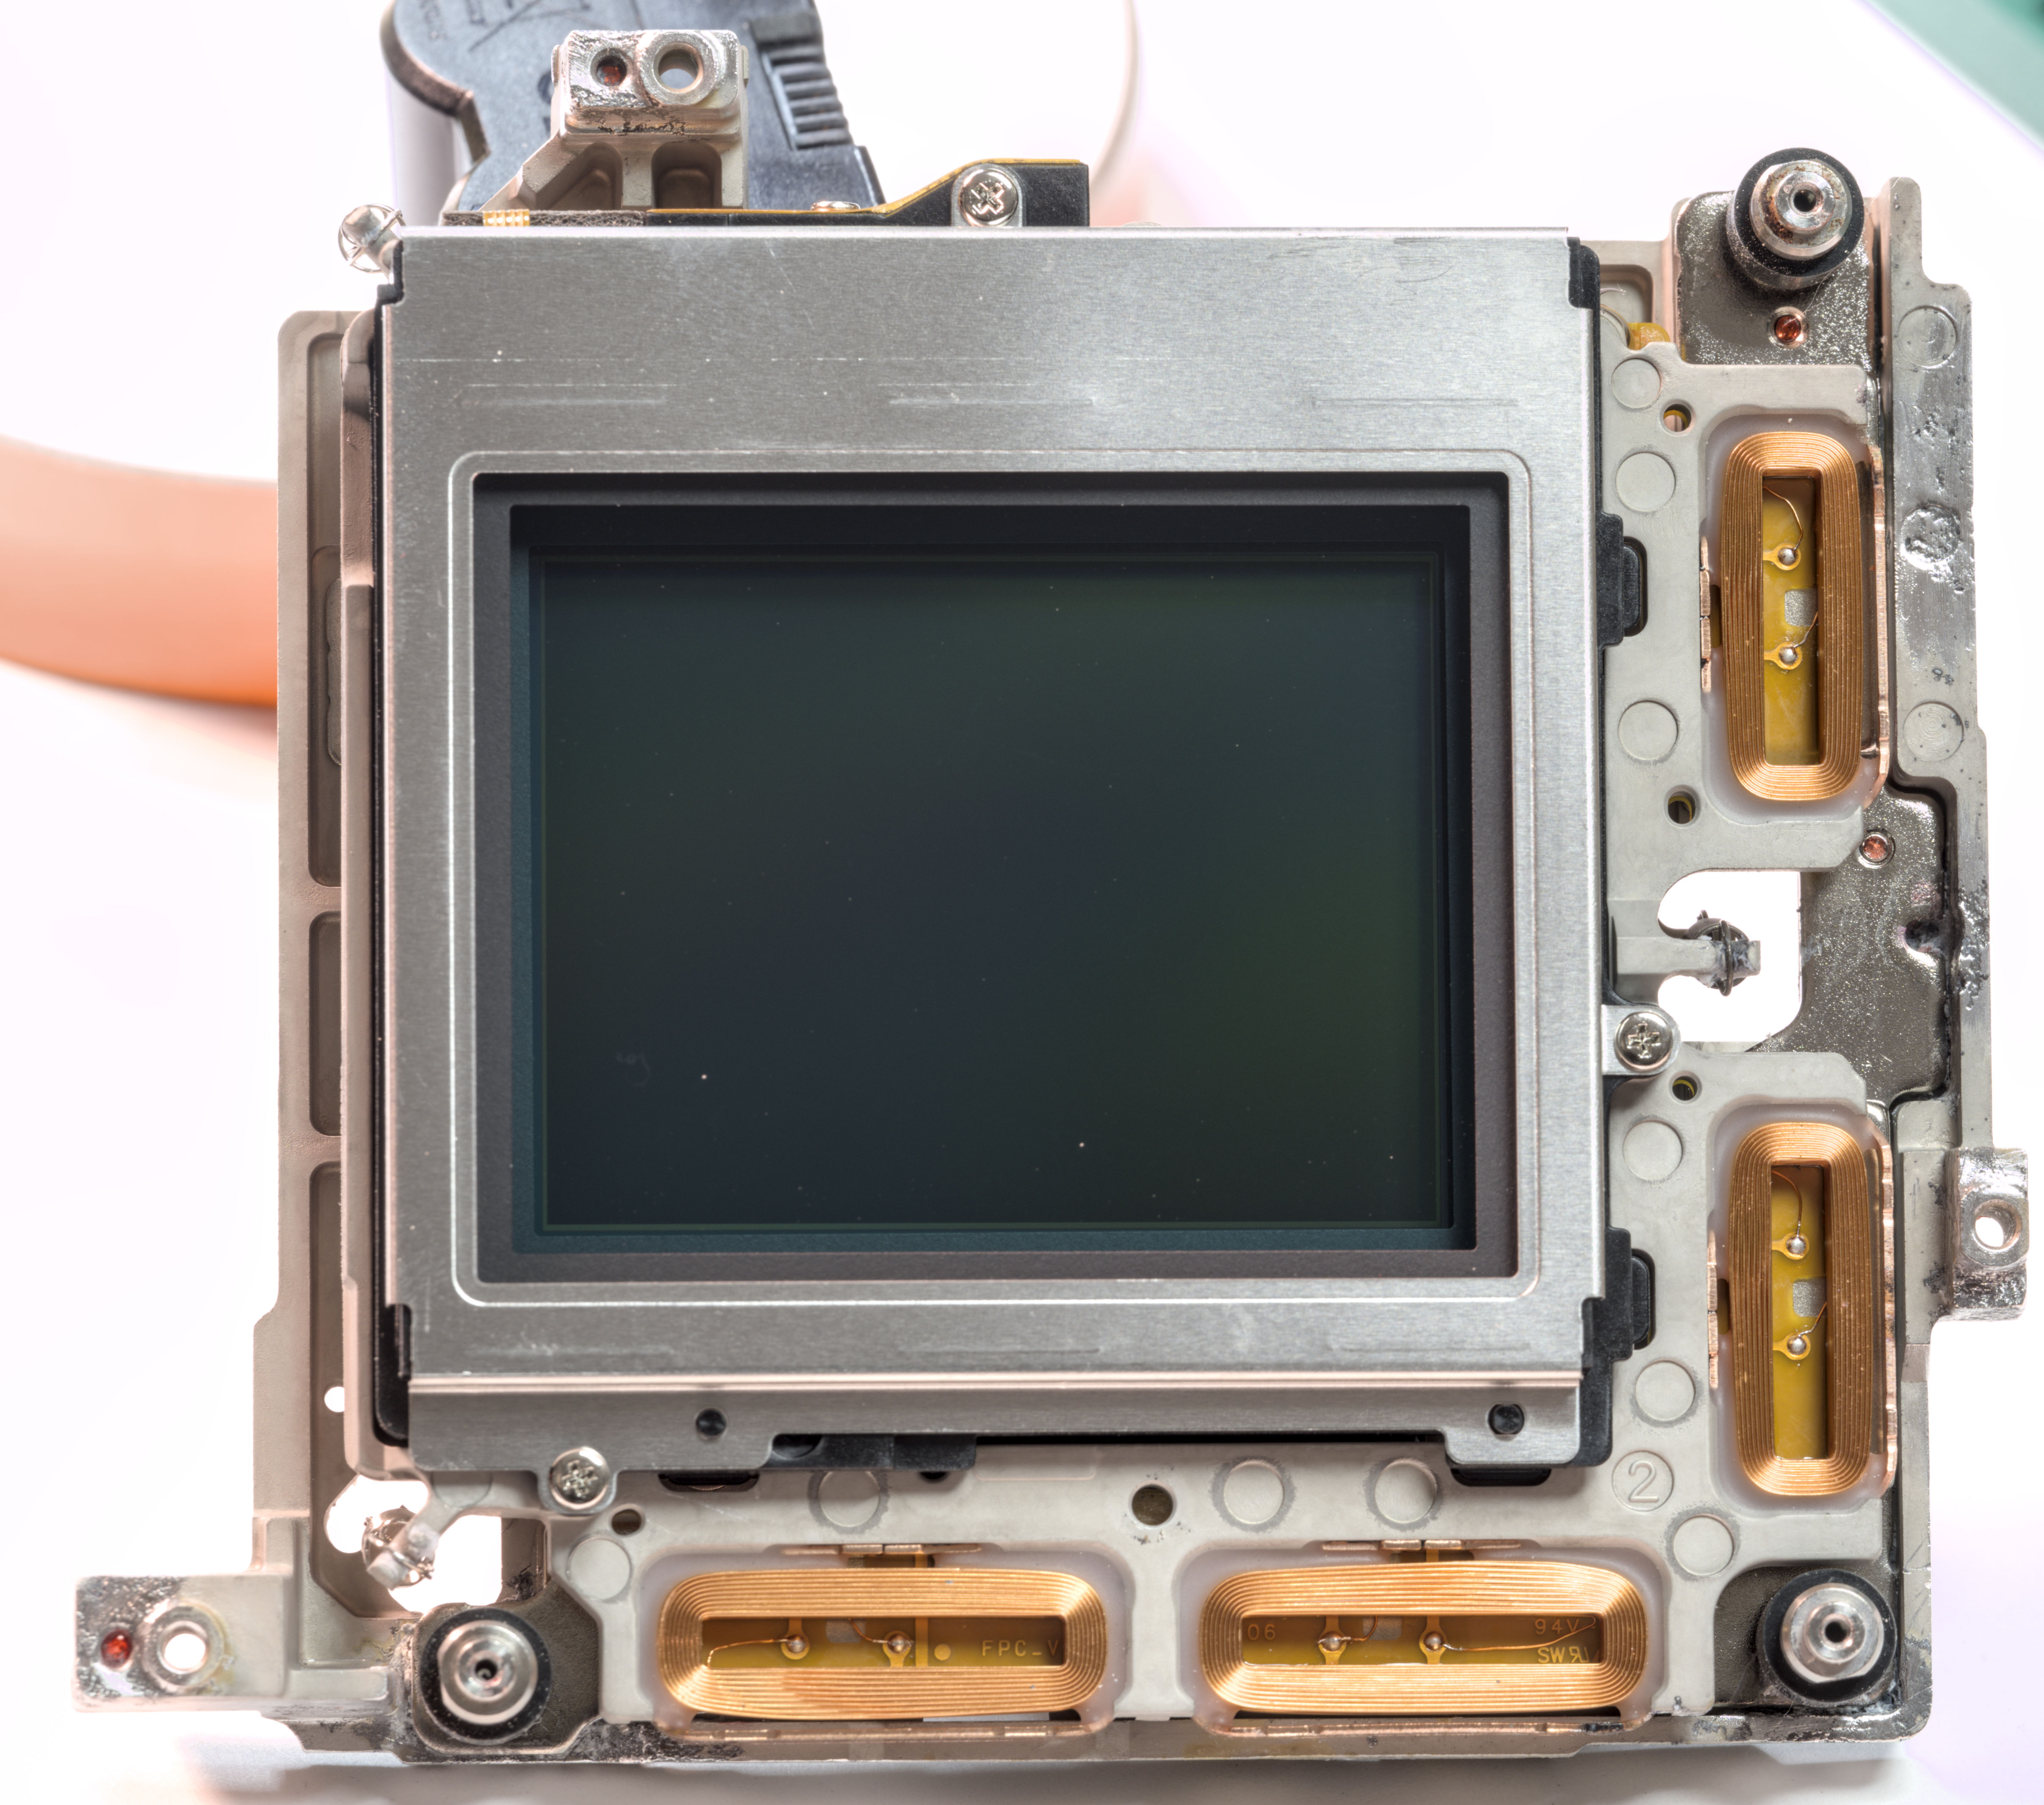
Sensor assembly mostly clean but has flakes and corrosion at the corners of magnesium body frame, a little bit on copper envelope around IBIS coils and tiny bit on magnet frame.
The bad news part is corroded “MAIN FPC” flex cable from the sensor assembly. It’s bad enough that three or four pads are not making any contact to actual signals anymore. Repair would be very tedious on this part. Maybe I’ll try to jump the bad connection with superfine wire and if that works then idea might be to replicate the replacement flexible cable. Layout would be fun to make fine-pitch 0.2mm FPC cable that is high-speed rated.

Top plate with all the EVF accessory, information LCD and top controls also has some corrosion and damages. It will be a pain to take apart further to clean everything…
Shutter mechanism block. Looks actually very clean outside, hopefully no water/liquid got inside of it.

Extracted main PCB with all the other parts removed. Back side looks pristine and clean, which is great news. I’ve also spent some time to figure out what are the key components around. Some of the chips are impossible to identify as they are too small to have full marking or hard to find any reference about. Micron chip with marking RW265 is MT35XU01GBBA1G12-0SIT NOR Flash 1Gbit memory chip where firmware of this camera lives.
But front side has quite a bit of cleaning and restoration to do, particularly on the bottom center and bottom left areas. Thin HDI PCB looks nice a clean with copper plating over the microvias, so it could be a challenge to rework and replace parts, especially in proximity to plastic connectors.
LCD flex is also corroded and has one pin open now.


Lego puzzle of thousand pieces. Confidence of successful repair at this point is maybe 15%, but will we try to save this GFX 100 II anyway.
I’ll need to go ahead with much deeper disassembly still, to free all the chassis metal part, clean them as best as possible and then hopefully try to reassembly everything back together into something complete.
Day 1-2 – Metalwork cleaning and further disassembly
How it’s time to start cleaning bits and see how we can get rid of corrosion. For metal part I’ve used a bit of dremel action with metal brush. It actually worked pretty good but creates lot of dust and fine particles of oxides and crap. Can’t get with brush into tight spots, so for that I just used few scrapers and manually get most of junk out. Back panel before cleaning:

After cleaning looks much better already:

So this method works, but need to remove all the electronic and other components from the metalwork first, which can be difficult. Also whatever adhesive seals for weatherproofing are now gone, so will need to find some alternative material later to reseal assembly somehow. But that’s problem for future if we actually manage to get this camera doing anything useful.
Now same process to bottom metal plate.
Works pretty good here as well. Can easily see some heavy pitting near the edges, so this camera sat with liquid inside for quite some time.
How back to electronic parts. Let’s clean up carnage around worst area with rusted DC-DC and see if we have chances to restore that area back to good looking circuit. To protect other parts and plastic connectors nearby I’ve applied copper adhesive tape all around the affected rework area.
Now with TI TPS63070 regulator IC, inductor and large 0805 capacitors removed we can evaluate PCB condition and it honestly look pretty decent. Few pads on top for input MLCC got damaged/ripped but that’s okay, I can just scrape some solder mask off and get the connection nice and secure there. That large polygon on top for two exposed pads on the right is voltage input, according to TPS63070 datasheet. I’ll order new replacement regulator and passives from Digikey and mount new parts once they arrive.
Output is polygon on the bottom section where four 22 uF 0805 capacitors normally were connected. I’ve measured caps, they were indeed 22 uF. This power rail on PCB does not read short but some hundreds kΩ which is promising.
Will also need to replace few corroded FPC connectors, such as Molex 5040705191. At least it is available plus few others we can steal from the other broken GFX.
Day 3 – front frame cleaning and reassembly
Removing G-mount ring reveals lot more alien life forms and corroded flakes. There is a rubber O-ring around the front metal mount ring but that did not stop liquid ingress into the body…
I didn’t bother cleaning G-mount ring and spring for it, reused same ring from parts GFX 100 instead. But actual front body definitely require cleaning:
More Dremel action needed… Here’s cleaning metal brush I’ve used to clean most of corroded salts and crap out:
After some mess and cleaning process, frame metal. A lot of pitting from corrosion.
Next was lens contact ring with spring loaded Pogo pins. Removing transparent plastic holder was a mistake, all the springs immediately determined to fly away…
Spent next two hours picking them up and figuring out way to somehow position them all. Fujifilm solved that issue by adding bunch of holes in plastic tensioner part I’ve removed, so guiding pins could go thru. Apparently resistor leg is perfect size, so I’ve soldered together a little jig to help with such task. Still, needed to hold tongue just at the right angle.
Back to mainboard. I have probably managed to replace BGA-4 device with marking “GX” (will need inspect it closer, but replacement part is in) and clean up area where corroded TPS63070 regulator was. New TI regulator, inductors, capacitors and resistors are ordered from Digikey and will be replaced. Measurement with Keithley 2002 revealed that two 0402 resistors nearby (still original) are 682 kΩ and 130 kΩ for feedback network. This reflects datasheet values 680 kΩ and 130 kΩ for 5.0 V output voltage setting. Another resistor for PS/S pin was measured 76.4 kΩ. I’ll replace feedback resistors with new 0402 parts just to be sure.
Focus-stacked PCB photograph from 21 images in high-resolution:

Same image with labelled chips and sections:
Back side, stack out of 19 images:
Focus-stacked macro image of the Fujifilm X-Processor 5 (chip mounted on the mainboard) and multi-chip LPDDR4 memory assembly soldered on top of it, using Package-on-Package technology.
Now that we cleaned most gunk out it’s time to try bring it back and see if we get any progress.
Analysis and overall repair challenges for this camera
Some parts were identified after researching part number codes on main PWB, such as “3070 part” – TI TPS63070, surrounded with legged MLCC capacitors = 20uF 0805. Few “15B” TSSOP parts are Texas Instruments TCA9800 – 2-bit level-translating 400-kHz I2C/SMBus buffer/repeater with internal 0.5-mA current source. DRAM on POP package marked D8CJN are LPDDR4 MT53E2G32D4DE-046 WT:C , 2133MHz 64Gbit chip with x32 bus width . SkyHigh BGA package is MLC eMMC 4 GByte e.MMC5.1 BGA 13 × 11.5 × 0.8 mm STDF available on Mouser
Part with marking ES71 part in DFN8 package is TI TPS259571DSG eFuse for current up to 4 amps. Parts with marking D42S in DFN8 package is TI TLV6742IDSGR are dual 10 MHz Low Broadband Noise, RRO, Operational Amplifiers with supply voltage up to 5.5 V just near Analog Devices AD7682 16-bit ADC.
There is also Microchip LAN7430 low-power PCIe Ethernet 1GbE controller. Main digital processor and memory are powered by Renesas DA9220 is dual phase PMIC. There is also DA9121 as well. Both chips are from Renesas. Some FPC connectors are probably Molex 5040703991 with 39 pins and 0.2mm pitch.
Little chip on top left with funky datamatrix code marking and SO 236 letters is actually IMU from STMicroelectronics LSM6DSO or LSM6DSO32X. This low-power IMU has 6-axis, three for accelerometer and three for gyroscope. It communicate with host processor by the serial interface such as MIPI I3C or legacy I2C or SPI. IMU has features to detect motion detection, tilt detection and generate interrupts for various free-fall, wake-up, 6D/4D orientation, click and doubleclick activities. All these features are great for integrated sensor stabilization functions.
Day 4 – Reassembly and first tests
I’ve ordered some new components for mainboard repairs for the stuff that got corroded and damaged by liquid. It was fairly easy to determine the original parts, thanks to typical implementation from datasheet. Parts used from Digikey:
- 1 x TI TPS63070RNMR DC-DC regulator
- 6 x CAP CER 22UF 16V X5R 0805 EMK212BBJ226MG-T from Taiyo Yuden
- 1 x FIXED IND 1UH 3.1A 45 MOHM SMD Murata Electronics 1277AS-H-1R0M=P2
- 1 × 680 kΩ 0402 resistor
- 1 × 130 kΩ 0402 resistor
- 1 x Molex 5040703991 FPC connector, 39 position 0.2mm pitch
- 2 x Molex 5047405100 FPC connector, 51 position 0.2mm pitch
- 1 × 0201 100nF X7R capacitor
Also replaced some mystery “GX” marked BGA4 device, taken from donor damaged GFX 100 motherboard. It’s most likely MOSFET or load switch since there are +5V at the input and +5V at the output of it. Flex cable from main rear LCD display had corner pad corroded away and had to be repaired:
Tiny copper jump-wire took care of that:
TPS63070 regulator area prior to mounting new components, photographed with 2.5x SuperMacro 25mm lens and focus-stacked.
GX chip replaced (little square between two capacitors with some stuck fibers out of Q-tip) , photographed with 2.5x SuperMacro 25mm lens and focus-stacked.
FPC connector replacement process video:
And now after reassembling I’ve connected the camera to USB-C power monitor. It negotiated power higher delivery level at +15 V and was charging the battery (green LED lit up). That was a progress, since originally camera did not go over 5V and did not try to charge battery. No smokes or sparks flew at this point. So I’ve disconnected USB-C power bank, crossed the fingers and held the tongue at the right angle while flipping the switch to ON position.
Top MemoryLED display show some initial display information (like previously) but zero response to the controls. Rear LCD also was pitch dark. I’ve tried with GFX 100 rear LCD display (since original GFX 100 II display flex had corroded pads on FPC) but result was identical, no life… Then I reworked connector some more for the rear main LCD on the mainboard and found that few pins were not making contact to PCB anymore as corrosion turned solder joint into grey powder. Reworked that and…..
Yay! It’s showing something, initialization screen that camera asks user when it comes from factory default, awesome! This means that chances of this Poseidon to live increased from 5% to maybe 30%… We can confirm at this point that main processor brains, memory, most if not all power delivery circuitry is working as it supposed which is a great progress at this point. We can flip to video mode and it changed operation mode accordingly:
Then fiddled some more reconnecting more stuff to mainboard and….
We now get the first life from sensor readout. It looks quite promising at this point. Connecting the lens also makes the lens motor do their thing and detection works. But it’s not all happy in the kingdom yet.
Shortly after power on after a second, sensor stabilization mechanism slowly moves sensor to the extreme left, way off the normal position of the sensor relative to frame box and coils remain energized in that position, making them very warm after a minute. And when stabilization reach extreme left end position camera detects a problem and says “TURN OFF THE CAMERA” and try again error that locks all controls. I’ll need to get back to more cleaning and try to repair the damaged flex that buggers off into sensor assembly, that we detected during the teardown. Or maybe the driver electronics for IBIS got damaged? More repairs to investigate..
Also I have not take apart or cleaned up the top frame (with top info LCD, EVF connector and top controls) yet, so that’s next step as well. To make stuff more organized with all the tiny bolts and pieces I’ve designed and 3D-printed a little tray with pockets to keep everything organized. I wish I’d do that before digging knee deep into disassembly :)
Box dimensions are 190 mm x 150 mm x 7 mm. I’ve used PETG-CF material here.
STL-file for anyone willing to print the replica
More repairs and troubles
To replace old torn thermal pads suitable replacement pad of the same 2.5 mm thickness from Digikey was sourced, manufactured by t-Global Technology TG-A486G-20-20-2.5-0.
Day 8 – going deeper into sensor assembly
To further investigate if there is any liquid made its way into sensor electronics we need to take it apart further. I was reluctant to go this step as I’m sure there are specific and precisely performed procedures to align and install sensors mechanically into the frame. This might be pretty bad way to ruin things like autofocus accuracy or sensor parallel alignment to the body center. But I guess badly working camera is better than non-working camera at this point? In the worst case we get to learn some more engineering and see inside construction of top of the line Fujifilm GFX body.
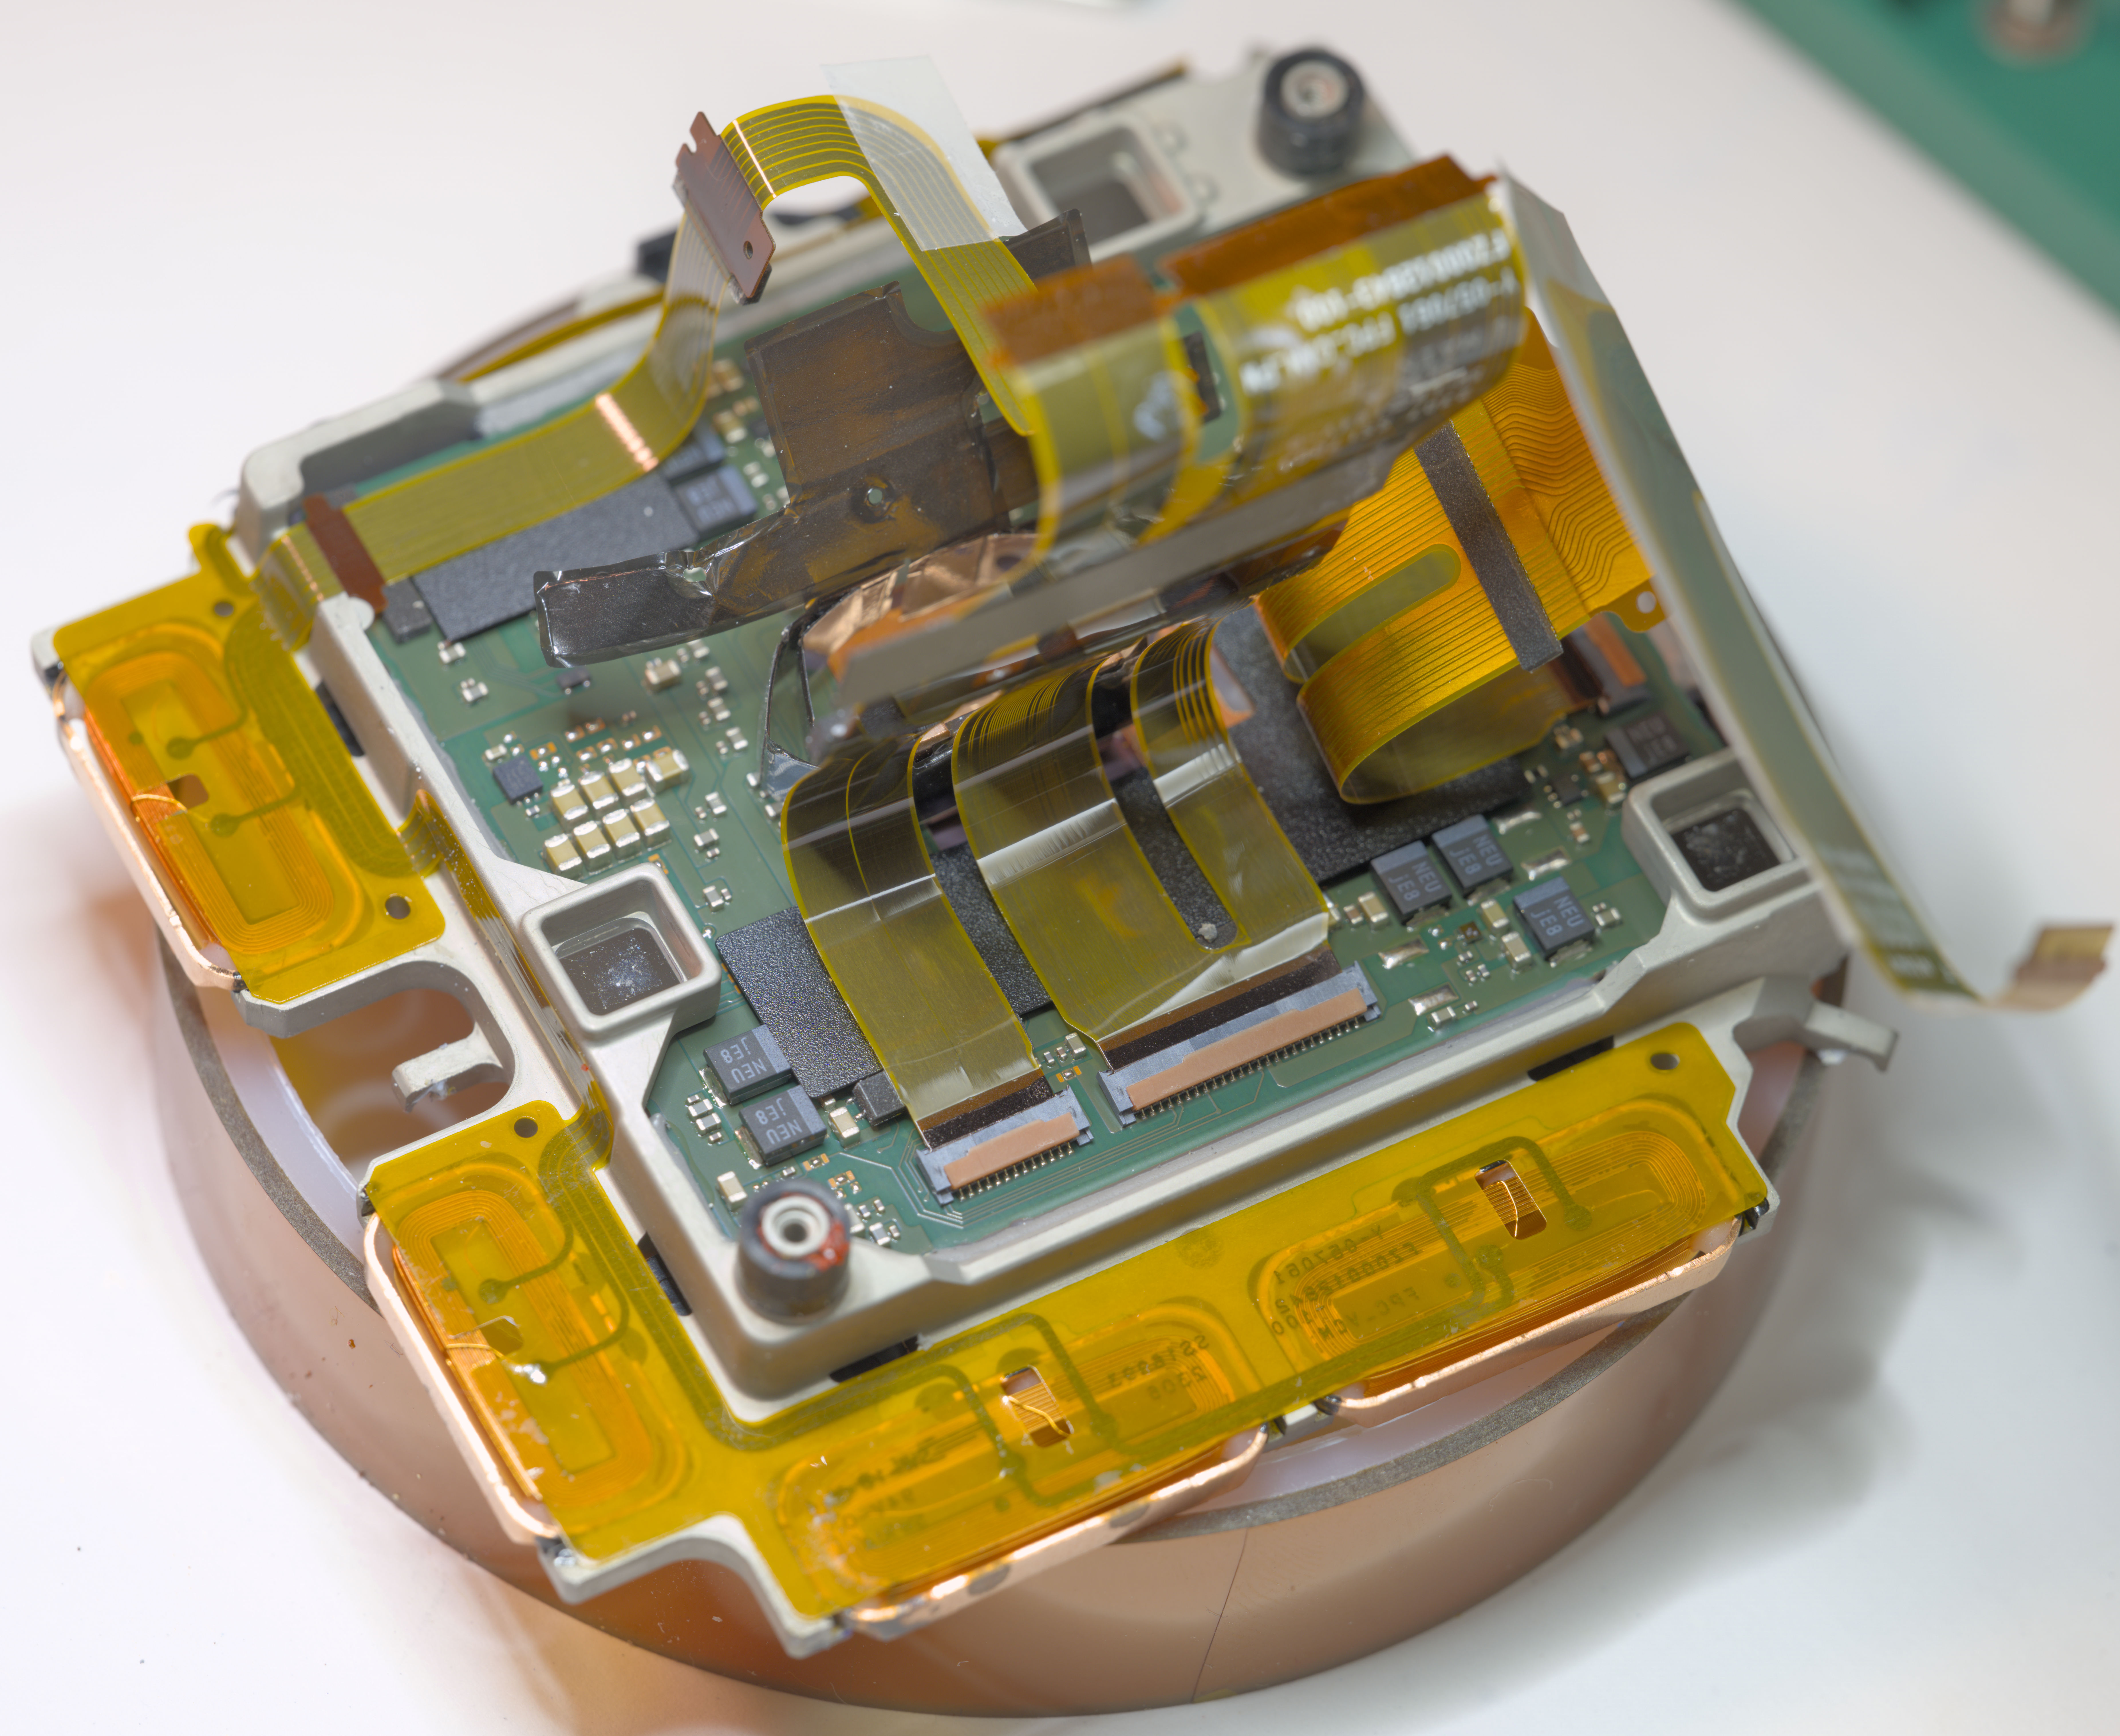
Sensor assembly has five flat flexible PCB cable interfaces, going from top left to bottom right order:
- 5 contact FPC-BIS-TH cable for some kind of position sensor, perhaps?
- 23 contact cable with coils drive for IBIS movement mechanism + ultrasound actuator for dust cleaning feature.
- many contact cable section with 1.25 VDD supply power for sensor core (thick two rails)
- 51 contact cable section with additional power and control signals to sensor electronics
- 51 contact 0.2mm pitch SW-18 SS15153 FPC_CAM_SIG FPC for high speed 8-lane serial link to sensor data readout + some auxiliary I/O?
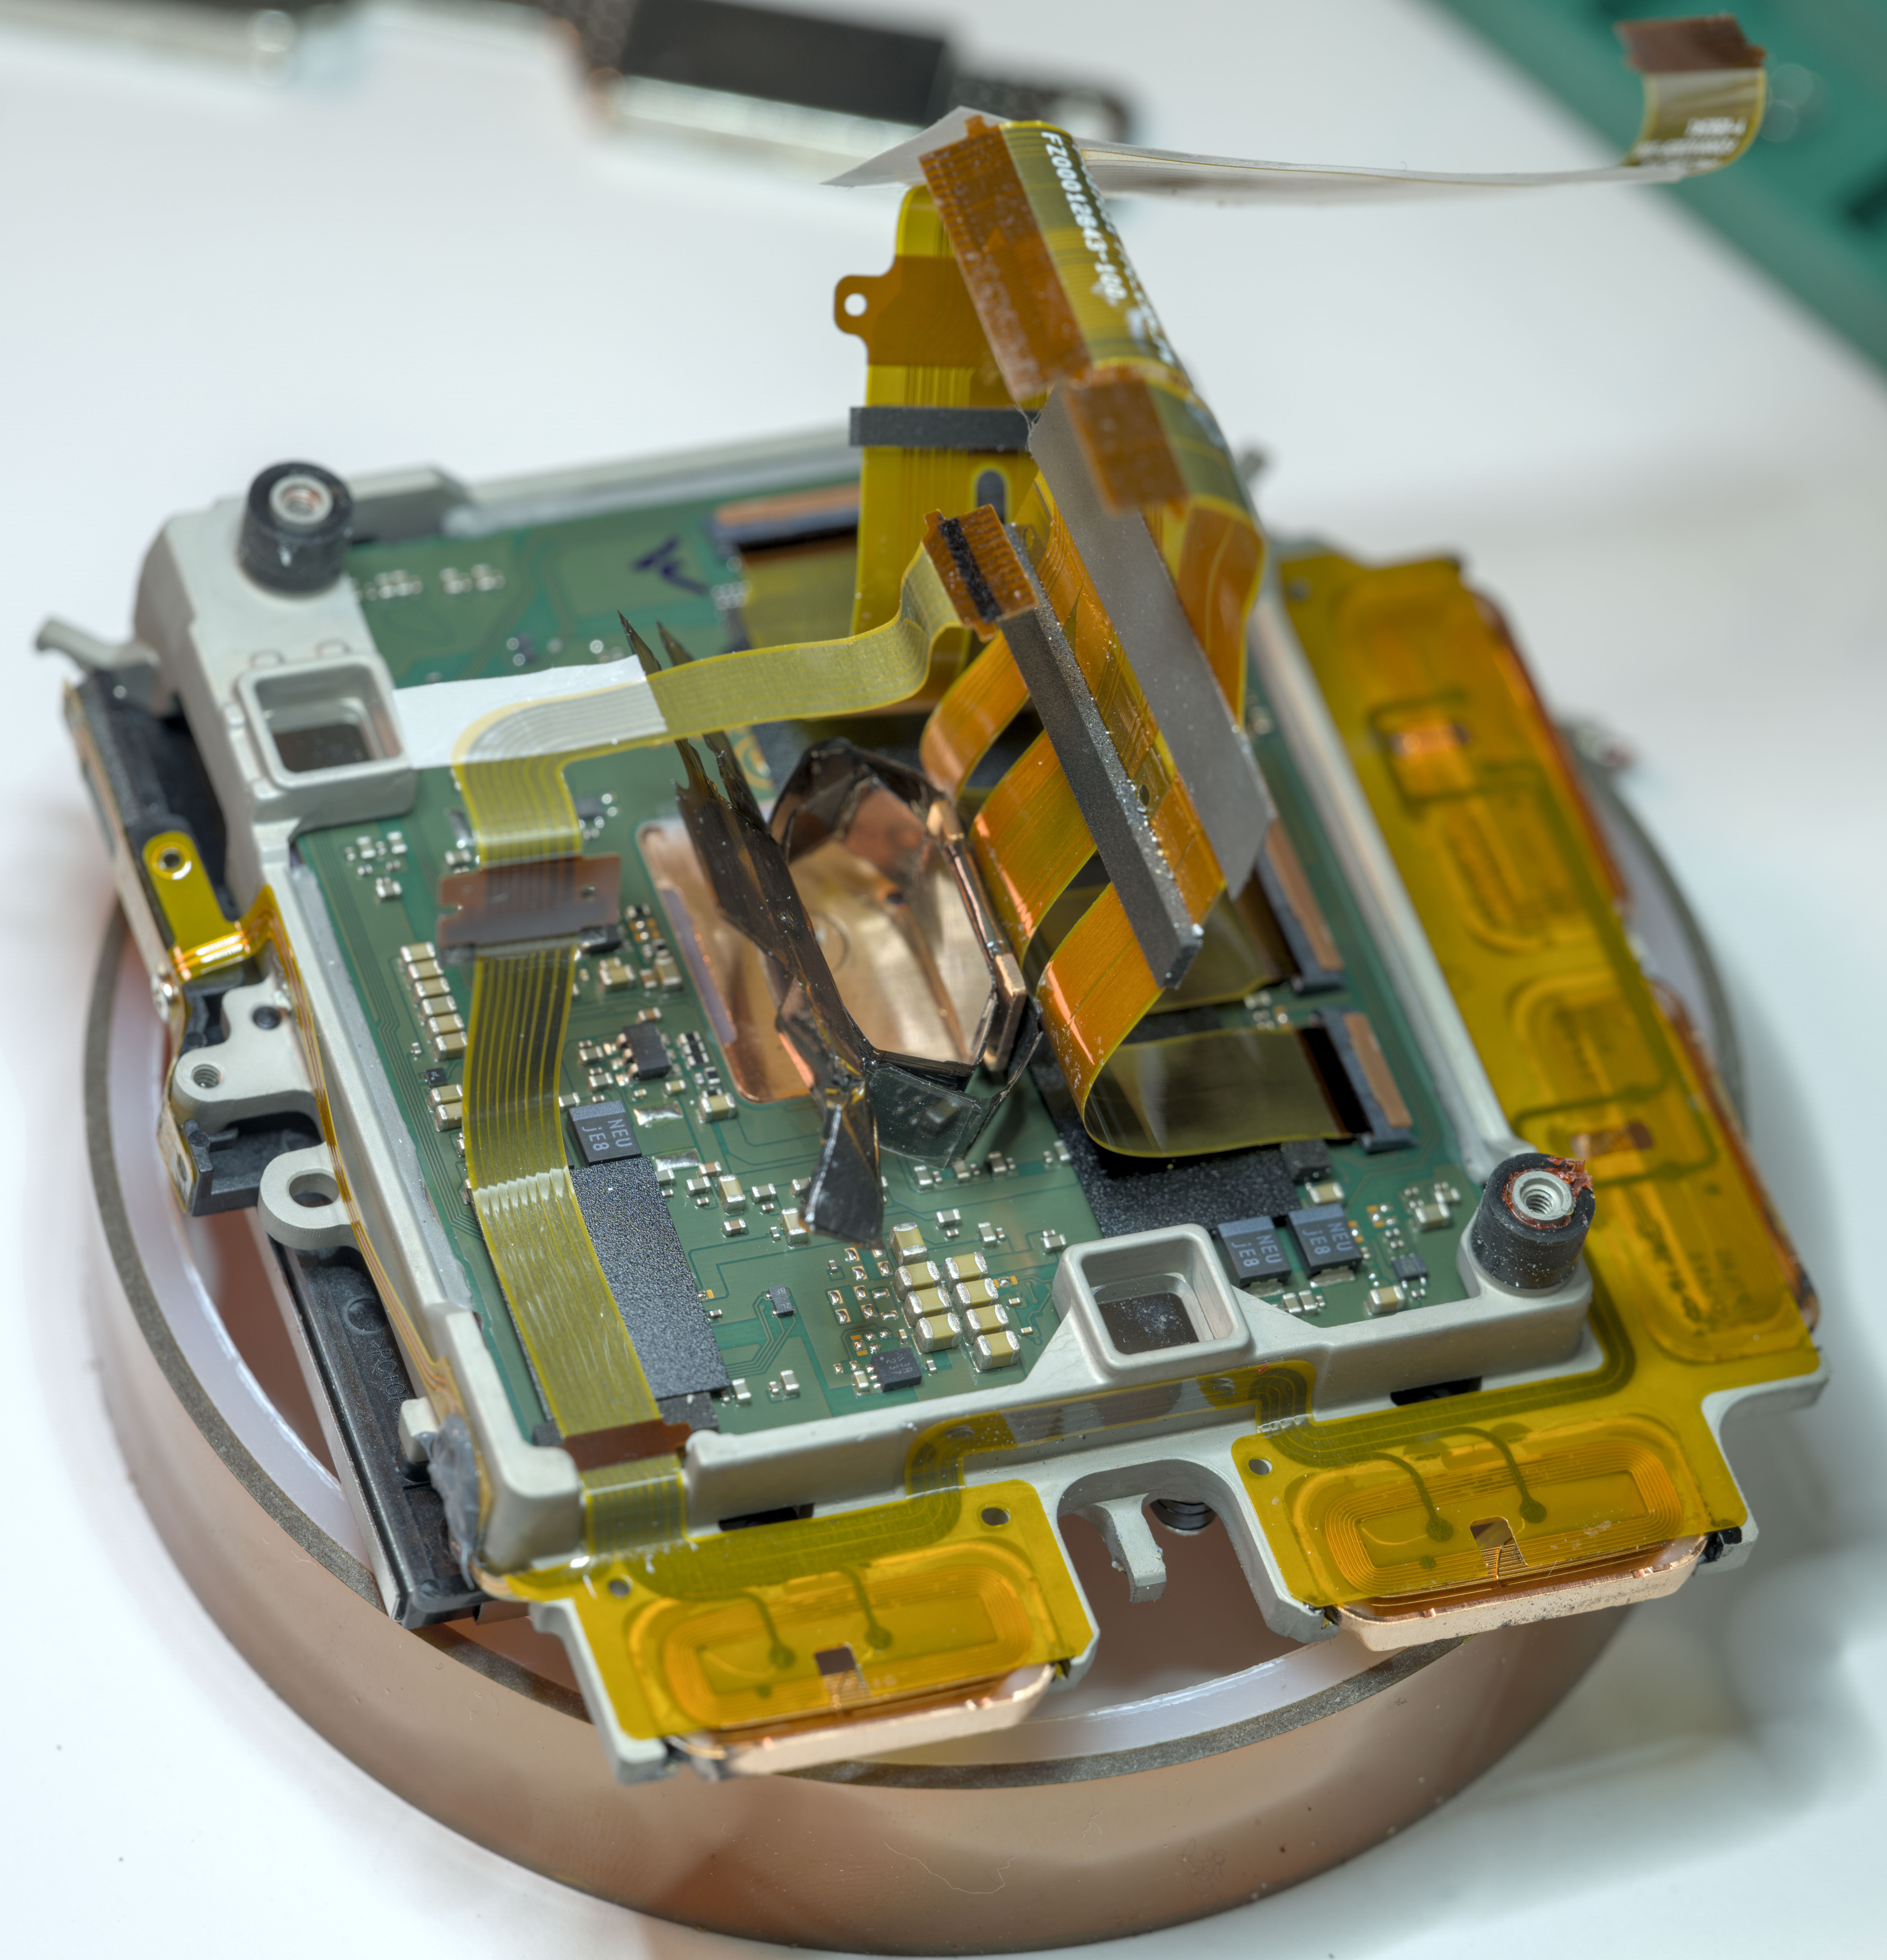
Interesting enough, cheaper and slower GFX 100S II is also using same actual sensor and same pin out for main cables but IBIS movement cable is different configuration. GFX 100S II sensor actually works in GFX 100 II body, but magnesium mechanical body frame is different since GFX 100 II has modified metalwork for large RJ45 magnetic transformer. Time to remove top steel frame with glued rare earth metal alloy magnets to get access into moving sensor frame. It is suspended on three springs and have resting glass/ceramic beads on two mirror-finish boxed areas acting as tripod bearing for rest position.
Further angles with movable sensor block removed out of magnet frame.
Two larger coils on the bottom of the camera (if looking from the front in normal orientation) are paralleled together, while others are separate.
Coils measured with Keithley 2002 at 122 Ω, 160 Ω and 230 Ω. They are driven by electronics in normal mode by ~170 kHz square wave 5V pk-pk signal and movement achieved by the variable duty cycle PWM. Coils are driven by pair of 4A half-bridge Toshiba TC78H653FTGEL drivers, each responsible for two coils.

I have replaced drivers earlier but it didn’t change camera body behavior.
Frame remaining without sensor guts. I’ve used the chance to clean the corrosion around with dremel here as well, without risk of contaminating sensor surface.
You could see couple of the metal brush strings stuck to magnet :) There is also little IC mounted on this frame that is terminated with small 5 contact FPC.
And for size comparison, GFX 100 type sensor (from older body) versus small APS-C Fujifilm X-Trans HR 40 megapixel sensor assembly taken out of the bad Fujifilm XT-5 camera.

I don’t have normal 35mm full-frame sensor around to put in between :) Also both sensors shown here have ultraviolet/infrared cutoff filter installed in front of the actual CMOS SONY sensor unit, which is obvious from cyan color hue of the glass.
To convert camera into wider spectrum coverage (upsetting the normal photography white balance without adding external lens filters) one would need to unscrew the steel holder bracket and remove the front filter glass. Ideally that should be replaced with wide-spectrum cover glass of same thickness, to avoid exposing sensor front to external dust particles and messing up focusing.
Day 25 – repair progress, after countless test attempts
After taking a break for a day or a week, I’ve swapped few more parts and FPC connectors on the main-board. Additional tests were done with a bad GFX100S II to see if the issue with fault error and erroneous sensor movement coils is related to original Poseidon parts or specific to electronic main board.
Also replaced couple of the suspect chips from donor Fujifilm X-T5 board which share many components on PWB, such as Analog Devices AD7682BCPZ and three opamps in WSON8 marked D42S 1B8 which are Texas Instruments TLV6742IDSGR. These opamps specified with 10 MHz gain bandwidth, low 3.5 nV/√Hz noise and low input bias current ±3 pA. Each chip has two op-amps.
Below are captured thermographs with camera running to check if there are any hot-spots during various modes of operation. Interesting fact that upper DRAM chip is heating up slightly more than bottom one. Perhaps memory utilization is not flat across whole memory space and upper module gets more work done? Overall nothing hot was detected, which is good.
Tracing all connections on FPC connectors and cables revealed 5th line missing connection on SW-18 SS15153 FPC_CAM_SIG FPC. Adding jump wire to the damaged flexible board connector resolved this issue and to my relief camera booted up and IBIS started to work without errors. I’ve did some brief tests and key main functionality seem to work good. More test for image quality, video recording functions and wired/wireless connectivity are required. More time will be need for field tests with different lenses and scenarios, but for now it’s back together and can capture images:
In future camera will be disassembled and reassembled once again to put back better seals around the body parts to protect the camera guts from liquid ingress from future encounters in bad weather. Also sourcing Fujifilm EVF-GFX3 electronic viewfinder for this GFX 100 II could be nice to help with bright day light scenarios where rear LCD would be difficult to use. Hopefully, Poseidon will be able to deliver some nice video and stills footage to our readers, covering next list of interesting xDevs projects.
Sample images after Poseidon repair
Some of the sample test photos captured with Poseidon camera are presented below. All images are processed from 16-bit RAW files and slightly edited for personal author’s taste. Click on the image to open full-resolution image.
Image : Test with long GF 250/4 lens, some birds focusing
Image : Test with long GF 250/4 lens, some birds focusing

Image : Test with GF 63/2.8 lens

Image : Test with GF 63/2.8 lens

Image : Test with GF 63/2.8 lens, cropped

Image : Test with GF 63/2.8 lens, focus-stacked 30 images of lilac branch, hand-held
Nice smelling bush of purple lilac blossom reminded me my school years in national biosphere reserve Askania-Nova, Ukraine. We had lot of lilac near our apartment block and I smelled it every time in spring going to school.

Image : Test with GF 63/2.8 lens, panorama stitched rainbow sky

Image : Test with repaired GF 80/1.7 lens

Image : Test with repaired GF 80/1.7 lens
Image : Test with repaired GF 80/1.7 lens

Image : Test with repaired GF 80/1.7 lens

Image : Test with repaired GF 80/1.7 lens

Image : Test with repaired GF 80/1.7 lens

Image : Test with repaired GF 80/1.7 lens

Image : Test with focus-stacked 50 images from Laowa 25mm f/2.8 2.5-5X Ultra Macro lens

Image : Same image but with 100 percent crop section
Fujifilm GF 32-64/4 damaged lens repair
As a bonus chapter, I’ve also decided to added mini-project of GF zoom lens repair. And to find a proper lens match for this Poseidon revival I scoured ePay to get some broken Fujifilm glass. This resulted in a gamble purchase of GF32-64mmF4 R LM WR zoom which is equivalent to 25 mm – 51 mm focal range in traditional 35 mm film format size. This lens was acquired for $530 USD in parts condition. Previous owner described stuck zoom due to camera drop accident. I’m sure something got mangled up internally due to mechanical impact.
Outside everything looked in decent shape, no shattered glass inside. I could hear some rattling bits when shaking lens gently. When attached to the camera body, this lens detected properly and focusing was operational over the full range of distances. So we know that electronics is good and working, which is a good start.

Taking Fujifilm GF lenses apart is rather convenient if one follows step by step process and document/remember position and orientation of all the small parts and screws. Critical optical blocks are epoxied and fixed together into large modules which is helpful to maintain their alignment and positional accuracy inside of the lens assembly.
Usually going from the body mount side is a good starting point. That will allow removal most of the aperture controls and rings for better access to internal parts. Be careful not to scratch or damage large front and rear lens elements. That’s what I did when screwdriver slipped and hit the corner of the front element, chipping a tiny 0.5mm piece out of it :(.
But small front-element damages usually don’t have significant impact on the image quality.
After I got front element removed from the zoom barrel, I found the rattling pieces. Those were the barrel rollers that move along the helix slots, responsible for movement of the front focal element. Rollers made of white cloudy slippery plastic, most likely a variant of PE or PTFE. There was also some brass washer that got damaged and bent, so I just removed it. Who needs those “spare” parts, right?
I did not remove any of the epoxy or optical blocks, just reseated everything back as it supposed to be. Few areas of the damaged barrel body helix can be seen on few photographs below (look for exposed metal dents):
These damages are consistent with original seller description of fall-induced damage. Extendable body of this lens in zoomed in position would be the first one to get impact damage, causing damage to mechanicals and small components inside. Lenses with no externally movable parts such as GF20-35/4 or primes GF110/2, GF120/4 are bit more protected against such damages, but they are also larger and heavier as result.
After reassembly zoom movement was returned to normal. It’s just a tiny bit stiff on 32-35mm range due to deformed plastic bit, but totally useable now. Finally I’ve focus-stacked and photographed the only PCB with electronic bits from this lens before closing it up all together.
I love the PCB art and stylish looking “Tiger” head on the board. I wonder what is the story behind this, as I’ve seen same “tiger” on other Fujifilm GF boards as well. Maybe somebody who knows somebody can explain? :)

Main chip on the back is one with marking 343F10. This Toshiba TMPM343F10XBG embedded low-power microcontroller equipped with 54 MHz ARM Cortex™-M3 core, fast 12-bit high-resolution PPG ADC module, eight H-SW drivers for microstep motor control, real-time optimized interrupt engine and 4 hardware PSC – Programmable Servo/Sequence Controllers. All of that is packaged into a tiny 7 × 7 mm VFBGA162, which makes it perfect in this lens to serve the role of lens brain. TMPM343F10 has 1024 kByte NANO Flash for firmware storage and 64 Kbyes + 32 KBytes of SRAM. I was not able to find a detailed datasheet for this particular microcontroller, but got couple of simplified block diagrams:
Such diagrams are useful to grasp the idea of complexity that is packed into modern photo/video equipment.

This is precisely how it’s used by Fujifilm in their lenses.
After reassembly I got just few “spare” bits and forgot to put few screws on the front. Will return them back into proper places next time I take this lens apart. There is still a very minor issue of zoom position readout, as electronics does not seem to read it. EXIF data shows that lens is at 32 mm position regardless of actual zoom ring position. It does not affect quality of RAW files I capture, but I might want that fixed in future, as some software post-processing often use focal distance data for lens distortion correction algorithms.


First few images of the carpet I captured with this doctored GF 32-64 mm F4 R LM WR show quite impressive results with sharp image all across the frame, even in extreme corners at f/4.0 aperture. I’ll need to do more testing on different focal lengths and apertures to have a better feel, but initially it looks like this zoom actually sharper and has less abberations than GF45/2.8 prime. I also have repaired Fujifilm GF63/2.8 which is still very sharp wide open. These will be good to do a comparison some time in the future. Overall, this gamble of fixing complex zoom Fujifilm GFX lens played out rather happily and will keep Poseidon a good company.
Summary and conclusion
Overall it was very interesting project and very different to usual metrology stuff that I do on xDevs.com pages here. I still get some questions from time to time about my old Nikon D3 DSLR repair article from readers, so perhaps this one will be also useful to someone. And please remember to keep liquids and water away from your expensive photography and video equipment. Despite good progress over the years for sealing and protecting sensitive electronics inside from elements out there in the field modern cameras are still very delicate and complex instruments that are not designed to be submerged into water. Cameras protected from occasional splashes or some small rain, but not from costly swimming expeditions with corrosion outcomes.

If you get camera submerged, immediately retrieve the camera from the water and remove the battery. There is a risk of hardware damage if you try to power it on. Due to the voltage potential provided by the battery (even if the camera is switched off!) any amount of water that has leaked into the camera circuits will cause corrosion and turning on the camera at this time could cause even more significant damage to the camera.
Don’t put camera into rice or other powders, that is pointless and just a meme, not actual useful advice. Use a dry towel to wipe any water off the exterior of the camera, open all covers/doors/ports, remove memory cards and place camera in a warm and dry location for at least few days to allow sufficient time for any internal moisture to evaporate and dry out. If it’s expensive camera, then best would be then to bring it to camera repair store to inspection/diagnostics before attempting to power it up again.
I’ve compiled a video footage during the repair, which is now public and available at xDevs.com’s YouTube channel:
Take good care of your equipment and avoid precarious situations like one depicted below with Poseidon in it’s natural habitat.

The author would like to express our appreciation to everyone contributed to this project, especially our friend Alex, TheSignalPath, azonenberg and KF for interesting discussions and making this fun. Discussion is very welcome thru comment section or at our own IRC chat server: irc.xdevs.com (port 4808, channel: #xDevs.com). If you have information and interesting ideas on Fujifilm (or other brands) cameras hardware repairs, feel free to provide them and xDevs will be happy to publish it and add them on our pages.
Projects like this are born from passion and a desire to share how things work. Education is the foundation of a healthy society - especially important in today's volatile world. xDevs began as a personal project notepad in Kherson, Ukraine back in 2008 and has grown with support of passionate readers just like you. There are no (and never will be) any ads, sponsors or shareholders behind xDevs.com, just a commitment to inspire and help learning. If you are in a position to help others like us, please consider supporting xDevs.com’s home-country Ukraine in its defense of freedom to speak, freedom to live in peace and freedom to choose their way. You can use official site to support Ukraine – United24 or Help99. Every cent counts.
Modified: Feb. 4, 2026, 1:18 a.m.
References
- Fujifilm GFX 100 teardown and repair attempt
- Teardown and troubleshooting Fujifilm GF80mm F1.7 R WR
- Teardown and troubleshooting Fujifilm GF120mm F4 R LM OIS WR
- Teardown and troubleshooting Fujifilm GF 63mm F2.8 R WR
- Internal photo of Fujifilm GFX 50S II medium format camera
- A quick look at Fujifilm EVF2-GFX for GFX 100
- Testing GF80 lens with multi-exposure averaging photos
- Comet C/2023 A3 (Tsuchinshan-ATLAS) photos
- Foggy photos in the night, GFX100S + GF45/2.8
- Fujifilm GFX 100 II product page
- xDevs.com Video : Teardown footage recording